Students can use NCERT Class 9 Advanced Science Notes and Chapter 9 Microscope and Microscopy Class 9 Notes to understand complex concepts with ease.
Microscope and Microscopy Notes Class 9 Advanced Science
Class 9 Microscope and Microscopy Notes
What is a Microscope?
Microscope (micro = small; skopein = to view or to observe) is used to observe tiny living organisms or their parts that cannot be seen with the naked eye by magnifying them. With a microscope, we can observe small specimens such as onion cells, cheek cells, bacteria and even dust particles. It helps doctors to detect germs and study cells in living organisms.
The Limit of Resolution
The ability of the human eye to distinguish two very close objects as separate is called the resolving power or resolution of the eye. The human eye can normally distinguish two points only if they are at least about 0.1 mm (100 μm) apart when viewed from a distance of 25 cm. If the points are closer than this, they appear as a single point. This is known as the limit of resolution of the human eye.
Since most cells are much smaller than 0.1 mm, they cannot be seen clearly with the unaided eye. Therefore, cell biologists use special instruments called microscopes, which magnify tiny objects and improve resolution. Microscopes allow scientists to observe the structure, shape and functioning of cells and their parts in detail.

Historical Background
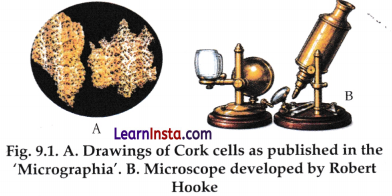
In 1665, Robert Hooke observed thin slices of cork under a microscope designed by him. He saw many tiny, box-like compartments arranged like a honeycomb and named them cells. Around the same time, Antony van Leeuwenhoek developed powerful simple microscopes with tiny lenses. He observed microscopic living organisms, which he called “animalcules.” These were later identified as bacteria and protozoa. Their discoveries marked the beginning of cell biology and opened a new microscopic world for scientific study.
Activity 9.1: Let us think and write:
If you could shrink yourself and travel inside a leaf, what would you see? Write 3—4 lines imagining that journey.
Answer:
Inside the microscopic world of a leaf, the scenery transforms into a bustling green city.
- I would enter a vast, airy chamber surrounded by giant, pill-shaped cells (mesophyll cells).
- Inside these cells, I would see hundreds of bright green chloroplasts drifting like slow-moving ships, busy capturing sunlight to make food.
- I might even hear the gentle flow of water rushing through the xylem veins, acting like high-speed water pipes that keep the whole leaf hydrated and upright.
A Quick Historical Journey of Microscopes
The development of microscopes took place gradually over several centuries and greatly improved our understanding of cells and microorganisms.
- During the 13th-15th centuries, simple magnifying glasses were used by spectacle makers.
- In 1590, Hans Janssen and Zacharias Janssen developed an early compound microscope using two lenses fixed in a tube.
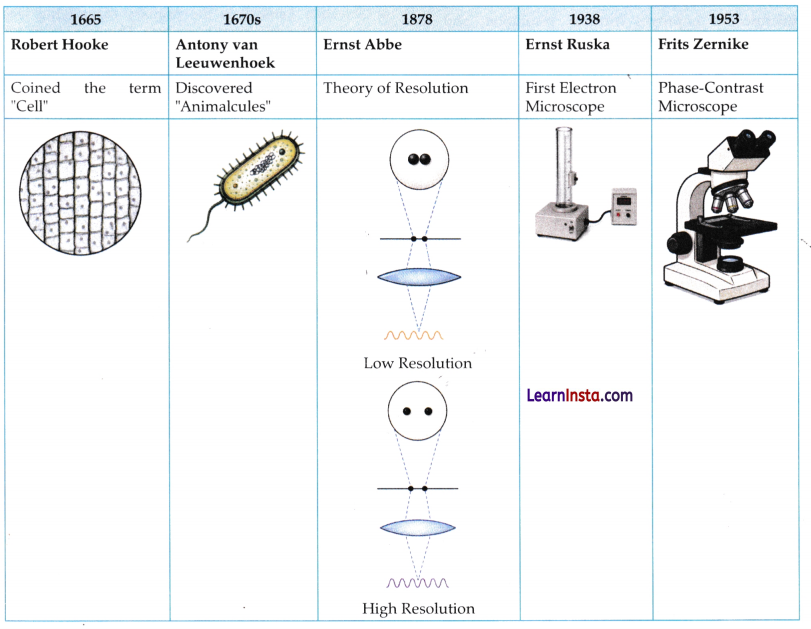
- In 1665, Robert Hooke observed cork under a microscope and coined the term “cell.” He published his observations in the book Micrographia.
- In the 1670s, Antonie van Leeuwenhoek used a powerful single-lens microscope to observe living microorganisms such as bacteria and protozoa. He is known as the Father of Microscopy.
- In 1878, Ernst Abbe explained the relationship between resolution and wavelength through a mathematical theory.
- 1930s onwards: Electron microscopes (TEM and SEM) were invented, where viruses, cell organelles and cell surfaces could be observed.
- 1938 Ernst Ruska: developed the first electron microscope, which operated on the principle of using electrons as the illumination source (instead of light) that provides shorter wavelengths and thereby significantly enhances the resolving power.
- 1953: Frits Zernike received the Nobel Prize in Physics for inventing and demonstrating the phase-contrast microscope.
Activity 9.2: A Timeline Strip
Draw a horizontal line. Mark at least 5 important dates in microscopy and add a tiny sketch or symbol for each (e.g., cork cells, bacteria, electron beam, etc.).
Answer:
How Does a Microscope Work?
A microscope works by using lenses and light to make tiny objects appear larger and clearer. It does not simply “zoom in”; instead, it depends on three important factors:
- Magnification: It is the process of enlarging the image of an object. In a light microscope, curved glass lenses bend light rays to produce a bigger image of the specimen.
- Resolution: It is the ability to distinguish two closely placed points as separate. Resolution is the most important feature because high magnification without good resolution produces a blurred image.
- Contrast: It is the difference in brightness or colour between the specimen and its background. Since many cells are transparent, scientists often use stains or dyes to increase contrast and make cell structures clearly visible.
Types of Light Microscope
Light (Optical) microscopes rely on visible light and glass lenses to magnify and observe specimens.
Basic Classification
- Simple microscope: A simple microscope utilises a single lens to magnify an object, similar to a magnifying glass. For example, a dissecting microscope is used for 3D viewing of small objects.
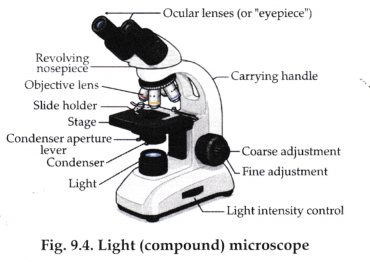
- Compound Microscope: This is the most commonly used laboratory microscope. It utilises at least two sets of lenses—the objective lens (located near the specimen) and the eyepiece (ocular lens)—to achieve high magnification.
- Advanced optical microscopes: Advanced optical microscopes improves contrast, resolution, and the ability to observe living cells in greater detail.
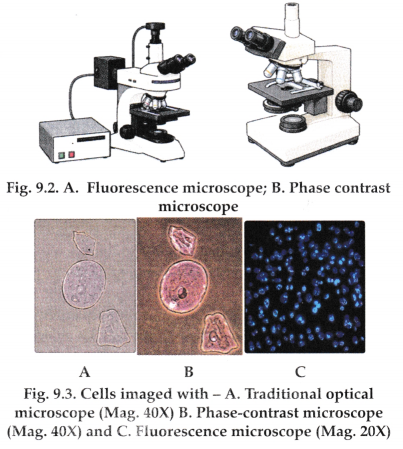
i) Fluorescence Microscopy
This technique is designed to make specific parts of a cell “light up” for easier identification.
- How it works: It uses high-intensity light to excite specialised dyes (fluorescent stains) that are added to the specimen.
- These dyes cause specific cellular structures to glow brilliantly against a dark background, much like stars in the night sky.
- Primary use: It is excellent for locating specific proteins, DNA sequences, or organelles within a cell.
ii) Phase-Contrast Microscopy
This is a revolutionary technique for studying living organisms.
- How it works: It enhances contrast by manipulating the way light passes through different parts and thicknesses of a cell.
- Major advantage: It does not require chemical stains. In standard microscopy, these stains often kill the specimen; Phase-Contrast allows scientists to view living cells in their natural and active state.
- Primary use: It is used to observe cell division (mitosis), cell movement, and other dynamic biological processes.
2. Parts of a Compound Microscope Core
Components and Their Roles
- Light Source: Provides the necessary illumination required to observe the specimen. This is typically an LED or halogen lamp located at the base of the microscope.
- Condenser Lens: Located beneath the stage, its job is to focus light directly onto the specimen. This helps optimise the numerical aperture and improves the contrast of the image.
- Specimen Stage: It is the flat platform where you place the slide. It holds the slide containing the specimen securely in place for viewing.
- Objective Lens: It is the primary magnifying lens located on the revolving nosepiece. These are available in different magnifying powers such as 4X, 10X, 40X, and 100X. They produce a real, enlarged, and inverted image of the specimen.
- Eyepiece (Ocular Lens): It is the lens through which the observer looks. It further magnifies the image formed by the objective lens.
Light Microscope
The Role of Lenses
Light changes direction when it passes through glass. A convex lens (also known as a converging lens) bends the light rays so that they meet at a specific point called the focus. When a tiny object is placed near such a lens, it forms a larger, inverted image of the object.
The Mechanism: Refraction and Reflection
A light microscope works mainly on the principle of refraction, which is the bending of light as it passes from one medium to another, such as from air into glass. This bending occurs because light changes speed in different media. The microscope also uses reflection to direct light toward the specimen. Together, refraction and reflection help focus light rays and produce a clear, magnified image of the specimen.
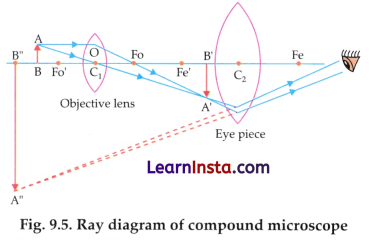
Working of a Compound Microscope:
In a compound microscope:
- Light from the source is directed toward the specimen using a mirror or built-in illuminator.
- The condenser lens focuses light onto the specimen placed on the stage.
- The objective lens forms a real, enlarged, and inverted image of the specimen.
- The eyepiece (ocular lens) further magnifies this image.
- The observer finally sees a highly magnified virtual image of the specimen.
Take peels from both upper and lower epidermis of a monocot leaf (Rhoeo/ maize/ lily) and a dicot leaf (Bryophyllum/ petunia/ balsam). Prepare their temporary mounts. Observe them under a microscope, compare their structure and draw labelled diagrams. Record similarities and differences, if any.
Now correlate the points noted by you in activity 9.1 with your observations.
| S. No. | Feature | Monocot Leaf Name of source plant……. | Dicot Leaf Name of source plant…………….. |
| 1. | Shape of epidermal cells | ||
| 2. | Pattern of epidermal cells | ||
| 3. | Shape of guard cells | ||
| 4. | Distribution of stomata | ||
| 5. | Any other observation |
Microscopy Skills
Activity 9.4: Let us prepare, observe and compare leaf peels of monocot and dicot leaves:
| S. No. | Feature | Monocot Leaf (e.g., Maize/Lily) | Dicot Leaf (e.g., Bryophyllum/Petunia) |
| 1. | Shape of epidermal cells | Long, narrow, rectangular | Irregular, polygonal |
| 2. | Pattern of epidermal cells | Arranged in parallel rows | Irregular/mosaic pattern |
| 3. | Shape of guard cells | Dumbbell-shaped | Kidney-shaped (bean-shaped) |
| 4. | Distribution of stomata | Present on both upper and lower epidermis (almost equal). | Mostly on the lower epidermis (a few on the upper) |
| 5. | Any other observation | Presence of silica bodies (in some grasses), uniform arrangement | More variation in cell size may show trichomes (hair-like structures) |
Permanent Slides
While temporary mounts are useful for immediate observation, they have only a limited lifespan. As the water in the mount dries, living cells shrink and die, leading to the formation of air bubbles, stain crystals and distorted cell shapes. To preserve specimens for long-term study, biologists create permanent mounts.
Permanent slides are prepared for long-term preservation and repeated observation. When stored carefully in slide boxes in a laboratory, these slides can remain useful for many year without losing the clarity of the cells.
Preparation of Permanent Mounts
Creating a permanent mount involves a specialised technical process to prevent the specimen from decaying or degrading.
- Fixing: The specimen is first fixed using chemicals that kill the cells quickly while preserving their internal and external structures in a life-like condition.
- Staining: Dyes are used to highlight specific parts of the cell (like the nucleus or cell wall).
- Dehydration: Water is carefully removed from the specimen to prevent decay and microbial growth.
- Mounting and Sealing: The specimen is placed in a special mounting medium, such as Canada balsam or DPX.
- Cover-slipping: A coverslip is placed over the specimen to seal and protect it completely.
Benefits of Permanent Slides
- Prevention of Decay: The sealing process prevents the specimen from drying out, rotting, or being damaged by microorganisms.
- Durability: They can be safely handled and stored in slide boxes without damaging the delicate specimen.
- Consistency: They allow repeated observation of the same specimen over several years, ensuring that students obtain a clear, high-quality image of the cells during study.
Activity 9.5: Observing permanent slides of leaf peel of a monocot and dicot leaf
Procedure
- Obtain a permanent slides of a monocot leaf peel and a dicot leaf peel from the laboratory collection.
- Observe both slides under the low-power and high- power objectives of a compound microscope.
- Compare the clarity, staining and structural details of these slides with the temporary mounts prepared earlier.
Question: Do you find any difference in the clarity of the slides?
Observation:
Yes, the permanent slides are clearer than the temporary mounts because they are properly stained and sealed, which improves visibility and prevents air bubbles or distortion.
Question: Notice the cell walls and guard cells in the fresh temporary mount and the stained permanent mount of the dicot peel. Does the clarity differ?
Observation:
Yes, in the stained permanent mount, the cell walls and guard cells appear more distinct and clearly visible due to better staining and contrast. The professional staining (often using Safranin or Fast Green) provides high contrast, making the boundaries of the cells and the opening of the stomata much easier to identify than in an unstained temporary mount.
Question: Identify two common anatomical differences in leaf peels that remain consistent in both temporary and permanent mounts.
Observation:
- Guard Cell Shape: Dicot guard cells remain kidney/ bean-shaped, while monocot guard cells (especially in grasses) remain dumbbell-shaped.
- Epidermal Arrangement: Monocot cells remain arranged in regular, parallel rows, whereas dicot cells maintain an irregular, jigsaw-like pattern.
By what factor is the image larger than the actual object?
When you look at a diagram of a cell or a tiny insect in your book, it often appears huge on the page, though you know it might be smaller than a grain of sand. When observing onion peel cells under a microscope, you would have noticed the difference in the size of the image when switching from a low-power to a high- power objective lens. The enlargement of an object seen under a microscope is called magnification. It tells us how many times larger the image appears compared to the actual object.
Magnification Formula
The total magnification (M) of a microscope is calculated by multiplying the magnification of the objective lens by that of the eyepiece lens:
M = m0 × me
Where:
- m0 = magnification of the objective lens
- me = magnification of the eyepiece
For example, if a microscope has: - 10X eyepiece and 40X objective lens, then M = 10 × 40 = 400X.
This means the image appears 400 times larger than the actual object.
Types of Microscopes
All microscopes perform the same basic function— magnifying small objects—but they differ in their methods and levels of detail.
In microscopy, magnification and resolution are important factors that determine how clearly a specimen can be observed.
Different types of microscopes possess varying magnifying powers and resolving abilities. The choice of microscope depends on the size and nature of the specimen as well as the objective of the observation.
Magnification vs. Resolution – Big vs. Sharp Image
A common misconception is that “more magnification is always better.”
However, imaging quality depends on two distinct factors:
- Magnification: Magnification is the extent to which a microscope enlarges the image of an object compared to its actual size. For example: 400 X, means the object appears 400 times larger than its real size.
- Resolution: Resolution is the ability to distinguish two closely placed points as separate and distinct. If the resolution is poor, the image appears blurred even at high magnification.
- Resolving Power: Resolving power is the ability of a microscope to separate two closely placed points. It is the reciprocal of resolution (smaller resolution value = higher resolving power and higher resolving power = clearer image).
Resolution Comparison Table
| Instrument | Resolution (in meters) | Approximate Value |
| Human eye | ~1 × 10⁻⁴ m | 0.1 mm |
| Light microscope | ~ 2 × 10⁻⁷ m | 0.2 pm |
| Electron microscope | ~ 2 × 10⁻¹⁰ m | 0.2 nm |
Light (Compound) Microscope
The light or compound microscope is the type most commonly used in school laboratories.
- It uses visible light and glass lenses to produce magnified images.
- Its magnification is usually up to about 1000X.
- Its resolving power allows details as small as about 0.2 μm to be seen clearly.
- It is used to observe living cells and microorganisms, such as cheek cells, onion peel cells, and moving protozoa.
Electron Microscopes
- Electron microscopes use beams of electrons instead of light to produce highly detailed images. They work with electron beams that have extremely short wavelengths (about -0.005 nm compared to 550 nm for visible light).
- These electrons are accelerated and directed in a vacuum chamber using magnetic lenses. Electrons also behave like waves, but with a much shorter wavelength than visible light. A shorter wavelength gives better resolution.
- Electromagnets tunction as ‘lenses’ to focus the electron beam
- A tungsten filament is commonly used as the source of electrons.
Transmission Electron Microscope (TEM)
The TEM is significantly more powerful than a light microsope due to its superior magnification and resolution.
- It operates using a beam of electrons rather than light.
- Specimen Preparation: Extremely thin slices of the specimen (about 50-90 nm thick) are prepared using an ultramicrotome equipped with a glass knife.
- Mechanism: Electrons pass through the ultra-thin slice of the specimen.
- Staining: Heavy metal stains like uranyl acetate (for proteins/nucleic acids) and lead citrate (for lipids/ carbohydrates) are used to increase electron density via positive staining, providing contrast.
- Application: Internal details of cells—such as mitochondria, ribosomes and viruses—can be observed.
- Image Type: The produced image is two-dimensional (2D).
- Resolution: Resolution can be as fine as 0.1 nm.
Scanning Electron Microscope (SEM)
- The Scanning Electron Microscope (SEM) is mainly used to study the surface details of specimens. Like the TEM, it operates with a beam of electrons.
- Unlike TEM’s ultra-thin sections, SEM uses thicker sections or whole mounts.
- Mechanism: Electrons are reflected from the specimen as they scan the surface.
- Coating: Heavy metal coatings are applied to provide conductivity for the electrons.
- Application: Provides 3D-like images of surfaces, such as pollen grains, insect legs, and microchips.
- Resolution: Resolution typically ranges from 1-20 nm.

| S.No. | Feature | Light Microscope | Transmission Electron Microscope | Scanning Electron Microscope |
| 1. | Illumination
source |
Visible light | Electron beam (broad) | Electron beam (focused, scanned) |
| 2. | Types of lenses | Glass (convex, achromatic) | Electromagnetic coils (condenser, objective, projector) | Electromagnetic coils (condenser, scanning, objective) |
| 3. | Thickness of section | Up to several mm – whole mounts; 5-10 μm for tissue sections | Ultra-thin (<100 nm, typically 50-90 nm ultramicrotomy) | Surface only (no sectioning; samples 20-30 mm thick, coating 10-100 nm) |
| 4. | Staining | Basic dyes (e.g., methylene blue, eosin; lightabsorbing) | Dense metal compounds such as uranyl acetate and lead citrate | Conductive coating (e.g., gold/ palladium; no traditional staining) |
| 5. | Observing living cells | Yes (e.g., pond life, cheek cells) | No (vacuum kills cells) | No (vacuum and coating kill cells) |
| 6. | Resolution | ∼0.2 pm | ∼0.1 nm or better | -1-10 nm |
| 7. | Magnification | Up to 1,500 × | Up to 50 million × | Up to 2 million × |
| 8. | Sample preparation time | Minutes (simple mounting) | Hours-days (embedding, ultramicrotomy) | Hours (dehydration, coating) |
| 9. | Cost | Low | Very high | High |
| 10. | Vacuum required | No | Yes | Yes |
What is new in Microscopy? What are the limits?
- New Developments With rapid advances in science and technology, modern microscopes are becoming more advanced and user- friendly.
- Digital microscopes can display real-time images directly on a computer or digital screen. This allows live observations to be shared with an entire classroom at the same time.
- Super-resolution microscopes are capable of observing structures smaller than the normal resolution limit of light microscopes.
- Students can explore these modern inventions through science books, reliable websites, science magazines, and virtual laboratory simulations. The curiosity and innovations of today may contribute to the development of the microscopes of the future.
Limitations
- Resolution Limit: With a light microscope, structures smaller than about 0.2 pm cannot be resolved due to the diffraction limit of light.
- Complexity: Electron microscopes are costly, need a vacuum, and require very careful sample preparation; most samples must be processed with chemicals and metal stains.
Where do we use Microscopes?
Microscopes are widely used in various fields:
- Hospitals and Pathology laboratories: Diagnosing diseases by checking blood, sputum and tissue biopsies (e.g., detecting malaria parasites in blood).
- Science laboratories: Studying stomata, plant and animal tissues, and plant diseases.
- Industry: Checking the quality of metals, plastics and electronic chips using both light and electron microscopes.
- Police and forensics: Examining fibres, hair, glass fragments and blood stains from crime scenes.
- Environment: Checking water samples for algae, protozoa and pollution indicators.