Students can use Kaushal Bodh Class 7 Solutions Project 3 and Class 7 Vocational Education Chapter 3 Tie and Dye Question Answer to understand textbook activities more clearly.
Class 7 Vocational Education Chapter 3 Question Answer
Class 7 Kaushal Bodh Chapter 3 Question Answer
What did I learn from others? [Page No. 80]
Question 1.
You learnt during field trips, online and offline interactions with experts, family and friends, community members, and other sources. What did you find most interesting?
Answer:
What I found most interesting was learning about the traditional art of tie and dye from different sources like field trips, experts, family, and community members.
It was fascinating to see how natural materials like vegetables, fruits, and spices are used to prepare dyes and how different tying techniques create beautiful and unique patterns on fabric.
Question 2.
What did you learn from family/community members (e.g., any information about traditional clothes at home, stories about making clothes or special memories attached to clothes)?
Answer:
I learned from family and community members that traditional clothes often have cultural and emotional value. They shared stories about how clothes were earlier made at home using natural dyes and simple tools.
Some also talked about special memories attached to handmade clothes, such as wearing them during festivals, weddings or important family occasions, which made those clothes very meaningful.
Think and Answer [Page No. 82]
Question 1.
What did you enjoy doing in this project?
Answer:
I enjoyed experimenting with different tie and dye techniques like Bandhani and Shibori and creating unique patterns on fabric. Preparing natural dyes from ingredients like turmeric and beetroot was also exciting.
The best part was untying the fabric to reveal colourful designs, which made the process creative, surprising and fun.
Question 2.
What challenges did you face? How did you overcome them?
Answer:
I faced challenges in tying the fabric tightly and evenly, which affected the final pattern.
Sometimes, the dye spread unevenly or appeared too light.
I overcame these problems by practising the tying technique, using proper fixers like salt or vinegar, and carefully following each step to improve the results.
Question 3.
what will you do differently next time?
Answer:
Next time, I will plan my design more carefully before starting and try more colour combinations. I will ensure tighter and more precise tying to get clearer patterns.
I will also experiment with new natural dye materials and improve my dye preparation process to achieve brighter and long-lasting colours.
Question 4.
Write the journey of a tie and dye product from producing raw materials to reaching the market. Which jobs are involved in this process?
Answer:
The journey begins with farmers growing cotton or other fibres. The fabric is then woven, washed and prepared. Artisans design, tie and dye the fabric using natural or synthetic dyes.
After drying and finishing, the product is stitched and packed. It reaches markets through traders and retailers. Jobs include farmers, weavers, dyers, designers and sellers.
Question 5.
Identify few examples of jobs related to the work you just did. For example, artisan, dyer, fashion designer, retailer, and textile researcher. Look around, speak to people and write your answer.
Answer:
Some jobs related to this work include
- Artisan creates tie.
- Dye designs and dyer prepares and applies colours.
- Fashion designer plans patterns and products.
- Textile researcher develops new techniques.
- Retailers sell finished items.
- Suppliers provide raw materials like fabric, dyes, and tools.

Tie and Dye Class 7 Question Answer
Activity 1: Visit to a shop or Market
Purpose of the Activity
This activity helps students understand the variety of fabrics, techniques and designs used in making textiles. By observing products in a shop, students learn about different fabrics, printing, embroidery and dyeing methods, including traditional tie and dye techniques like Bandhani, Leheriya, Shibori and Batik.
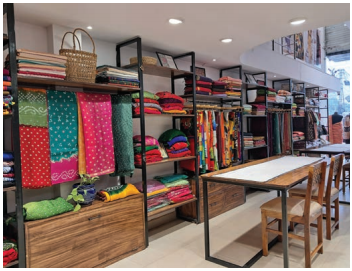
Figure: Range of products made of different fabrics using different methods
Pre-Visit Preparation (In Class)
- Discuss different types of fabrics and textile techniques (weaving, embroidery, dyeing, printing) found in your region.
- Revise key terms: fabric types (cotton, silk, linen, synthetic, jute), pattern-making techniques (tie and dye, block printing, digital printing, embroidery).
- Prepare a small notebook to record observations.
- Frame 2-3 questions to ask the shopkeeper during the visit.
Exploring Fabrics in a Shop during Visit
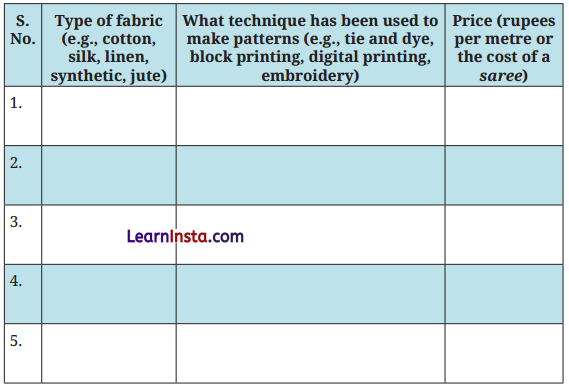
Question 1.
Is tie and dye available?
Answer:
Yes, tie and dye products are available in the fabric shop. They are displayed in sections with traditional and modern designs. These fabrics are commonly seen in items like dupattas, sarees and scarves, showing a variety of colours and patterns created using different resist-dye techniques.
Question 2.
If yes, which type (Shibori, Leheriya, Bandhani,…)?
Answer:
Different types of tie and dye such as Bandhani, Leheriya and Shibori. Bandhani designs have small dotted patterns, Leheriya shows wave-like stripes and Shibori features artistic folded patterns. Each technique has a unique style, reflecting different cultural traditions and methods of tying and dyeing.
Question 3.
What kind of garment is most popular (saree, dupatta, scarf, kurta)?
Answer:
Among the available products, dupattas and sarees are the most popular tie and dye garments. Customers prefer them for their vibrant colours and traditional appeal. These garments are widely used during festivals and special occasions, making them a common choice in the shop compared to scarves or kurtas.
Question 4.
Which fabrics and colours are most popular with customers?
Answer:
Cotton and silk fabrics are most popular because they absorb dye well and feel comfortable. Bright colours like red, yellow, blue and green are commonly preferred by customers. These colours enhance the patterns created by tie and dye techniques, making the fabrics more attractive and suitable for different occasions.
Question 5.
What else do you think tie and dye can be used for besides clothes, like kurtas, turbans, shirts, sarees, dupattas? Think and write down your ideas.
Answer:
Tie and dye can be used for home decor items like cushion . covers, curtains, tablecloths, and wall hangings. It can also be applied to bags, bedsheets, and even handmade crafts. These uses add colour and creativity to everyday items, making them unique and visually appealing beyond clothing.
Kaushal Bodh Class 7 Tie and Dye Question Answer
Activity 2: A visit to a tie and dye workshop
Purpose of the Activity
This activity helps students understand the process of tie and dye by observing artisans at work. Students learn about fabric selection, tying techniques, dye preparation, colouring methods, and finishing processes while exploring traditional and modern variations.
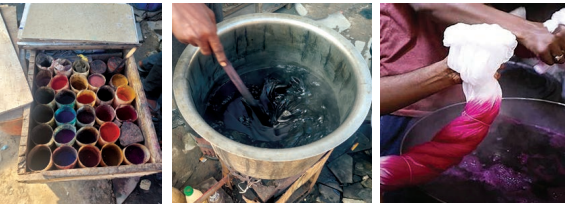
Figure: Dyeing of fabric
Tie and dye process flow chart

Step 1: Select the fabric
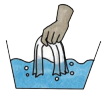
Step 2: Wash the fabric
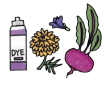
Step 3: Select the plant for natural dye

Step 4: Tie the fabric

Step 5: Prepare the dye and add fixer

Step 6: Dye the tied fabric
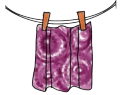
Step 7: Dry the dyed fabric
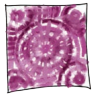
Step 8: Untie the fabric and see the design
Question 1.
How do you tie the fabric? How do you ensure patterns are the same size? How do you make patterns larger or smaller?
Answer:
The fabric is tied by pinching small sections and wrapping them tightly with thread or rubber bands. To keep patterns the same size, markings or measured spacing are used before tying.
Larger patterns are made by tying bigger sections, while smaller patterns are created by tying smaller, closely spaced portions of fabric.
Question 2.
Which tools and materials do you use for dyeing? Where do you get the dye from?
Answer:
The dyeing process uses tools like containers, tongs, measuring cups and stirrers. Materials include fabric, thread, natural dye ingredients and fixers tike salt or vinegar. The dyes are prepared from natural sources such as beetroot, turmeric, spinach, tea or flowers, which are boiled and strained to obtain colour.
Question 3.
What type of fabrics can be dyed easily? Are all these fabrics suitable for tie and dye?
Answer:
Natural fabrics like cotton, silk and linen can be dyed easily because they absorb colour well. These fabrics give clear and bright patterns in tie and dye. However, synthetic fabrics do not absorb dye properly, so they are not very suitable for tie and dye compared to natural fibres.
Question 4.
How do you ensure the colour does not bleed after dyeing?
Answer:
To prevent colour bleeding after dyeing, fixers like salt or vinegar are added to the dye solution. The fabric is properly soaked and then dried completely before washing. Rinsing with plain water removes excess dye and careful handling ensures that colours remain fixed and do not spread to unwanted areas.
Question 5.
What should be the temperature of the dye when you dip the fabric? Does the temperature have to be the same for all fabrics and all dyes?
Answer:
The dye solution should be hot (warm to near boiling) when the fabric is dipped in it. Heating helps the dye dissolve properly, speeds up the dyeing process and helps the colour fix better to the fabric.
No, the temperature does not have to be the same for all fabrics and dyes. Some dyes and fabrics require less heat or even work at room temperature. Certain processes may use minimal heating or alternative methods like sunlight (solar method) instead of heat.
Question 6.
How many times is the fabric soaked in the dye?
Answer:
The fabric is usually soaked in the dye more than once, depending on how deep or dark the colour is needed. It is dipped, removed, and sometimes dipped again to ensure even colouring. The number of times may vary according to the fabric type, dye strength and desired shade.
Question 7.
How is the fabric dyed? How long does it take?
Answer:
The fabric is dyed by dipping the tied fabric into a prepared dye solution so that the colour reaches only the untied parts. After soaking, it is removed and left to absorb the colour.
The dyeing process usually takes a short time for soaking, but the fabric is then dried for about a full day before untying to reveal the design.
Question 8.
Is it possible to dye different sections of fabric in various colours? If so, could you explain the process?
Answer:
Yes, it is possible to dye different sections of the fabric in various colours.
After tying the fabric in different sections, one part is dipped in a dye solution of one colour and then dried. After that, another section is untied or retied and dipped in a different colour dye. This process is repeated carefilly to create multi-coloured patterns on the same fabric.
Activity 3: Exploring the art of tie and dye
Purpose of the Activity
This activity helps students explore the art of tie and dye by making small samples and a final product. Students learn to select fabrics, practise tying techniques, prepare and apply dyes, create patterns and document their process, developing both practical skills and creativity.
Step 1: Prepare the Sample Fabrics
Take five handkerchief-sized fabrics (6×6 inches) from old clothes (shirts, kurtas, sarees, bedsheets). Use different fabrics: thin cotton, thick cotton, silk or linen.
- Choose white or light-coloured fabrics for clear designs.
- Wash to remove starch and dirt, then dry and iron.
Preparing fabric for tie and dye
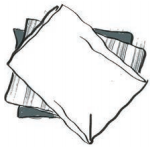
Step 1: Cut the fabric

Step 2: Wash to remove any starch to dirt
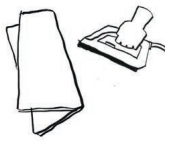
Step 3: Dry the fabric and iron it to remove any crease
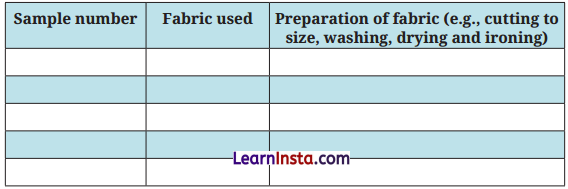
Checklist of samples
Step 2: Tying the fabric
Three main techniques of tying the fabric are described below
Bandhani tying technique
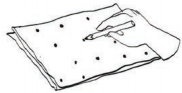
Step 1: Draw a design on the fabric using tiny circles/dots.
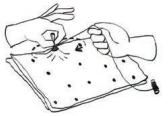
Step 2: Place a mustard seed on the fabric where you want the design element to appear. Pinch a small portion of the fabric around the seed using your figures.
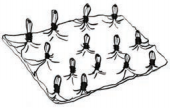
Step 3: Pull the seed up with the fabric and tie it tightly with the thread. Repeat the process for the design you would like to create.
Shibori tying technique
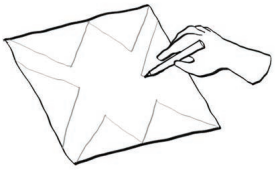
Step 1: Draw the design on the fabric. You can draw the design either in a straight or dotted line.
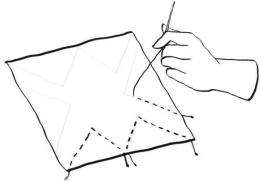
Step 2: Use a needle and thread to sew simple running stitches along the lines of your design. Make sure to keep even spacing for a neat pattern.
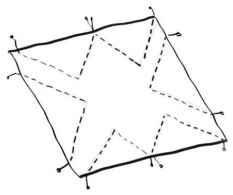
Step 3: Continue stitching until your entire pattern is outlined with the running stitches. Keep the stitches loose, as they will be gathered later.
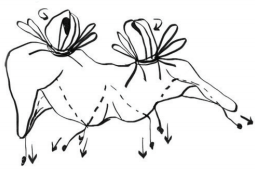
Step 4: Gently pull the loose ends of the thread to gather the fabric, creating folds. The tighter you pull, the more distinct your design will be.
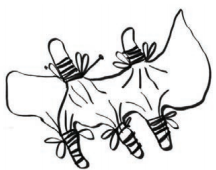
Step 5: Once gathered, tie a fim knot at the end of the thread to hold the folds in place. Make sure it is tight, so the dye does not seep into the folded areas.
You can vary the pattern by varying the length of the stitches, the angle of the lines, and where and how tightly you tie the thread.
Leheriya tying technique
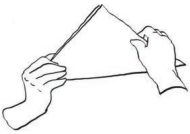
Step 1: Fold the fabric in half and fid the centre point. This will help in creating symmetrical pleats.
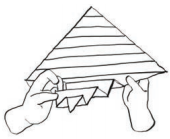
Step 2: Start making small, even pleats by folding the fabric back and forth like an accordion. Ensure the pleats are neat for a clean pattern.

Step 3: Continue folding until the entire fabric is pleated. Hold the fabric fimly to maintain the folds.
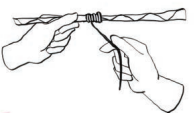
Step 4: Carefully hold the pleats and tie them tightly with thread at the centre. Ensure the knot is secure to keep the pleats in place.

Step 5 : Tie the fabric at equal intervals on both sides of the centre. This will create the Leheriya pattern after dyeing.
You can vary the design by decreasing or increasing the number of pleats, as well as the distance at which you tie the thread.
Making the samples
| Actions | Details Challenges and Solutions |
| Sample 1 — Fabric | TyingTechnique |
| Design of the sample | |
| Sample 2 —Fabric | Tying Technique |
| Design of the sample | |
| Sample 3 —Fabric | .ying Technique |
| Design of the sample | |
| Sample 4 —Fabric | TyingTechnique |
| Design of the sample | |
| Sample5 —Fabric | TyingTechnique |
| Design of the sample | |
Step 3: Preparation of dye
Natural dyes are more environment-friendly than chemical dyes. Select ingredients based on the colour you want
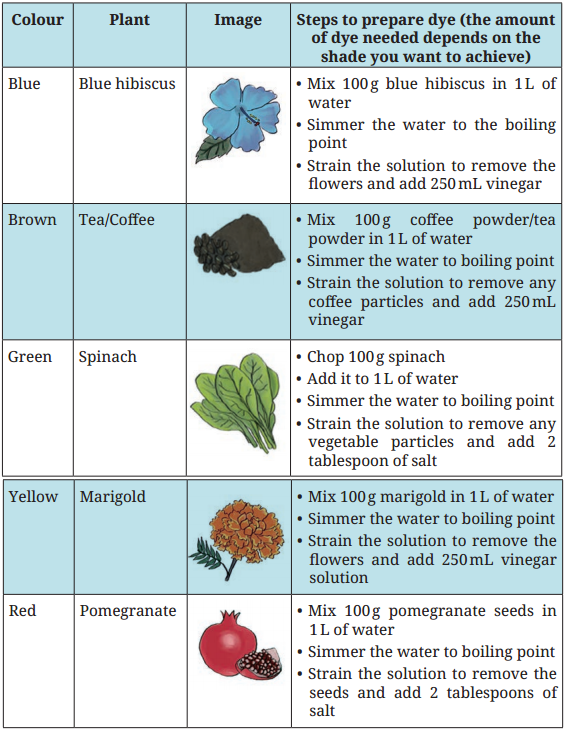
Record of Dye Preparation
| Steps | Details |
| Materials used to prepare the dye | |
| Quantity of ingredients | |
| Quantity of water | |
| Fixer material used (salt, vinegar, etc.) | |
| Safety precautions taken | |
| Any other material that could give a similar colour |
Step 4: Dye, Dry and Untie the Fabric
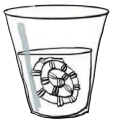
Step 1: Dip the tied fabric in normal water.
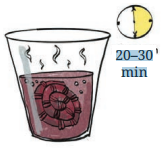
Step 2: Dip the fabric in warm dye solution for 20–30 minutes.
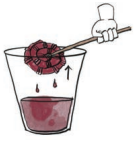
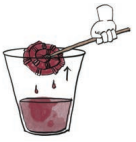
Step 3: Take the fabric out of the dye. Ensure you wear gloves.
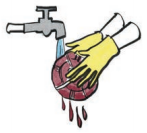
Step 4: Wash it with plain water once toremove excess dye.
Step 5: Keep it in a clean space to dry for a day.
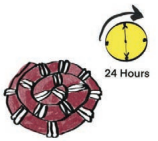
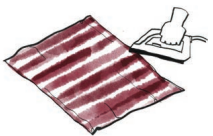
Step 6: Next day, you can untie and press the fabric.
Repeat the process from steps 1–6 for all 5 samples
Common Challenges and Their Solutions
| Challenges | Try This Solution |
| Thread broke or opened during dyeing | Tie the fabric more tightly. Handle it carefully so it does not loosen in the dye. |
| Dye solution spilled | Ensure there is enough workspace.
Use a cloth or gloves to hold hot containers. Spread plastic sheets on the surface. |
| Fabric cut while untying | Do not use scissors to cut thread. Use a needle to find the thread’s loose end and untie it by hand. |
Step 5: Documenting a Swatch File
Prepare a swatch file to showcase your five samples. For each sample, include
- Sample fabric (attach/staple the actual fabric piece)
- Type of fabric used
- Technique used for tying and dyeing
- Plants/Materials used for the dye
- Challenges faced while creating the sample
- Step-by-step process followed
Question 1.
What types of fabrics did you use for your samples and why were they chosen?
Answer:
I used different fabrics such as thin cotton, thick cotton, silk and linen for my samples. These were chosen because natural fabrics absorb dye easily and show clear pattern.
Using a variety of fabrics helped me compare how each material reacts to dye and understand which gives the best results.
Question 2.
How did the tying method affect the final design after dyeing?
Answer:
The tying method directly affected the final design by controlling where the dye could reach. Tight tying created clear, undyed patterns, while loose tying allowed some dye to enter.
Different techniques like Bandhani, Shibori, and Leheriya produced unique patterns such as dots, folds and waves, making each sample visually different.
Question 3.
How did you fix the dye to prevent colour bleeding?
Answer:
To fix the dye and prevent colour bleeding, I added fixers like salt or vinegar to the dye solution. After dyeing, I rinsed the fabric with plain water to remove excess dye and allowed it to dry completely. Proper fixing ensured that the colours stayed bright and did not spread or fade.
Question 4.
How does heating or soaking time affect the dyeing process and final colour?
Answer:
Heating helps the dye dissolve properly and improves its absorption into the fabric, resulting in brighter colours. Longer soaking time allows the fabric to absorb more dye, making the colour deeper and richer. However, too little heating or soaking can result in uneven or dull colours in the final design.
Question 5.
What challenges did you face while making the tie and dye samples?
Answer:
I faced the following challenges while making the tie and dye samples
- The threads sometimes loosened or broke while dyeing, which affected the pattern.
- It was difficult to tie the fabric tightly and evenly in all samples.
- Some dye spilled while transferring or soaking the fabric, creating a mess.
- Untying the fabric was tricky, and there was a risk of cutting or damaging the cloth.
Activity 4: Making the final product
Purpose of the Activity
This activity helps students create a usable tie and dye product by applying the skills learned from sample fabrics. Students learn to select fabric, plan a design, prepare dyes, tie and dye creatively, and finish the product, developing both practical skills and artistic creativity.
Step 1: Selection of Product and Fabric
- Select a product — dupatta, pillow cover, scarf, kurta, or dress material.
- Find old clothes at home (bedsheets, discarded clothing) and cut them to the required size.
- Dupatta 1-1.5 metres wide x 2-2.5 metres long
- Pillow Cover 26 inches * 20 inches
- Scarf 50 cm * 50 cm
Sketch the pattern of your product with dimensions in the box below

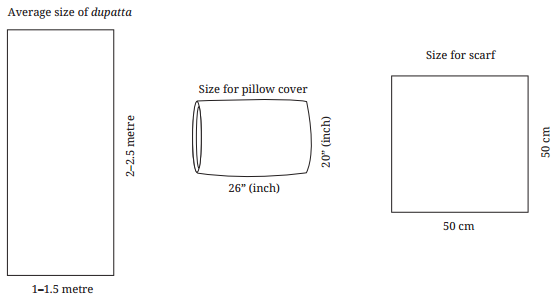
Figure : Measuring and selecting fabric
Step 2: Finalise the Design, Colour and Tying Technique
- Draw design inspiration from things around you
- Nature Flowers, rivers, waves
- Architecture Windows, geometric grids
- Traditional motifs.
- Sketch your design on paper first, then on the fabric.
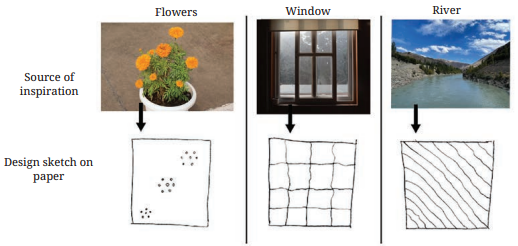
Figure : Design inspiration and designs for tie and dye
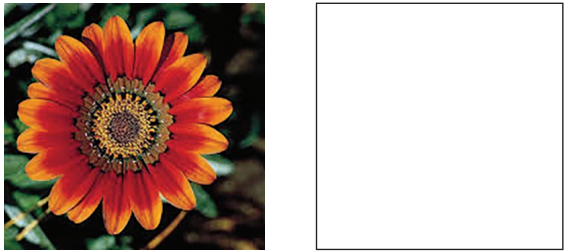
Figure: Design inspired by a flower
Step 3: Tie and Dye the Product
Prepare your fabric and follow your design to create patterns by tying the fabric in creative ways.
Use 2-3 L of dye solution for a larger piece.
After dyeing, leave to dry for a full day.
Recording the Process of Making the Final Product
| Actions | Steps taken |
| Preparation of the fabric | |
| Tying | |
| Preparation of dye Dyeing and drying |
Step 4: Untie the Product
- Carefully untie the dried fabric to reveal your unique design.
- Once all knots are undone, iron your product to smooth out any wrinkles.
- Select the iron’s heat setting according to the fabric type.
Question 1.
Which product will you make?
Answer:
I will make a tie and dye dupatta as my final product. A dupatta is a suitable choice because it provides enough space to create detailed patterns and experiment with colours. It is also useful in daily wear and special occasions, making it both creative and practical.
Question 2.
Which fabric did you select? Why?
Answer:
I selected cotton fabric for my product because it absorbs dye easily and gives clear, bright patterns. Cotton is also comfortable, easily available and suitable for beginners.
It allows better control during tying and dyeing, which helps in achieving neat and well-defined designs.
Question 3.
What is your design inspiration?
Answer:
My design inspiration comes from nature, especially waves and flowing water patterns. I wanted to create a simple yet attractive design that reflects movement and rhythm.
Natural patterns are easy to visualise and help in creating balanced and visually appealing tie and dye designs.
Question 4.
Which plant/ingredient will you use to prepare your dye?
Answer:
I will use turmeric to prepare a yellow dye for my product. Turmeric is easily available and produces a bright, vibrant colour. It is also natural and safe to use. The dye can be prepared by mixing turmeric in water and adding a fixer like salt or vinegar.
Question 5.
Which tie and dye technique will you use (Bandhani / Shibori / Leheriya / other)?
Answer:
I will use the Leheriya technique for my product. This method creates beautiful wave-like patterns by folding and tying the fabric in pleats. It is suitable for larger fabrics like dupattas and gives a flowing, continuous design that looks attractive and traditional.
Question 6.
Did you manage to create the design you wanted? If not, what might be the reason?
Answer:
I was able to create a design similar to what I planned, but it was not exactly the same. The differences occurred due to uneven tying and slight variation in dye absorption.
This shows that tie and dye is a creative process where results can vary depending on technique and precision.
Activity 5: What did you invest?
Purpose of the Activity
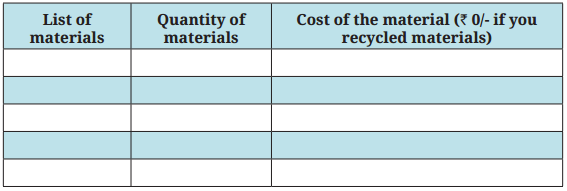
This activity helps students understand the cost involved in creating a product, including materials and time. It develops awareness about resource use, budgeting, and the value of handmade products.
Product costing
Question 1.
Which materials did you use to create your product?
Answer:
I used cotton fabric, thread for tying, natural dye ingredients like turmeric and fixers such as salt or vinegar. I also used tools like containers, measuring cups, and stirrers for preparing the dye. These materials helped me complete the tie and dye process effectively and create my final product.
Question 2.
Which materials were recycled?
Answer:
The cotton fabric used for the product was recycled from old clothes such as a bedsheet or kurta. Some containers used for dyeing were also reused from home. Recycling these materials helped reduce cost and made the project more environment-friendly while promoting the reuse of available resources.
Question 3.
What was the total cost of your product?
Answer:
The total cost of my product was very low because most materials were recycled. Only a small amount was spent on dye ingredients like turmeric and fixers like salt or vinegar. Overall, the cost was minimal, showing that tie and dye can be an affordable and creative activity.
Question 4.
How did you calculate the cost of materials used in your product?
Answer:
I calculated the cost of materials used in my product by adding the cost of each item used, such as fabric, dyes and other materials. For recycled materials like old clothes, I considered the cost as 0/-. Finally, I added all the individual costs to find the total cost of the product.
Question 5.
Why is it important to record the cost and materials used while making a product?
Answer:
It is important to record the cost and materials used while making a product because it helps us understand how much money and resources are needed to create it. It also helps in budgeting, avoiding waste, and calculating the final price of the product. This makes us more aware of value, planning and efficient use of materials.