To prepare effectively, include Kaushal Bodh Book Class 6 Solutions Project 4 and Class 6 Kaushal Bodh Chapter 4 Animation and Games Question Answer in your daily study routine.
Class 6 Vocational Education Chapter 4 Question Answer
Kaushal Bodh Class 6 Chapter 4 Question Answer Animation and Games
What did I learn from others and how did I use it? [Page No. 98 – 99]
Question 1.
Did you watch any tutorial or observe how others coded their projects?
Answer:
Yes, I watched tutorials and explored other Scratch projects to understand how games and animations are created. This helped me learn how to use different blocks, get new ideas, and improve my own project.
Question 2.
Did you work on any project with classmates? What did you learn from them?
Answer:
Yes, I worked on the project with my classmates. I learned new ideas and different ways of using Scratch blocks from them.
I also learned how to share responsibilities, communicate better, and solve problems together while creating the game.
Question 3.
Did you ask for help or advice from your teacher or peers? What was the most helpful piece of advice you received?
Answer:
Yes, I asked my teacher and classmates for help while working on the project. The most helpful advice I received was to plan the game properly using a storyboard before coding and to test the game regularly to find and fix mistakes easily.
Question 4.
What new techniques or blocks did you discover with the help of peers?
Answer:
I discovered new techniques like using loops to repeat actions and using ‘if-else’ blocks for decision-making in the game.
I also learned how to use sensing blocks for interaction and variables to keep score, which helped make the game more interactive and interesting.
Question 5.
Did learning from others inspire any new idea or feature in your projects?
Answer:
Yes, learning from others inspired me to add new features like better animations, sound effects, and interactive elements in my game.
I also got ideas for improving the design, such as using different backdrops, adding scoring systems, and making the game play more interesting.
Question 6.
Have you had the opportunity to teach or help others with Scratch? What did you teach them, and how did it help you reinforce your own understanding?
Answer:
Yes, I had the opportunity to help others with Scratch. I taught them how to use basic blocks like Motion, Looks, and Events, and how to create simple animations.
Teaching others helped me understand the concepts more clearly and improved my confidence in using Scratch.

Think and Answer [Page No.101]
Question 1.
What did you enjoy doing?
Answer:
I enjoyed creating the animated birthday card the most. Seeing my friend’s name animate letter by letter on screen with background music was very exciting.
I also loved the moment when my rubber band car in the propeller activity began moving. Designing my storyboard was a creative challenge that I really enjoyed.
Question 2.
What were the challenges you faced?
Answer:
The challenges that I faced were
- Creating a Scratch account was slightly confusing at first — the email verification step needed teacher’s help.
- Understanding how Control blocks like ‘if-else’ and ‘forever’ work took some practice.
- Finding the right backdrop and sprite that matched my game idea was time-consuming.
- Fixing bugs in my code — the sprite kept going off-screen and needed sensing blocks to detect the edge.
Question 3.
What will you do differently next time?
Answer:
I will do the following things differently next time
- I will spend more time on my storyboard so coding is faster and easier.
- I will test my game after coding each part instead of waiting until the end.
- I will explore more block categories — especially variables and operators — to make my game more complex.
- I will ask classmates for feedback earlier so I have time to improve the game before the final submission.
Question 4.
Compare online and offline games. State three things you like about each.
Question 5.
What jobs are related to this project? Look around, speak to people and write your answer. A few examples of jobs related to the activities you just did, are programmer, software developer, game developer and 3D animator.
Answer:
Jobs directly related to this project include; programmer/software developer, game developer, 3d animator, mobile app developer, UI/UX designer (designs how apps and games look), sound engineer (creates game music and sound effects), storyboard artist, VFX artist (visual effects), artificial intelligence engineer (builds AI tools like image generators), cybersecurity expert (keeps online games and apps safe) and computer science teacher.
Project 4 Animation and Games Class 6 Question Answer
Activity 1: Game Design – Thinking About Games
Purpose of the Activity
This activity will help students to understand different types of games and identify their key elements such as rules, players, objectives and challenges. It will also help students to connect real life games with game design ideas used in digital programmes like scratch.
Pre-Activity Discussion
- Discuss the difference between outdoor games (like cricket) and indoor games (like chess).
- Talk about what makes a game fun and engaging (e.g., challenge, competition, teamwork).
- Identify common elements in games, such as players, rules, objectives and scoring.
- Share personal favourite games and explain why they are favourites.
Observation Task
- Observe different games you play at home, school or outdoors.
- Notice the rules, numbers of players and how the game is played.
- Observe how players interact with each other during the game.
Think about Your Favourite Game and Answer
1. Why do we play games?
2. Which is your favourite game?
3. What do you like most about your favourite game?
4. How many members can play in your favourite game?
5. What rules are to be followed in your favourite game?
6. Is there anything else interesting about your favourite game?
Question 1.
What is the most important elements of any game?
Answer:
The most important elements of any game are
- Rules: Every game has a set of rules that all players must follow. Rules ensure fair play.
- Players: A game needs one or more players who take part.
- Goal: There must be a clear objective or purpose, such as scoring the most runs, reaching the finish line or solving a puzzle.
- Challenge: A good game has obstacles or competition that make it interesting and exciting.
- Characters or pieces: Most games have something to represent each player, like a token in Ludo or a player in Cricket.
- Background/Setting: The space or environment where the game is played.
Question 2.
How is designing a game similar to planning a project or event?
Answer:
Designing a game is similar to planning a project or event in the following ways
- Clear Goal or Idea: Both start with a clear concept. Just like an event has a theme, a game has a central idea or objective.
- Proper Planning: Both require planning details such as participants, materials, rules, and schedule.
- Focus on Audience/Players: Both consider what will make the experience enjoyable and engaging for people.
Question 3.
What do you understand by the term ‘rules’ in a game? Why are they important?
Answer:
Rules in a game are instructions that tell players how the game is played. They explain what is allowed and what is not allowed.
Rules are important because they make the game fair for everyone, prevent confusion, and help players understand how to win. Without rules, the game would become disorganised and unfair.
Question 4.
How do challenges in a game make it more interesting for players?
Answer:
Challenges make a game more interesting because they test the skills and thinking ability of players.
They create excitement and keep players engaged while trying to overcome difficulties.
When players face challenges, they feel motivated to improve and complete the game. This makes the game fun, competitive and enjoyable instead of boring or too easy.
Question 5.
How does teamwork help players perform better in a game?
Answer:
Teamwork helps players perform better in a game because they can share responsibilities and support each other. Players can use their different skills together to achieve the common goal.
It also improves coordination, communication, and decision-making. When team members work together, they can solve problems quickly and play more effectively, increasing their chances of winning the game.
Kaushal Bodh Class 6 Animation and Games Question Answer
Activity 2: Model your favourite game
Purpose of the Activity
This activity will help students understand how to design a game by creating a physical model of their favourite game. It will develop planning, creativity and design thinking skills by focusing on game layout, rules and components such as boards, players and boundaries.
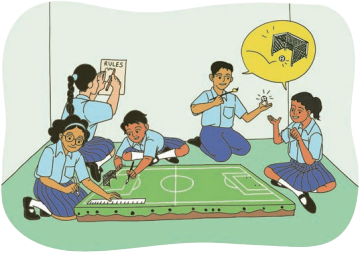
Figure: Making a model of a game helps you think about the details of a game
Pre-Activity Discussion
- Discuss how a board game like Ludo is different from a field game like Cricket in terms of space and equipment.
- Talk about how a model can help explain a game to someone who has never played it.
- Identify the key physical elements needed for your chosen game (board, pieces, boundaries, pitch, etc.).
- Discuss how to use waste or craft materials to represent these elements.
Materials Required
- Cardboard
- Buttons
- Markers
- Loose papers
- Glue
- Any other available craft materials
Procedure (Steps to Follow)
- Examples of game models you can make
- Ludo or Snakes and Ladders Use cardboard as the board and buttons as game pieces.
- Cricket Draw a cricket pitch on cardboard. Mark the crease, stumps, and fielding positions.
- Blind Man’s Buff Draw a top-view map of the playground with clear boundaries.
- Chess Draw a chessboard and label the squares.
- Football Draw a football field layout with goal posts and positions.
Write the rules of your game on a separate card and attach it to your model.
Draw a sketch or paste a photograph of the model of a game in the space given below
Sketch / Photograph of Game Model

Question 1.
What craft materials did you use to make your game model?
Answer:
We used the following craft materials to make the game model (example; Snakes and Ladders)
- Cardboard To make the base board.
- Markers and Sketch Pens To draw the squares, snakes, ladders and numbers on the board.
- Buttons To use as game pieces or tokens for different players.
- Loose Paper To write the rules of the game.
- Glue To hold cardboard pieces together if the board needed to be joined.
Question 2.
How did making the physical model help you plan the game better?
Answer:
Making the physical model helped us plan the game better in several ways, such as
- It made us think carefully about every detail — the size of the board, the number of squares and the positions of snakes and ladders.
- We had to decide the rules clearly before writing them on paper, which forced us to think about any gaps or problems.
Question 3.
If you were to convert this offline game into an online game on Scratch, what would you need to design first?
Answer:
To convert an offline game like Snakes and Ladders into an online Scratch game, the first things we would need to design are
- The backdrop: The game board background (the grid of squares with snakes and ladders drawn on it).
- Sprites: Characters or tokens to represent each player, plus the snakes and ladders as objects.
- Game Rules: Using Control blocks (if-else) to check if a player lands on a snake (go back) or a ladder (move up).
- Dice Sprite: A sprite that randomly shows a number from 1 to 6 when clicked, using the Operators block.
- Variables: A score or position variable to keep track of each player’s position on the board.
Question 4.
What important parts of the game (such as rules, players, or boundaries) were easiest to represent in your model?
Answer:
The easiest parts to represent in my game model were the boundaries and players because they can be shown clearly using simple materials like cardboard, paper, and buttons. Boundaries could be drawn easily on the base, and players or pieces could be made using small objects. Rules were also added on a card, but they could not be shown visually as clearly as the game layout.
Question 5.
How is planning a physical game model similar to designing a digital game?
Answer:
Planning a physical game model is similar to designing a digital game because both require clear thinking about rules, players and objectives, and how the game will be played. In both, we first plan the structure and sequence of actions. A physical model helps us understand the layout, while in a digital game like Scratch, we use code blocks to create the same ideas on a computer.
Activity 3: Trying out online games
Purpose of the Activity
This activity introduces the world of online and digital games. It helps them observe and compare the common features of digital games, such as characters, backgrounds, music and rules.
Pre-Activity Discussion
- Discuss the difference between playing a physical game (like Ludo with a board) and a digital game (like Ludo on a phone).
- Talk about common elements found in digital games; characters (sprites), backgrounds, sound effects and music.
- Discuss how digital games provide instructions and feedback to the player.
- Share experiences of playing online games and what made them interesting or boring.
Some activities have already been done based on offline or online games. Now, try playing a few online games on a smartphone, computer or laptop and explore different types of games. Based on this experience, answer the following questions
- Do all the games have rules? Yes/No
- Did they all have characters, such as cartoons, animals, heroes, etc.? Yes/No
- Did the characters interact with each other in all the games? Yes/No
- Was there a colour background in all the games? Yes/No
- Was there music in the games? Yes/No
- Did you find any game interesting and challenging? If yes, why? If not, how could the game be made more interesting and challenging? Yes/No
Question 1.
Name any two online games you tried. What simple machines or concepts did they teach or use?
Answer:
Two online games that can be tried are
(i) Match the Pair Game Teaches memory skills and pattern recognition, helping understand the concept of cause and effect.
(ii) Maze Game Uses the concept of motion and direction control, showing how objects move along paths and respond to inputs.
Question 2.
What is the difference between an online game and an offline game?
Answer:
The differences between an online game and offline game are as follows
| Online Games | Offline Games |
| Played on devices like computers, smartphones or tablets using a screen. | Played in the real world using physical objects like boards, cards or balls. |
| Use coding, animations, music and digital graphics. | Do not use digital technology; depend on physical materials. |
Question 3.
What three features would you add to an online game to make it more fun?
Answer:
Three features that can make an online game more fun are
(i) Background Music and Sound Effects: To make the game more engaging and lively.
(ii) Levels and Challenges: To keep players motivated and provide a sense of achievement.
(iii) Interactive Elements or Animations: Like moving characters, objects or rewards that respond to the player’s actions.
Question 4.
How do characters (sprites) in online games make the game more interactive?
Answer:
Characters (sprites) in online games make the game more interactive in the following ways
- They respond to player actions like moving, jumping, or collecting objects, making the game active and engaging.
- They interact with other characters through animations and behaviours, making the game more lively and enjoyable.
Question 5.
What skills or ideas do you need to create your own simple online game using Scratch?
Answer:
To create a simple online game using Scratch, you need basic skills like using block coding to control characters (sprites).
You should know how to add backgrounds, sounds, and animations. You also need creative ideas for designing characters, setting rules, and planning the game steps clearly using a storyboard.
Activity 4: Preparing to make your own game with animation
Purpose of the Activity
This activity prepares for hands-on creation by introducing Scratch. It includes exploring existing Scratch projects, learning how to create an account and understanding the basic purpose of the platform.

Pre-Activity Discussion
- Introduce Scratch as a visual programming language where you snap blocks together to give instructions.
- Discuss what ‘animation’ means (making still images move).
- Talk about the importance of planning and having an account to save your work.
- Discuss online safety; using a teacher’s or family member’s email, not sharing passwords and asking for help if something is confusing.
Explore Scratch Games and Animations
- Search for interesting games and animations made in Scratch using the following keywords
- Play animations using Scratch
- Educational Scratch games for school students
- Scratch games for practising math skills
- Creative Scratch games with music and sound effects
- Scratch games for teaching history or geography
- Adventure games made in Scratch
Did you face any difficulty in creating your account on Scratch? Yes / No.
If yes, how was it solved?
____________________________________________________________
Question 1.
What is Scratch and who made it?
Answer:
Scratch is a free, visual programming language and online platform that allows users to create animations, games, interactive stories and art by snapping together coloured blocks of code.
It was developed by the Lifelong Kindergarten Group at the Massachusetts Institute of Technology (MIT) Media Lab.
Question 2.
Name any three things you can create using Scratch.
Answer:
Three things I can create using Scratch are
(i) Animated Stories: Characters can move, speak and interact in a sequence of scenes, just like a cartoon.
(ii) Games: You can build interactive games where a player controls a sprite to collect objects, avoid enemies or solve puzzles.
(iii) Animated Birthday Cards or Greetings: You can create a personalised card where someone’s name animates on screen with music.
Question 3.
Why is Scratch called a ‘visual programming language’?
Answer:
Scratch is called a ‘visual programming language’ because instead of typing lines of text-based code (like in Python or JavaScript), the user drags and snaps coloured blocks together that represent instructions.
Question 4.
What is the difference between a sprite and a backdrop in Scratch?
Answer:
Differences between a sprite and a backdrop in Scratch are
| Feature | Sprite | Backdrop |
| Definition | A character or object that can move, interact and perform actions in the game or animation. | The background or stage setting on which the sprites perform their actions.or |
| Function | Performs actions, responds to code blocks and interacts with other sprites. | Sets the scene or environment for the game or animation. |
Question 5.
Why is it important to explore existing Scratch projects before creating your own game?
Answer:
It is important to explore existing Scratch projects before creating your own game because it helps you understand how games and animations are designed using blocks. You can learn new ideas, styles, and techniques from others’ work. It also gives you inspiration and makes it easier to plan and create your own game.
Activity 5: Build characters, objects and a backdrop of your game
Purpose of the Activity
This activity will help students to explore the Scratch interface and learn how to add sprites (characters), objects and backdrops to stage. It is the first step to building any game or animation.
Pre-Activity Discussion
- Define the terms ‘Sprite’ (any character or object in Scratch) and ‘Backdrop’ (the background).
- Demonstrate how to open the sprite and backdrop libraries in Scratch.
Discuss the different ways to get a Sprite; choosing from the built-in library, uploading an image from the computer or drawing your own.
Introduce the concept of ‘costumes’ – different looks for the same sprite to create animation.

Figure : Backgrounds and Sprite on Scratch
Try out a few features in Scratch. Different elements can be seen on the screen, such as backgrounds and characters or objects.
While Exploring Scratch, Record Your Progress
1. Were you able to select and import a sprite? Yes/No
2. Were you able to use the in-built sprite or did you use some image from the internet or a photo you had taken? Or did you use both? Yes/No

Choosing the Sprite to be Loaded on to your game
3. Did you attempt creating your own sprite by drawing? Yes/No
4. Were you able to change the costumes of the chosen Sprite? Yes/No
5. Were you able to identify and import objects? Yes/No
6. Were you able to identify and use appropriate backdrops for the chosen sprite? Yes/No

Figure: Select your Sprite, and drag the code blocks on to your window to have it follow your instruction
Question 1.
What is the difference between a sprite and a costume in scratch?
Answer:
Differences between a sprite and a costume in scratch are
| Feature | Sprite | Costume |
| Definition | A character or object in Scratch that can move, interact, and perform actions. | A different appearance or outfit of a sprite that can be switched to show changes. |
| Function | Performs actions, responds to code blocks and interacts with other sprites. | Changes how a sprite looks, helps show movement, emotions or different states. |
Question 2.
Name three ways to add a sprite to your Scratch project.
Answer:
Three ways to add a sprite to my scratch project are
(i) Choose from the built-in sprite library — Scratch has a large library of ready-made sprites like animals, people and objects. Click the ‘Choose a Sprite’ button to browse and select one.
(ii) Upload an image from the computer — you can upload your own photograph or a downloaded image from the internet to use as a Sprite.
(iii) Draw your own sprite — Scratch has a built-in drawing tool (Paint Editor) that lets you draw and design a completely original Sprite yourself.
Question 3.
What is an AI image generator? How can you use it in Scratch?
Answer:
An AI image generator is a tool that creates images from a text description (called “text prompt”). It processes the words given and generates an image that matches the description.
In Scratch, AI-generated images can be used as backdrops, sprites or objects in games and animations. For example, an AI-generated forest can be used as a backdrop or a flying cat created by Al can be used as a sprite.
Question 4.
Why is it important to choose the right backdrop for your animation or game?
Answer:
Choosing the right backdrop is important for the following reasons
- Sets the Mood and Environment: The backdrop creates the overall feeling of the game or animation. For example, a jungle backdrop feels adventurous, while an underwater scene feels calm and mysterious.
- Helps Understand the Setting: It allows players or viewers to quickly know where the action is happening (such as space, city, forest, or classroom).
Question 5.
How do costumes help in making animations more realistic?
Answer:
Costumes help make animations more realistic by changing the appearance of a sprite to show movement or different actions. Each costume shows a slightly different position or expression, so when they are played one after another, it creates the effect of motion. This makes characters look alive and the animation smoother and natural.
Activity 6: Programming your characters and objects
Purpose of the Activity
This activity introduces the core concept of coding in Scratch. Students will learn to animate their sprites by combining different types of code blocks (Motion, Looks, Events, Control) to create sequences of instructions.
Pre-Activity Discussion
- Explain that ‘programming’ is giving a set of step-by-step instructions to the computer.
- Introduce the main categories of blocks; Motion (to move), Looks (to change appearance or say something), Events (to start an action, like clicking a flag) and Control (to repeat actions).
- Demonstrate a simple example; dragging a ‘move 10 steps’ block and clicking on it to seethe sprite move.
- Discuss how combining blocks can create more complex behaviours.
Animate your Sprite

Figure: You can do animation on Scratch too; the letters are animated in this window
1. Were you able to import and use your friend’s picture as a Sprite? Yes/No
2. Were you able to use a combination of ‘Motion’, ‘Looks’, ‘Control’ and ‘Events’ blocks to create an animated birthday message using your friend’s Sprite? Yes/No
3. Were you able to use your friend’s favourite song as background music for the animated card? Yes/No
4. Were you able to save the card and share it with your friend? Yes/No
5. Did you face any challenge in designing this animated birthday card? Yes/No
If yes, how did you resolve them?
Question 1.
Which block category do you use to make a sprite move from left to right?
Answer:
To make a sprite move from left to right in Scratch, the Motion block category is used.
Blocks like ‘move 10 steps’ or ‘change x by 10’ control the sprite’s movement along the stage.
Question 2.
What does the ‘Events’ block ‘When green flag clicked’ do?
Answer:
The ‘When green flag clicked’ block in the Events category starts the program or action for a Sprite when the green flag above the stage is clicked. It is used to trigger all the instructions connected to that block at the beginning of the game or animation.
Question 3.
What is a loop in programming? Which block in Scratch creates a loop?
Answer:
A loop in programming is a set of instructions that repeats automatically a certain number of times or forever, without having to write the same code again and again.
For example, if you want a sprite to keep walking continuously, a loop repeats the ‘move 10 steps’ instruction over and over.
In Scratch, loops are created using Control blocks:
- ‘Forever’ Block Repeats the instructions inside it endlessly until the programme is stopped.
- ‘Repeat (_____) Block Repeats the instructions a specific number of times.
- ‘Repeat Until (_____)’ Block Repeats the instructions until a certain condition becomes true.
Question 4.
How do you make a Sprite say something on screen? Which block do you use?
Answer:
To make a Sprite say something on the screen in Scratch, you use blocks from the Looks category.
- ‘Say [text] for [time] Seconds’ Block displays a speech bubble for a specific amount of time.
- ‘Say [text]’ Block displays a speech bubble that stays on the screen until another action changes it.
These blocks show a speech bubble with your message, helping the Sprite communicate with the player or display instructions during a game or animation.
Question 5.
Why is it important to use different block categories together while creating a Scratch animation or game?
Answer:
It is important to use different block categories together because each category has a different role in making the animation or game work properly. Motion controls movement, looks changes appearance, Events start actions, and Control manages repetition. Combining them helps create complete, interactive, and well-structured animations or games in Scratch.
Activity 7: Create an animated birthday card for your friend
Purpose of the Activity
This activity applies the skills learned so far to create a personalised, meaningful project. It combines technical skills with creativity and emotional expression, showing students a practical and fun application of coding.
Pre-Activity Discussion
- Brainstorm ideas for a birthday card; what message do you want to send?
- Discuss how you can personalise a digital card (using a friend’s name, photo or favourite song).
- Review how to use Motion, Looks and Sound blocks to create an interesting ‘animation’ (e.g., the name wiggles, the photo appears with a fade-in effect).
- Talk about how to save and share digital creations appropriately
Make an animated birthday card for a friend, using his/her name and/or image.

Figure: You can do animation on Scratch too; the letters are animated in this window
Question 1.
Which block makes a sprite show a speech bubble on screen?
Answer:
The ‘Say’ block from the ‘Looks’ category makes a sprite show a speech bubble on screen. There are two versions
- ‘Say [Hello!] for [2] Seconds’ The speech bubble appears for the set time and then disappears automatically.
- ‘Say [Hello!]’ The speech bubble stays visible until another Looks block replaces it or the programme stops.
For a birthday card, you might use ‘Say [Happy Birthday!] for 3 seconds’ to show a greeting message in a speech bubble next to the friend’s sprite.
Question 2.
How would you animate individual letters of a name in Scratch?
Answer:
To animate individual letters of a name in Scratch
- Each letter is made into a separate sprite. For example, for the name ‘KOMAL’, you create five sprites; K, 0, M, A, L. Then, each letter Sprite is given its own script, for example
- Start each letter in a different position or off-screen.
- Use Motion blocks (like ‘Glide to x: y: ’) to make each letter move to its final position one by one.
- Use Looks blocks (like ‘Set size to ’ or ‘Change colour effect’) to make each letter grow, spin orchange colour.
- Use Control blocks (like ‘Wait seconds’) to delay each letter slightly so they appear one after another, creating an animated reveal effect.
Question 3.
How do you add a sound or song to a Scratch project?
Answer:
To add a sound or song to a Scratch project
- Go to the Sounds tab in the Scratch editor.
- Click ‘Choose a Sound’ to select from the Scratch library or upload your own audio file.
- Use Sound blocks from the Sound category, such as
- play sound [sound name] until done
- start sound [sound name]
- play drum [drum] for [beats]
- Combine these Sound blocks with Events or Control blocks to play the sound at the right
- time during your animation or game.
- This allows you to add music, effects or voiceovers to make the project more interactive and fun.
Question 4.
What is the use of the ‘Share’ button in Scratch?
Answer:
The ‘Share’ button in Scratch is used to publish your project on the Scratch website so that others
can see and play it. When you click ‘Share’, your project becomes publicly available on your Scratch profile page and anyone with the project link can view, play, or even remix (copy and modify) it.
Question 5.
Why is personalisation important when creating a digital birthday card?
Answer:
Personalisation is important when creating a digital birthday card because it makes the card more meaningful and special for the receiver. By adding their name, favourite colours, pictures, or music, the card feels unique and shows care and effort. It also helps express emotions better and makes the greeting more memorable and enjoyable.
Activity 8: Designing your game – Making a Storyboard
Purpose of the Activity
This activity introduces the concept of a ‘storyboard’ as a planning toot. It emphasises that good games and animations start with a clear, detailed plan before any coding begins, helping students organise their thoughts and ideas.
Pre-Activity Discussion
- Discuss why builders need a blueprint before constructing a house. Relate this to why game designers need a storyboard before coding.
- Define a storyboard as a visual plan that shows what will happen, scene by scene.
- Look at the example storyboard provided in the figure and identify its parts; scene number, background, characters, dialogue and actions.
- Brainstorm a simple game or animation idea as a class and practice planning a scene on the blackboard.
Create Your Own Storyboard
Name of Your Game / Animation: ____________________________________________________________


Present your game idea to your peers. Did you receive any suggestions? Yes / No. If yes, how did you use them?
____________________________________________________________
____________________________________________________________
____________________________________________________________
Question 1.
What is a storyboard? Why is it important to make one before coding?
Answer:
A storyboard is a visual plan or roadmap that shows what will happen scene by scene in a game or animation. It is like a series of sketches or boxes that describe each scene — who the characters are, what they say, what the background looks., like, what sounds play and what actions happen.
It is important to make before coding because
- It helps you organise all your ideas clearly before you start working on the computer.
- It saves time — if you plan everything first, you do not have to stop and think while coding.
Question 2.
What are the six elements that should be included in each scene of a story board?
Answer:
Each scene of a story board should include the
(i) Scene Number: To identify the order of scenes (Scene 1, Scene 2, etc.).
(ii) Background: The setting or backdrop for that scene (e.g., a classroom, a forest, outer space).
(iii) Characters: Who appear in the scene (e.g., Character 1: Sonu the dog, Character 2: Rakesh).
(iv) Sound and Music: What sounds or background music plays in that scene.
(v) Scene Description: What is happening in the scene (the narrative) and the dialogue spoken by the characters.
(vi) Actions and Animation: What movements or animations each character or object performs (e.g., Sonu jumps, the glass falls).
Question 3.
How does making a storyboard save time when you start coding your game?
Answer:
Making a storyboard saves time during coding in the following ways
- All Decisions are Already Made You know exactly which sprites to add, which backdrop to use, what each character will say and what will happen in each scene. You do not have to stop coding to think about these things.
- You Avoid Mistakes Since the plan is clear, you are less likely to code something wrong and have to redo it.
Question 4.
How is a storyboard similar to a blueprint used in construction?
Answer:
A storyboard is similar to a blueprint used in construction in the following ways
- Planning Tool: Both help organise ideas and plan the final product.
- Visual Representation: A blueprint shows the layout of a building, while a storyboard shows the sequence of scenes in a film, animation or presentation.
- Guides the Team: Builders follow a blueprint, and directors, animators, or designers follow a storyboard.
Question 5.
How does a storyboard help in organising characters, actions and scenes in a game or animation?
Answer:
A storyboard helps in organising characters, actions, and scenes by arranging them in a clear sequence before creating the game or animation.
It shows what happens in each scene, which characters are involved, and what actions they perform. This makes planning easier, avoids confusion, and helps create a smooth and well-structured final project.
Activity 9: Coding your game
Purpose of the Activity
This is the core making activity where students bring their storyboard to life. They will translate their plan into an actual Scratch project by creating characters, coding their behaviour, implementing game rules and adding sound.

Pre-Activity Discussion
- Review the different types of code blocks and what they do (Motion, Looks, Sound, Events, Control).
- Introduce new concepts like ‘loops’ (from Control blocks) to repeat actions and ‘conditional statements’ (if-then) for decision-making in games.
- Discuss game mechanics; how will the player score points? What happens when they lose? How will you use code to make this happen?
- Talk about designing a logo for the game to give it a unique identity.
Procedure (Steps to Follow) for Coding Your Game
With the help of your teachers or any other person, write the code for the designed game by
- Creating Characters and Scenes Set up sprites and backdrops as per your storyboard.
- Animating Characters Use Motion and Looks blocks to bring sprites to life.
- Using Dialogue and Text Use ‘Say’ and ‘Think’ blocks to add speech bubbles and text.
- Using Event Blocks Trigger different events — when the green flag is clicked, when a key is pressed, when the sprite is clicked.
- Using Sound Blocks Add background music and sound effects to make the game fun.
1. Write a script for the game you designed in Activity 5 using in-built blocks, such as Motion, Looks, Sound, Events, Control, Sensing, Operators, Variables, etc. and control structures that include loops and conditional statements.
____________________________________________________________
____________________________________________________________
____________________________________________________________
2. Prepare a logo with the name of your game and paste the photograph of the same in the space given below.

3. Were you able to do the following?
| Section | Task | Yes/No |
| a. Setting the stage | Choose or create a backdrop for the game’s stage by importing image. | |
| Design or import Sprite | ||
| Design or import object | ||
| b. Code your Sprite | Use a combination of ‘Motion’ and ‘Looks’ blocks to programme the movements of your Sprite. | |
| Experiment with different code blocks to control movement, interactions, animations and game logic. | ||
| c. Implement game mechanics | Define the rules of game using ‘Control’ blocks. | |
| Use conditional (if else statements), loops, variables and sensing blocks to create interactive gameplay elements. | ||
| Use ‘Event’ blocks to trigger actions in response to specifi events. | ||
| Enhance the gaming experience by adding background music using ‘Sound’ effects. |
4. Did you face any challenges while coding the game? Yes / No. If yes, how did you resolve it?
____________________________________________________________
Question 1.
What does the ‘Control’ block ‘if-else’ do in a game? Give an example of how it might be used.
Answer:
The ‘if-else’ block is a conditional statement in Scratch’s Control category. It checks a condition
- If the condition is true, the programme runs the set of blocks inside the ‘if’ section.
- If the condition is false, the programme runs the blocks inside the ‘else’ section instead.
For example, in a ball-catching game — ‘if the player’s Sprite is touching the ball sprite, ‘then’ increase the score by 1 (score = score +1) and play a happy sound. ‘Else’ (if the ball is not caught and falls off screen), decrease a life or show ‘Game Over’. This makes the game interactive and gives different outcomes depending on what the player does.
Question 2.
What is a ‘variable’ in Scratch? How would you use it to track a player’s score?
Answer:
A variable in Scratch is a named container that stores a value that can change during the programme. Think of it like a box with a label — you put a number inside and it changes as the game progresses.
To track a player’s score
- Go to the ‘Variables’ block category and click ‘Make a Variable’. Name it ‘Score’.
- At the start of the game, use ‘Set [Score] to 0’ to reset the score.
- Whenever the player achieves something (like collecting a star), use ‘Change [Score] by 1’ to add a point.
- The variable’s value is automatically shown on the stage, so the player can see their current score at all times.
Question 3.
What is the ‘Sensing’ block used for in a game? Give one example.
Answer:
The ‘Sensing’ block category in Scratch allows sprites to detect and respond to things happening in the game environment. It can sense
- Whether a sprite is touching another sprite or the edge of the screen.
- Whether the mouse is clicking on a sprite.
- Whether a specific key on the keyboard is being pressed.
- The distance between two sprites.
For example, in a maze game, the ‘Touching ‘wall’ sensing block checks if the player’s sprite touches the maze wall. If it does, the code can send the sprite back to the starting position as a penalty.
Question 4.
Why is it important to test your game as you code it, rather than only at the end?
Answer:
It is important to test the game while coding it (not just at the end) because
- Find Bugs Early: Small errors are easier to find and fix when you test one section at a time, rather than searching through a large amount of finished code.
- Ensures Each Part Works Properly: If one section has a problem, fixing it early prevents it from affecting other parts.
Question 5.
How do loops help in making a game more efficient and interactive?
Answer:
Loops help in making a game more efficient by repeating actions automatically without writing the same code again and again.
They make the game interactive by allowing continuous movements, animations, or actions like moving characters, updating scores, or checking conditions repeatedly, which keeps the game active and engaging.
Activity 10: Trying it out – Testing Your Game
Purpose of the Activity
This activity introduces the important concept of ‘testing’ or ‘debugging.’ Students learn that the first version of a game often has issues ‘bugs’ and that sharing it with others for feedback is a crucial step in making it better.
Pre-Activity Discussion
- Discuss what a ‘bug’ is in programming (an error or mistake in the code that prevents it from working correctly).
- Explain that finding and fixing bugs is a normal and important part of being a programmer.
- Talk about why getting someone else to play your game is helpful—they might find bugs you missed or have ideas for improvement.
- Explain the ‘Share’ button on Scratch, which publishes your project for others to see.
Test your game
- Publish your game by clicking the ‘Share’ button in Scratch.
- Request other group members and classmates to play the game.
- Are there any issues or‘bugs’that need to be removed for smooth working? YesD NoD
Question 1.
What is a ‘bug’ in programming? Give an example of a bug that might appear in a Scratch game.
Answer:
A ‘bug’ in programming is an error or problem in the code that causes the programme to behave in an unexpected or incorrect way.
For example, in a ball-catching game, the sprite is supposed to stop at the edge of the screen. But if the programmer forgets to add a ‘If touching edge, bounce’ or edge-sensing block, the Sprite disappears off the screen when moved to the edge — this is a bug.
Question 2.
What is ‘debugging’? Why is it an important skill for programmers?
Answer:
Debugging is the process of finding, identifying and fixing errors (bugs) in a programme so that it works correctly.
It is an important skill for programmers because
- All Programmers Make Mistakes: Even experienced professionals write code with bugs. Debugging is an essential part of the coding process.
- Develops Problem-Solving Skills: To find a bug, you must think carefully, test different parts and reason about what might be going wrong.
Question 3.
What changes did you make to your game after it was tested by your classmates?
Answer:
After classmates tested the game, the following changes were made
- Added Edge Detection: The player sprite kept disappearing off the screen, so we added an ‘If touching edge, bounce’ block to keep it within the stage area.
- Made the Game Slower at the Start: Classmates said the game was too fast and difficult, so we reduced the speed of the moving objects at the beginning.
- Added a ‘Game Over’ Message: When the player lost all lives, nothing happened before. We added a Sprite that shows ‘Game Over!’ and stops all scripts.
- Added Background Music: The game felt too quiet, so we added a looping background music block to make it more exciting.
Question 4.
Why is it useful to let others play your game before finalising it?
Answer:
It is useful to let others play your game before finalising it because they can find bugs or mistakes that you may not notice. They can also give suggestions to improve the game. This feedback helps make the game smoother, more interesting, and easier to play.
Question 5.
How does testing help in making a game smoother and enjoyable?
Answer:
Testing helps in making a game smoother and ^rjovable in the following ways
- It helps identify and fix bugs or errors that affect gameplay.
- It improves game performance, making actions run smoothly.
Activity 11: Sharing your game
Purpose of the Activity
This activity focuses on communication and presentation skills. We will learn to create clear instructions and documentation for their game, making it accessible and enjoyable for new users. It also encourages reflection on the learning process and collaboration with others.
Pre-Activity Discussion
- Discuss why a new game needs instructions. What happens if you start playing a game without knowing the rules? –
- Brainstorm what makes a good instruction manual; clear language, simple steps, images or diagrams.
- Talk about different ways to share instructions; a written document, an audio clip or a video.
- Reflect on the entire project; what did you learn from watching tutorials, from your peers and from your teacher? Now imagine that someone who has not worked on the game is going to play it. The game needs to be introduced and basic instructions should be provided. This can be done through an audio clip video clip or a written document.
The following questions will help in preparing these instructions.
1. What is the name of your game?
2. What are the different components of the game?
3. What are the rules of the game or instructions to play?
Question 1.
Why is it important to write clear instructions for a game?
Answer:
It is important to write clear instructions for a game because
- A new player who has never seen the game does not know what to do without instructions. Clear instructions help them start playing immediately.
- It prevents frustration; if a player does not understand the rules or controls, they will give up quickly.
Question 2.
What three things would a new player need to know before playing your game?
Answer:
The three things a new player would need to know before playing the game are <
(i) The Objective of the Game: What is the goal of the game?
(ii) How to Control the Sprite: Which keys to press or where to click.
(iii) The Rules and Sscoring: How do you earn points? What happens when you win or lose?
Question 3.
What format did you choose for sharing your game instructions — written, audio or video? Why?
Answer:
I chose a written document format for sharing the game instructions. The reason for choosing the written format is
- It is Easy to Read at any Time: A player can refer back to the written instructions while playing, which is not possible with audio or video.
- It Can be Shared Easily: The document can be attached to the Scratch project page in the notes section or shared as a PDF.
- It is Clear and Organised: Written instructions can be structured with numbered steps, making them easy to follow.
Question 4.
How do clear instructions make a game easier and more enjoyable to play?
Answer:
Clear instructions make a game easier and more enjoyable by helping players understand the rules, controls, and objectives quickly.
They reduce confusion and mistakes, allowing players to focus on playing and having fun. Good instructions also make the game more accessible, especially for new players.
Question 5.
What did you learn from sharing your game with others?
Answer:
I learned that sharing my game helps me get useful feedback and new ideas for improvement. Others can point out mistakes or suggest better features.
It also helped me understand how players think and made me more confident in presenting my work.