To prepare effectively, include Kaushal Bodh Book Class 6 Solutions Project 3 and Class 6 Kaushal Bodh Chapter 3 Maker Skills Question Answer in your daily study routine.
Class 6 Vocational Education Chapter 3 Question Answer
Kaushal Bodh Class 6 Chapter 3 Question Answer Maker Skills
What did I learn from others? [Page No. 78]
Question 1.
Name any three things you learnt from your friends while making toys or working models.
Answer:
Three things that I learnt from my friends while making toys or working models are
- To use simple machines like levers, propellers and wheel and axle to make working toys.
- To use waste materials properly and follow step-by-step instructions to build models.
- The importance of teamwork, sharing ideas and helping each other during activities.
Question 2.
Name any three things you learnt from the expert.
Answer:
Three things that I learnt from the expert are
- Identification of common bicycle problems such as flat tyres, rusting and loose parts.
- Correct use of tools for repairing and maintaining a bicycle.
- Importance of regular cleaning, oiling and checking of bicycle parts for smooth functioning.
Think and Answer [Page No. 79]
Question 1.
What did you enjoy doing?
Answer:
I enjoyed making the rubber band car and the propeller boat the most. Watching the rubber band car run across the floor after winding up the band was very exciting. It felt great to create a moving toy from ordinary waste materials.
Question 2.
What were the challenges you faced?
Answer:
The challenges I faced were
- Making holes exactly in the centre of bottle caps for the wheels was difficult.
- The rubber band would sometimes snap when wound too tightly.
- Getting the propeller blades to be equal in size and balance was tricky.
- Visiting the bicycle repair shop needed prior planning and coordination.
Question 3.
What would you like to do differently?
Answer:
The things I would like to do differently are
- I would test my materials before starting to build — some straws were too weak.
- I would measure all parts more carefully to make the toy more balanced.
- I would ask the mechanic more questions about how the gears in a bicycle work.
- I would document each step with photographs for better presentation at the exhibition.
Question 4.
Design a toy that you can use to help a peer understand a concept related to Mathematics or Science.
Question 5.
Can you estimate how many times the wheel rotates when covering 10 metres?
Answer:
To estimate how many times the wheel rotates when covering 10 metres, I can use this formula Number of rotations = Distance Circumference of the wheel.
First, I measure the circumference of the tyre or calculate it using Circumference = n × diameter.
For a standard tyre with a diameter of about 65 cm, the circumference is approximately 2.04 m.
Now, I divide the distance by the circumference 10 ÷ 2.04 = 4.9 rotations
So, the wheel will rotate about 5 times to cover 10 metres.
I can verify this by marking a point on the tyre and counting the rotations as it rolls.
Question 6.
Can using a bicycle make a difference to our health and environment?
Answer:
Yes, using a bicycle make a difference to our health and environment in the following ways
- Health Benefits: Cycling is a great exercise. It strengthens my muscles, improves heart health and increases stamina.
- Environmental Benefits: Bicycles do not use fuel and produce no air pollution. Riding a bicycle instead of a motor vehicle reduces carbon emissions and helps fight climate change.
- Traffic Benefits: Bicycles take up less space on the road, helping reduce traffic congestion.
- Economic Benefits: Bicycles are cheaper to buy, use and maintain compared to motor vehicles.

Question 7.
What jobs are related to this project?
Answer:
The jobs that are related to this project include
- Bicycle Mechanic
- Toy Maker/Designer
- Mechanical Engineer
- Civil Engineer (uses inclined planes and levers in construction)
- Aeronautical Engineer (uses propellers)
- Carpenter (uses wedges and levers), Industrial Designer
- Machine Operator
- Renewable Energy Engineer (designs windmills and turbines)
- Inventor/Innovator
Project 3 Maker Skills Class 6 Question Answer
Activity 1: Simple Machines in Our Surroundings
Purpose of the Activity
This activity helps students identify simple machines in their everyday environment. It develops the ability to recognise that complex objects are often made up of combinations of these basic machines and understand their practical applications in daily life.
Pre-Activity Discussion
- Discuss what a ‘machine’ is and differentiate between complex machines (like a car) and simple machines.
- Introduce the basic types of simple machines: lever, wheel and axle, pulley, inclined plane, screw and wedge.
- Look at common household tools (like a knife, scissor or a nutcracker) and guess which simple machine they might be.
- Talk about why understanding simple machines is important for making tasks easier.
Procedure (Steps to Follow)
- Identify the objects around you that help you do work, such as cutting, lifting or moving things.
- Observe each object and try to determine if it is a simple machine or if it is made up of one.
Observation
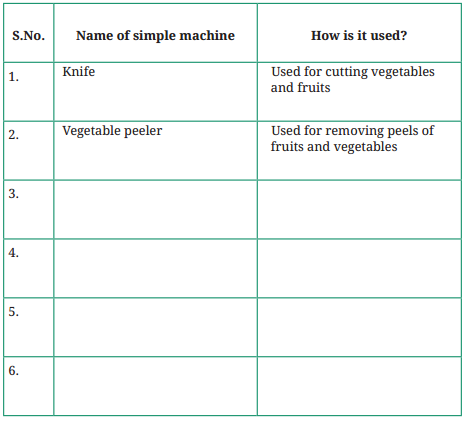
Take help from yourteacher, friends or family. Record all your observations in the given table below
Question 1.
Name any two simple machines you can find in your kitchen. What type are they?
Answer:
Two simple machines I can find in my kitchen are
- Knife: It is a wedge. The sharp, slanted edge splits objects (like vegetables) apart when force is applied on the flat top.
- Bottle opener: It is a lever. You apply force at one end, the pivot is in the middle and it lifts the bottle cap at the other end.
Question 2.
How does a knife act as a simple machine? What type is it?
Answer:
A knife acts as a wedge, which is a type of simple machine. When we press the knife downward, its slanted edges push the material sideways and apart, making it easier to cut.
The knife changes my downward force into a splitting force on both sides, reducing the effort needed to cut food or other materials.
Question 3.
Name one simple machine used in your school and explain how it is used.
Answer:
One simple machine used in my school is a door hinge. When we push the door at the handle end (far from the hinge), the hinge acts as the fulcrum and the door swings open or shut with less effort.
Question 4.
Which simple machine is used in a pair of scissors?
Answer:
The simple machine used in a pair of scissors is a lever. Scissors work using two levers joined at a fulcrum (pivot point), which helps in cutting materials easily by applying force at the handles to the blades.
Question 5.
Why are simple machines important in our daily life?
Answer:
Simple machines are important in our daily life because of the following reasons
- They make work easier by reducing the effort needed to perform tasks.
- They help us complete difficult jobs like lifting, cutting and moving objects more
Kaushal Bodh Class 6 Maker Skills Question Answer
Activity 2. Using Levers to Make Toys
Purpose of the Activity
This activity helps students understand the working principle of a lever by building working models. It develops practical maker skills, creativity and the ability to follow step-by-step instructions to create functional toys from waste materials.
Pre-Activity Discussion
- Discuss what a lever is and identify its three main parts; the fulcrum (hinge), the load and the effort.
- Demonstrate real-life examples of levers, such as a seesaw, a crowbar or a bottle opener.
- Talk about the difference between a single lever (like in a catapult) and multiple levers working together (like in a robotic arm).
- Discuss safety precautions when using tools like cutters and the importance of using waste materials responsibly.
The figures given below illustrate the step-by-step process of making a catapult and a robotic arm respectively, using waste materials.
Working Model of Catapult
Material Required Ice cream sticks, rubber bands and an ice c ream spoon.
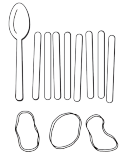
Materials : You will need ice cream sticks, rubber bands and an ice cream spoon.
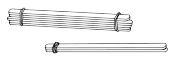
Step 1 : Stack about 5–6 ice cream sticks one on top of the other and hold them together with rubber bands — one on each end. Take two other ice cream sticks and hold them together at one end with a rubber band.
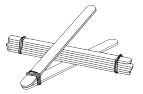
Step 2 : Place the two sets of ice cream sticks, as indicated in the fiure.
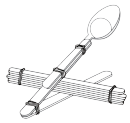
Step 3 : Using a rubber band, attach the ice cream spoon, as shown in the figure.
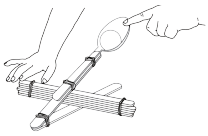
Your catapult is now ready.
Figure: Steps for making a catapult using ice cream sticks and spoon
Working Model of Robotic Arm
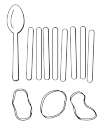
Materials: You will need ice cream sticks, glue, old bottle caps, toothpicks, and a cutter.
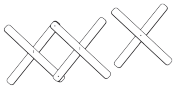
Step 1 : Pierce the ice cream sticks in the centre. Break a toothpick into small pieces and join the ice cream sticks by passing this piece through the holes. Remember to add glue where the sticks are joined.
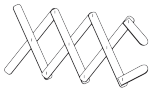
Step 2 : Join a few more ice cream sticks just like in Step 1. There needs to be a free movement of the ice cream sticks.
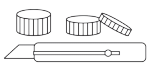
Step 3 : Cut out the centres of the bottle caps with the cutter so that you end up with two circular shapes.
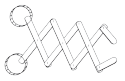
Step 4 : Glue the bottle caps to the ends of the fist set of ice cream sticks.
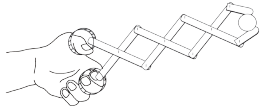
Your robotic arm is ready.
Figure : Steps for making a robotic arm using ice cream sticks, bottle caps and toothpicks
Draw a sketch of the toy, giving accurate measurements where different parts are connected. You can paste a photograph of the toy in the space given below

Write down instructions for someone who is using a robotic arm for the first time.
______________________________________________________
______________________________________________________
______________________________________________________
______________________________________________________
Question 1.
Where is the fulcrum (hinge) in your catapult? What acts as the lever?
Answer:
In the catapult, the fulcrum (hinge) is the point where the two sets of ice cream sticks cross and are tied together with a rubber band.
The stack of ice cream sticks that holds the spoon acts as the lever. When you push down on one end of the spoon, the fulcrum acts as the pivot point and the object on the spoon is launched upwards from the other end.
Question 2.
How does the catapult use a leverto throw objects?
Answer:
The catapult uses a lever to throw objects in the following ways
- The spoon end is the effort arm — you push it down.
- The crossed rubber band is the fulcrum — the fixed pivot point.
- When the spoon is pushed down and released, the lever action causes the other end to swing up forcefully.
Question 3.
How is a robotic arm different from a catapult?
Answer:
A robotic arm is different from catapult in the following ways
| Feature | Catapult | Robotic Arm |
| Number of Levers Used | Uses a single lever | Uses multiple levers |
| Structure | One bar pivoting around one fulcrum | Several sticks joined at different pivot points |
| Movement | Limited to one motion (throwing) | Flexible movement (lifting, extending, gripping) |
Question 4.
Give two real-life examples of levers that you see at home or school.
Answer:
Two real-life examples of levers I see at home or school are
(i) Seesaw in the playground: The fulcrum is in the centre and two people sit at either end. When one person pushes down, they go down while the other goes up.
(ii) Scissors: Scissors are two levers joined at a pivot point (the screw in the middle). When I apply force at the handles, the blades cut the material at the other end.
Question 5.
Why are rubber bands and glue used in making the catapult and robotic arm models?
Answer:
Rubber bands and glue are used in making the catapult and robotic arm models because rubber bands help in holding the parts together with flexibility, while glue is used to join the parts firmly and give strength and stability to the structure.
Activity 3: Using a Propeller to Make Toys
Purpose of the Activity
This activity introduces the concept of propellers and how they convert rotational motion into movement through air or water. It fosters an understanding of energy transfer and encourages experimentation with buoyancy and propulsion.
Pre-Activity Discussion
- Discuss what a propeller is and where it is commonly found (e.g., boats, aeroplanes, fans).
- Talk about how the shape and angle of the blades help push against water or air to create movement.
- Understand the role of elastic bands in storing and releasing energy to spin the propeller.
- Discuss the importance of making the boat waterproof and balanced so it floats properly.
- The figures below show the step-by-step process of making this boat using waste materials.
Working Model of Propeller Boat
Material Required
Ice cream sticks, glue, straw, bottle caps and rubber bands.
Steps for making a propeller boat.
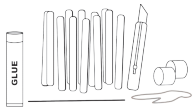
Materials : You will need ice cream sticks, glue, straw, bottle caps and rubber bands.
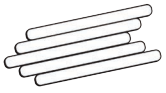
Step 1 : Paste ice cream sticks in the shape as indicated in the figure.
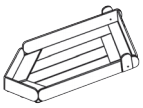
Step 2 : Paste additional ice cream sticks to make a boat shape. Make holes as indicated by the dots in the fiure.
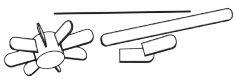
Step 3 : Make slits in the bottle caps, cut and paste ice cream sticks to the sides to make a propeller.
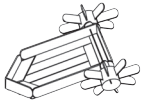
Step 4 : Pass a straw through the caps and the holes in the side of the boat as indicated in the fiure.
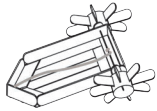
Step 5 : Tie a rubber band at the tip of the boat and to the middle of the straw.
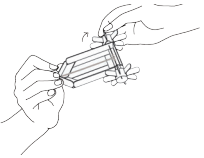
Step 6: Wind up the rubber band using the paddle wheels and place it in water.
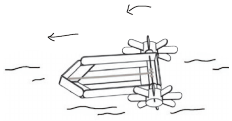
Your boat is ready.
Draw a sketch of the toy, giving accurate measurements where different parts are connected. You can paste a photograph of the toy in the space given below

Write down instructions for someone who is using a propeller boat for the first time.
______________________________________________________
______________________________________________________
______________________________________________________
Question 1.
What type of simple machine is a propeller? How does it help the boat move?
Answer:
A propeller is a type of wheel with blades. It works as a rotating wheel that pushes through water or air.
In a propeller boat, when the propeller spins, its blades push water backwards. The faster the propeller spins, the more water it pushes back and the faster the boat moves.
Question 2.
What is the role of the rubber band in the propeller boat?
Answer:
The role of the rubber band in the propeller boat is as follows
- It stores energy when it is wound tightly.
- It releases the stored energy when it unwinds.
- It spins the propeller by transferring energy to it.
- The spinning propeller pushes water backward, which moves the boat forward.
Question 3.
Why does the boat stop moving after some time? What would you do to make it move further?
Answer:
The boat stops moving after some time because the rubber band fully unwinds and runs out of stored energy. Once this happens, there is no force left to spin the propeller.
To make the boat move further, I can
- Wind the rubber band more tightly — more winds store more energy.
- Use a longer or thicker rubber band with greater elastic capacity.
- Make the propeller blades larger so each rotation pushes more water.
- Reduce the weight of the boat by using lighter material.
Question 4.
What materials are used to make the propeller boat in this activity?
Answer:
The materials used to make the propeller boat in this activity are ice-cream sticks, glue, straw, bottle caps and rubber bands.
Question 5.
Why is a straw used in the propeller boat model?
Answer:
The straw is used in the propeller boat model to support and guide the movement of the propeller. It helps the propeller rotate smoothly and keeps the structure stable so that the boat can move properly in water.
Activity 4: Using a Wheel and Axle to Make Toys
Purpose of the Activity
This activity helps us understand the mechanics of the wheel and axle, a key simple machine. It develops problem-solving skills as students build a moving vehicle and learn about friction, energy storage and balanced construction.
Pre-Activity Discussion
- Define the wheel and axle simple machine and explain how they work together (e.g., a doorknob or car wheels).
- Discuss why wheels are important for moving toads and reducing friction.
- Talk about different sources of energy to make the car move, such as elastic bands (potential energy) or air from a balloon (thrust).
- Understand the importance of making sure wheels are aligned and spin freely for the car to move straight.
- Make toys like a rubber band car and an air balloon car using two sets of wheels and axles.
The figures below show the step-by-step process for making a rubber band car. Follow these steps to build your own.
Rubber Band Car
Material Required
Clothes clips, straws, chopsticks/toothpicks, bottle caps, cellophane tape, scissor, rubber bands and glue.
Steps for making a rubber band car
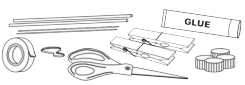
Materials : You will need clothes clips, straws, chopsticks/toothpick, bottle caps, cellophane tape, scissors, rubber bands and glue.
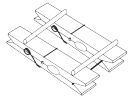
Step 1 : First cut a straw of length so that you can join the two clothes clips slightly far apart.
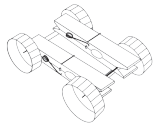
Step 2 : Make holes in the exact centres of four bottle caps and attach them to a toothpick/piece of wooden skewer to act as wheels for the clothes clips. Attach one cap, pass it through the straw at each end and then attach the other cap. Remember to use glue to hold the bottle cap and toothpick/ part of wooden skewer together.
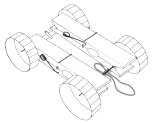
Step 3 : Attach a small part of a toothpick/chopsticks between one set of wheels. You will have to glue it to the straw. This is the front of the car. On the other end, loop a rubber band over the straw. This is the back of the car.
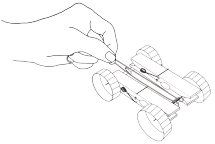
Step 4 : Pass the other end of the rubber band over the small piece between the wheels at the back of the car.
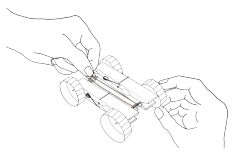
Step 5 : Wind up the rubber band at the back of the car and release it on stable ground. Your car is ready to race.
Air Balloon Car
Material Required
Flexible straws, an old plastic bottle, old bottle caps, cellophane tape, a rubber band, chopsticks, balloon and glue.
Steps for Making Air Balloon Car
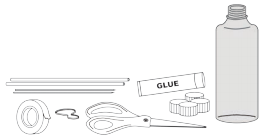
Materials : You will need flxible straws, an old plastic bottle, old bottle caps, cellophane tape, a rubber band, chopsticks, balloon and glue.
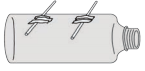
Step 1 : Tape the chopsticks onto the bottle as shown in the fiure.
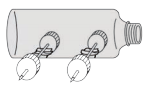
Step 2 : Make holes in the bottle caps and attach them to the chopsticks as indicated in the figure. Remember to use glue to ensure they stay attached.

Step 3 : Fix the balloon to one end of the straw with a rubber band.
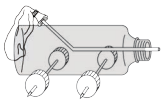
Step 4 : Make a hole in the bottle and insert the straw as indicated in the figure.
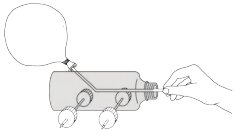
Working model 1 : Blow the balloon from the open end of the straw and then press your figure to the straw. Place it on an even surface.
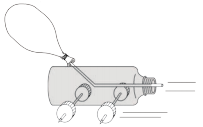
Working model 2 : Release your figure. Your balloon car is ready to move.
Paste a photograph of the toy that you created in the space given below.

Write down instructions for someone who is using air balloon car for the fist time
______________________________________________________
______________________________________________________
______________________________________________________
Question 1.
What acts as the wheel and axle in the rubber band car?
Answer:
In the rubber band car, the bottle caps act as the wheels and the toothpick/wooden skewer passing through the holes in their centres acts as the axle. The straw through which the axle passes acts as the support frame. When the rubber band unwinds, it turns the axle (toothpick), which rotates the wheels (bottle caps) together, making the car move forward.
Question 2.
What is the source of energy that makes the air balloon car move?
Answer:
The source of energy that makes the air balloon car move is the compressed air inside the inflated balloon. When I blow up the balloon, air is compressed inside it. When I remove my finger from the straw, the compressed air rushes out through the straw in one direction, creating a thrust in the opposite direction, which pushes the car forward.
Question 3.
What changes could you make to the rubber band car to make it go faster or further?
Answer:
To make my rubber band car go faster or further, I can make the following changes
- Wind the rubber band more tightly to store more energy before releasing.
- Use a thicker or longer rubber band that can store more elastic energy.
- Make the wheels larger (e.g., bigger bottle caps) so each rotation covers more distance.
- Reduce friction by running the car on a smooth, flat surface.
- Reduce the car’s weight so the same energy can move it further.
Question 4.
Name two everyday objects that use a wheel and axle.
Answer:
Two everyday objects that use a wheel and axle are
- Bicycle: The wheels are connected to the axle, and pedaling turns the axle, which rotates the wheels to move the bicycle.
- Doorknob: The knob (large wheel) is attached to a thin spindle (axle). Turning the knob with little effort rotates the spindle to unlatch the door.
Question 5.
Why is it important to keep the wheels properly aligned in the wheel and axle models?
Answer:
It is important to keep the wheels properly aligned in the wheel and axle models because proper alignment allows the wheels to spin freely and smoothly. This helps the vehicle move in a straight line and reduces friction, improving its speed and performance.
Activity 5: Using More Than One Simple Machine to Make Toys
Purpose of the Activity
This activity demonstrates how multiple simple machines can be combined to create a more complex and functional machine. It helps students understand systems thinking, where different parts work together to achieve a single goal, like capturing wind energy.
Pre-Activity Discussion
- Review the simple machines learned so far lever, propeller, wheel and axle.
- Discuss how a real windmill works to grind grain or pump water, not just spin.
- Identify which parts of the model windmill correspond to which simple machines (e.g., the fan is a propeller, the rotating straw is an axle).
- Talk about energy conversion the wind’s energy is converted into rotational energy by the machine.
The figures given below show the steps for making a windmill using various materials.
Windmill
Material Required
Pieces of cardboard, chart paper, straws, glue and a cutter.
Steps for Making Windmill
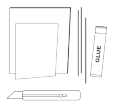
Materials : You will need pieces of cardboard, chart paper, straws, glue and a cutter.
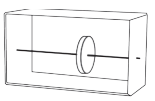
Step 1 : Make a cardboard box as shown in the figure. Make holes in the centre of the sides and pass the straw through the holes with a circular piece of cardboard passing through it.
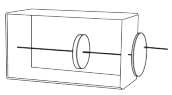
Step 2 : Attach another circular piece of cardboard of the same size to the other end of the straw. Stick a small piece of straw to the cardboard circle outside the box.
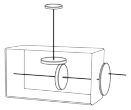
Step 3 : Repeat step 2 for another side as indicated in the figure except that now you must place the circular pieces of cardboard at the ends of the straw.
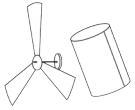
Step 4 : Make a cylinder with chart paper as shown. Make a fan with a short piece of straw, circular pieces of cardboard and blades cut out of chart paper.
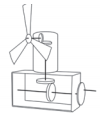
Step 5 : Assemble the pieces as shown in the figure.
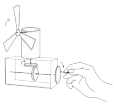
You now have a working windmill.
Draw a sketch of the windmill, with accurate measurements of different parts. You can paste a photograph of the toy in the space given below.

Write down instructions for someone who is using the working model of a windmill for the first time.
______________________________________________________
______________________________________________________
______________________________________________________
Question 1.
Which two simple machines are used in the windmill you made?
Answer:
Two simple machines use in the windmill I made are
- Propeller: The fan blades act as a propeller (a type of wheel with blades). When the wind blows, the blades spin and capture the wind’s energy.
- Wheel and Axle: The circular cardboard discs act as wheels and the straw passing through them acts as the axle. The spinning of the fan is transmitted through the axle to perform useful work.
Question 2.
What is the source of energy that makes a real windmill work?
Answer:
The source of energy that makes a real windmill work is wind energy. Moving air has kinetic energy, and when the wind blows against the windmill blades, it pushes them, causing the propeller to spin. This spinning motion is then used to do useful work — in traditional windmills, it ground grain, while in modern wind turbines, it generates electricity through a generator.
Question 3.
How is a windmill different from the other toys you made in this project?
Answer:
The windmill is different from the other toys in two ways
- It uses more than one simple machine — a propeller and a wheel and axle working together, while other toys like the catapult used; only one (a lever) and the rubber band car used mainly wheel and axle.
- It does not use stored energy (like a rubber band).
Question 4.
Can you think of another toy or machine that uses more than one simple machine?
Answer:
Yes, I can think of toys or machines that use more than one simple machine.
Example 1: Bicycle
- Wheel and Axle the wheels and the axle that connect them.
- Lever the brakes and handlebars act a:; levers.
- Pulley the chain and sprocket work like a pulley system, transferring force from the pedals to the rear wheel.
Example 2: Scissors
- Lever the two blades act as levers.
- Wedge the sharp cutting edges act as wedges to cut materials.
Question 5.
Why is a propeller used in the windmill model and how does it help in its working?
Answer:
A propeller is used in the windmill model to catch the wind and convert its energy into rotational motion.
It helps the windmill work by spinning; the axle, which allows the connected parts to move and show how wind energy is converted into useful movement.
Activity 6. Simple Machines in a Bicycle
Purpose of the Activity
This activity helps analyse a complex, everyday machine (a bicycle) and identify the simple machines that make it work. It also introduces basic maintenance skills, fostering a sense of responsibility and care for the objects they use.
Pre-Activity Discussion
- Look at a diagram of a bicycle and list all the parts students already know.
- Discuss what simple machines might be found in a bicycle (e.g., wheels/axles in the hubs, levers in the brakes, a pulley system in the chain and gears).
- Talk about why moving parts need maintenance, like cleaning and oiling.
- Discuss common problems like rust, flat tyres and loose parts and why they happen.
- A bicycle consists of different types of simple machines. To keep it running smoothly, you need to regularly inspect and maintain its parts.
- If necessary, you can also seek help from experts at a bicycle repair shop.
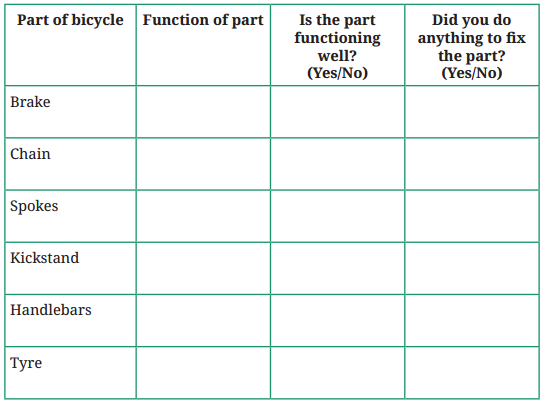
Use this information, along with guidance from your peers and teacher, to fill in the table given below
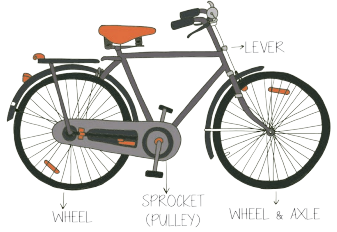
Bicycle Maintenance Checklist
| Part | Function |
| Brake Pads | They are placed around wheels and they grab them to resist their motion. |
| Brakes | They slow down or stop the bicycle. The different types of brakes are rim brakes, disc brakes and drum brakes. |
| Chain | It transfers power to the rear wheel. |
| Chain rings, sprocket | They guide the chain and transmit power from pedal to chain. |
| Frame | This is the main structure that supports the rider and connects all the parts. |
| Handlebars | They provide a place to hold and steer the bicycle. |
| Hubs | These are the central part of the wheel. They allow the wheel to spin around the axle. |
| Kickstand | It enables the bicycle to stand upright. |
| Cycle light | t improves visibility and safety. |
| Pedals | These are the point of contact for the rider’s feet to apply force. |
| Rims | They support the tyres, and provide braking surface (rim brakes). |
| Saddle | This is where the rider sits. |
| Seatpost | This connects the saddle to the frame, usually of adjustable height. |
| Spokes | They connect the rim to the hub and provide strength and stability. |
| Tyres | They provide traction and cushioning. |
Question 1.
Name three simple machines found in a bicycle.
Answer:
Three simple machines found in a bicycle are given below
- Wheel and Axle the wheels are attached to the axle and spin around it, allowing the bicycle to move with less friction.
- Lever the brakes are levers. Squeezing the brake lever applies force to the brake pads, which grip the wheel and slow it down. The handlebars and pedals also work ;as levers.
- Pulley the sprocket (chain ring) and rear sprocket connected by the chain work as a pulley system, transferring the effort from the pedals to the rear wheel.
Question 2.
What is the function of the chain in a bicycle? Which simple machine does it resemble?
Answer:
The function of the chain in a bicycle is to transfer power from the pedals to the rear wheel. When the rider pedals, the front sprocket rotates and moves the chain, which then turns the rear sprocket, causing the rear wheel to rotate and the bicycle to move forward.
The chain system resembles a pulley-like system, as it uses a flexible chain to transmit motion and force between rotating parts, similar to how a rope works in a pulley.
Question 3.
Whale should you do if the wheels of a bicycle are not moving freely?
Answer:
If the bicycle wheels are not moving freely, we should do the following things
- Apply lubricating oil to the hub (the central part of the wheel where it connects to the axle).
- Check if the axle nuts are too tight — if so, use a spanner to loosen them slightly.
- Check if the wheel is bent or if the spokes are unequal in tension — a bent wheel needs to be straightened.
- Check if the brake pads are rubbing against the rim-adjust them using the brake cable adjuster.
Question 4.
What: is the difference between rim brakes and disc brakes?
Answer:
The (difference between rim brakes and disc brakes is as follows
Question 5.
Why is regular maintenance important for a bicyc le?
Answer:
Regular maintenance is important for a bicycle because it keeps all its parts working smoothly and safely. It helps prevent problems like rust, flat tyres and loose parts, and also increases the life and performance of the bicycle.
Activity 7: Visit to a Bicycle Repair Shop
Purpose of the Activity
This activity provides direct, practical knowledge from a community expert. It bridges classroom learning with real-world skills, teaches respect for skilled trades and helps students learn how to diagnose and solve common mechanical problems.
Pre-Activity Discussion
- Discuss why it is valuable to learn from an expert like a mechanic.
- Brainstorm questions to ask based on the problems discussed in Activity 6 (e.g., “How do you fix a flat tyre?”).
- Talk about the tools a mechanic uses and how they are also machines.
- Discuss safety and proper behaviour when visiting a workplace or hosting a guest in school.
Procedure (Steps to Follow)
- Plan a visit to a local bicycle repair shop with your teacher and classmates. Alternatively, request your teacher to invite a bicycle mechanic to the school.
- Prepare a list of questions to ask the mechanic. You can use the questions given in the activity or add your own.
- During the visit or interaction, observe the mechanic carefully as they explain the various parts of a bicycle and how to maintain them.
- Ask your prepared questions and note down the important points and tips shared by the expert.
- If possible, watch a live demonstration of a simple repair, such as fixing a puncture or tightening a chain.
Questions to Ask the Mechanic
1. Is there anything that should be regularly checked before riding a bicycle?
2. Can the saddle height be adjusted? How is this done?
3. What is the best way to clean a bicycle?
4. How do you know when the tyres need to be inflated?
5. How is a punctured tyre repaired?
6. How often should a bicycle chain be oiled?
7. How can squeaking brakes of a bicycle be fixed?
8. How are the wheels of a bicycle aligned?
Question 1.
What was the most important thing you learnt from the bicycle mechanic?
Answer:
The most important thing I learnt from the bicycle mechanic was that regular maintenance prevents major breakdowns.
He showed us that simple tasks like oiling the chain, checking tyre pressure and tightening loose bolts — done regularly — keep the bicycle in perfect working condition for years.
He also explained that a well-maintained bicycle is safer to ride, as loose brakes or flat tyres can cause accidents.
Question 2.
What tools did the mechanic say are essential for maintaining a bicycle?
Answer:
The mechanic said the following tools are essential for maintaining a bicycle
- Spanner set: For tightening and loosening bolts and nuts on wheels, handlebars and saddle.
- Wrenches: For adjusting brake cables and various bolts.
- Chain brush and old toothbrush: For cleaning the chain and sprockets.
- Tyre levers: For removing the tyre from the rim when repairing a puncture.
- Air pump: For inflating tyres to the correct pressure.
- Lubricating oil: For oiling the chain, pivot points and brake cables.
- Spoke wrench: For adjusting spoke tension when truing (aligning) wheels.
Question 3.
Write the steps to repair a punctured tyre as told by the mechanic.
Answer:
Steps to repair a punctured tyre as told by the mechanic are as follows
- Remove the wheel from the bicycle using a spanner.
- Use tyre levers to remove the tyre from the rim carefully.
- Pull out the inner tube.
- Inflate the tube slightly and dip it in water — bubbles will show where the puncture is.
- Mark the hole, dry the area and roughen it with sandpaper.
- Apply rubber solution (patch glue) and wait until it becomes sticky (1-2 minutes).
- Press a rubber patch firmly over the hole.
- Let it set for a few minutes, then reinsert the tube into the tyre, fit the tyre back on the rim, inflate to the correct pressure and remount the wheel.
Question 4.
Why is it important to take help from a bicycle mechanic for repairs?
Answer:
It is important to take help from a bicycle mechanic for repairs because , a mechanic has the proper knowledge, skills and tools to fix problems correctly. This ensures that the bicycle works safely and efficiently and prevents further damage.
Question 5.
What safety precautions should be followed while visiting a bicycle repair shop?
Answer:
The following safety precautions should be followed while visiting a bicycle repair shop
- Maintain proper behaviour and do not touch tools or machines without permission.
- Stay at a safe distance from working areas and follow the instructions given by the mechanic or teacher.
Activity 8: Organise an Exhibition of Toys
Purpose of the Activity
This activity helps share work with a wider audience, building confidence and communication skills. It develops project management, teamwork and presentation abilities as they plan and execute a public showcase of their creations.
Pre-Activity Discussion
- Discuss the purpose of an exhibition; to show work, teach others and celebrate learning.
- Brainstorm possible themes for the exhibition (e.g., “Toys from Waste,” “Machines in Motion”).
- Talk about howto present a toy effectively; labels, demonstrations and explaining the science behind it.
- Discuss the different roles needed to organise an event (e.g., greeters, demonstrators, set-up crew) and the importance of teamwork.
- Organising a school toy exhibition allows students to showcase creativity. It teaches how to make toys and share their work with others. Take guidance from your teacher to plan and manage the event effectively.
Steps for Planning the Exhibition are v
- Define the purpose: Decide whether the exhibition is meant to showcase creativity, teach how to make toys from waste materials or raise awareness about toys. For example, you can demonstrate toy-making skills during the event.
- Choose a theme: Select a theme such as eco-friendly toys, historical toys or futuristic toys.
- Align the toys with the theme: Ensure that all toys on display match the chosen theme.
- Select the exhibition space: Decide where in the school the exhibition will be held.
- Plan the layout: Arrange the toys so each has enough space and visitors can move comfortably. Decorate the area to match the theme and create an engaging environment.
- Send invitations: Invite parents, local artists and community members to attend.
- Display toys attractively: Label each toy with the creator’s name and a brief description. Ensure all toys are safe to handle and that the venue is child-friendly.
- Arrange supervision: Have volunteers assist visitors and manage any issues during the exhibition.
- Collect feedback: Ask visitors, students and teachers for feedback to learn what worked well and what could be improved.
- Document the event: Take photos and videos to record the exhibition and share highlights through the school’s newsletter or website.
Question 1.
What theme did your class choose for the exhibition? Why?
Answer:
Our class chose the theme ‘Toys from Trash’ for the exhibition. We chose this theme because all the toys we made such as the catapult, robotic arm, propeller boat, rubber band car, air balloon car and windmill were built entirely from waste materials like ice cream sticks, plastic bottles, straws and bottle caps.
The theme helped us send a message about recycling and upcycling waste, showing that discarded materials can be turned into creative, working toys.
Question 2.
Which toy at the exhibition got the most attention from visitors? Why do you think it was popular?
Answer:
The air balloon car got the most attention from visitors. I think it was popular because
- It was easy to understand visitors could immediately see how blowing the balloon made the car zoom forward.
- It was interactive visitors could blow the balloon themselves and release the car.
- The movement was surprising and fast, which excited younger visitors.
Question 3.
What feedback did you receive about your toy? What would you improve next time?
Answer:
The feedback I received was that my rubber band car was creative and well-made, but the wheels wobbled slightly and the car did not always go straight.
I would improve the following things next time
- Make the holes in the bottle caps exactly in the centre to reduce wobbling.
- Make sure both axles (front and back) are perfectly parallel so the car goes straight.
- Use slightly wider bottle caps as wheels for better stability.
- Add a label with a clearer description explaining which simple machine the car uses and how it works.
Question 4.
Why is it important to arrange toys properly in an exhibition?
Answer:
it is important to arrange toys properly in an exhibition because it helps visitors see each toy clearly and move around easily. A well-organised display makes the exhibition attractive, improves understanding and ensures safety for everyone.
Question 5.
How does teamwork help in organising a successful exhibition?
Answer:
Teamwork helps in organising a successful exhibition because different tasks such as planning, arranging, guiding visitors and managing activities are shared among members. This makes the work easier, ensures better coordination and helps the event run smoothly and efficiently.