To prepare effectively, include Kaushal Bodh Book Class 6 Solutions Project 1 and Class 6 Kaushal Bodh Chapter 1 School Kitchen Garden Question Answer in your daily study routine.
Class 6 Vocational Education Chapter 1 Question Answer
Kaushal Bodh Class 6 Chapter 1 Question Answer School Kitchen Garden
What did I learn from others? [Page No. 32]
Question 1.
Write three most important things that you learned from others (they could be about making a kitchen garden, looking after plants or simply working with others).
Answer:
The three most important things that I learned from others are as follows
- I learned how to prepare a kitchen garden by selecting a proper location, preparing soil, and planting seeds or seedlings correctly.
- I learned how to take care of plants by watering properly, using manure, protecting them from pests, and removing weeds regularly.
- I learned the importance of teamwork, patience, and regular observation while working in a kitchen garden to get healthy and better yield.
Think and Answer [Page No. 33]
Question 1.
What did you enjoy doing?
Answer:
I enjoyed the watering and harvesting activities the most. It gave me satisfaction to see small seeds grow into healthy plants over time. It was very rewarding to know that the vegetables I grew were used in our school meals.
Question 2.
What were the challenges that you faced during the activities?
Answer:
Some of the challenges I faced were
- Making vermicompost took patience — we had to wait several weeks.
- In the beginning, we did not know the correct depth for sowing different seeds.
- Some plants started wilting due to over-watering before we learnt to check soil moisture.
- Weeds grew quickly and needed regular removal.
- Setting up the fence required teamwork and measuring skills.
Question 3.
What will you do differently next time?
Answer:
Next time, I will
- Research suitable plants and learn about their correct sowing depths before starting.
- Start making vermicompost much earlier so it is ready when needed.
- Keep a proper garden diary from Day 1.
- Plan spacing more carefully to avoid crowding.
- Involve more classmates so we can rotate watering duties.
Question 4.
What were the conditions that helped your plants grow? If your plants did not grow well, what should you do next time?
Answer:
The conditions that helped my plants to grow were
- Regular watering
- Good sunlight (at least 6 hours)
- Organic manure in the soil
- Protection from pests using neem spray.
If plants did not grow well, possible reasons are
- Lack of sunlight
- Waterlogged soil
- Too much or too little manure
- Pest attack
- Sowing seeds too deeply.
Next time, I will ensure better drainage and monitor plants more closely.
Question 5.
What jobs are related to the project? Look around, speak to people and write your answer. A few examples of jobs related to the activities that you did are farmer, gardener, agricultural scientist, and mechanic for agricultural equipment, such as tractors and harvesters.
Answer:
Jobs related to this project are as follows
- Farmer: A farmer grows crops and vegetables and takes care of plants for food production.
- Gardener or Horticulturist: A gardener grows and maintains plants in gardens, parks, and home or school gardens.
- Agricultural Scientist: An agricultural scientist studies better methods of farming and improves crop growth.
- Soil Scientist: A soil scientist studies soil and helps improve its quality for better plant growth.
- Nursery Worker: A nursery worker grows and cares for young plants before planting them in gardens or fields.
Project 1 School Kitchen Garden Class 6 Question Answer
Activity 1: Visit to an Agricultural Farm / Nursery / Garden
Purpose of the Activity
This activity helps students understand how plants are grown in real-life conditions. By observing farmers and gardeners at work, students learn about soil preparation, planting techniques, nutrition and plant protection methods.
Pre-Visit Preparation (In Class)
- Discuss different types of crops grown in your region.
- Revise basic concepts
- Revise basic concepts
- Types of plants (herbs, shrubs, trees, climbers)
- Seasons (summer, winter, rainy crops)
- Organic vs. inorganic fertilisers
- Prepare a small notebook to record observations.
- Frame 2—3 questions you want to ask the farmer or gardener.
During the Visit — Observation Tasks
- While visiting, carefully observe and note
- Types of plants grown
- Arrangement of plant beds
- Soil preparation method
- Use of tools and equipment
- Irrigation method (drip, sprinkler, hose, etc.)
- Use of manure or fertilisers
- Pest control methods
- Protective measures (fencing, shade nets, etc.)
| Field Observation Record | ||
| Observation Point | What I Saw | Why I Think It is Done |
| Type of plants | ||
| Soil preparation | ||
| Nutrition method | ||
| Protection method | ||
Question 1.
Which plants are being grown?
Answer:
Common plants grown include vegetables like tomatoes, brinjal, chilli, cabbage, spinach, coriander, and mint. Some farms also grow crops like wheat, rice, or pulses.
Question 2.
Were all the plants planted at the same time? If not, why?
Answer:
No, not all plants were planted at the same time. Different plants have different growing seasons. For example, some vegetables grow better in winter (spinach, peas) and some in summer (cucumber, brinjal). Planting is done in stages, so there is a continuous supply of fresh produce.
Question 3.
Can all the plants be grown in a kitchen garden?
Answer:
No, not all plants can be grown in a kitchen garden. Small plants like herbs (coriander, mint), leafy vegetables (spinach), and small vegetables (tomato, chilli) are ideal. Large plants like mango or banana trees need too much space.

Question 4.
How is the soil prepared for sowing or planting?
Answer:
The soil is first cleared of rocks, weeds, and debris. It is then dug up and loosened using a spade or hand cultivator. Organic manure or compost is mixed into the soil before sowing or planting seedlings.
Question 5.
How are the plants provided nutrition in addition to what they get from the soil?
Answer:
Plants are given extra nutrition through organic fertilisers like compost, vermicompost, and farm animal manure. Sometimes chemical fertilisers like urea are also used. Manure is mixed into the soil before planting and sometimes applied around growing plants.
Question 6.
How can plants be protected from harm from animals and pests?
Answer:
Plants are protected by making fences around the garden using bamboo, old pipes, or wooden sticks. Organic pesticides like neem-based spray are used against insects and pests. Companion planting (growing pest-repelling plants nearby) and regular weeding also help.
Question 7.
What were the two most interesting things you learnt during your visit?
Answer:
The two most interesting things I learnt during your visit were
(i) Plants need not just soil but also proper sunlight, water, and nutrients in the right balance to grow well.
(ii) Farmers have deep knowledge about seasons, pests, and soil — it is both a science and an art!
Kaushal Bodh Class 6 School Kitchen Garden Question Answer
Activity 2: Planning Your School Kitchen Garden
Purpose of the Activity
This activity helps students plan a kitchen garden scientifically. Students learn how to select a suitable location, measure land area, consider environmental factors, and prepare a basic layout plan before planting. Planning is an important life skill as farmers and gardeners always plan before sowing seeds.
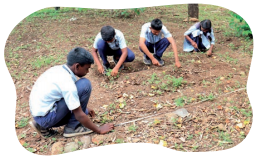
Pre-Planning Discussion (In Class)
- Discuss where a garden can be made in the school.
- Identify sunny and shaded areas on the campus.
- Revise how to calculate area in square metres.
- Discuss which vegetables grow in the current season.
Observation and Planning Tasks
- Inspect available space in school
- Decide between land beds, pots or both
- Measure the selected area
- Draw a rough sketch of the garden
- Select plants according to season
Question 1.
Are you planning to make your school kitchen garden in land or in pots, or both?
Answer:
We are planning to use both plant beds and pots. Plant beds will be made in the available open land on the school campus, and pots will be placed on the terrace or near the classroom windows for plants that need more direct sunlight.
Question 2.
How are you going to calculate the area of your kitchen garden?
Answer:
We will measure the length and width of the garden plot using a measuring tape.
Area = Length × Width.
For example, if the plot is 4 metres long and 3 metres wide, the area = 4 × 3 = 12 square metres.
Question 3.
What factors did you consider when selecting a location for the garden?
Answer:
The factors we considered when selecting a location for garden are
(i) Sunlight: The area should receive at least 6 hours of sunlight.
(ii) Drainage: The area should not get waterlogged after rain.
(iii) Spacing: Enough space between plants for easy watering and care.
(iv) Accessibility: We should be able to reach all plants easily.
Question 4.
Why is it important to select plants according to the season?
Answer:
It is important to select plants according to the season because of following reasons
- Plants grow better in suitable weather conditions, which helps in healthy growth and good yield.
- Seasonal plants need less care and are less affected by pests and diseases, making gardening easier and more successful.
Question 5.
What is the benefit of drawing a rough layout of the kitchen garden before planting?
Answer:
The benefit of drawing a rough layout of the kitchen garden before planting is that it helps in proper planning and organisation. It ensures correct spacing, better use of sunlight and water, and makes it easier to take care of plants and manage the garden efficiently.
Activity 3: Making Vermicompost
Purpose of the Activity
This activity helps students understand how organic waste can be converted into nutrient-rich compost using earthworms. It promotes sustainable waste management and teaches students the importance of recycling biodegradable materials. Vermicomposting reduces waste and improves soil fertility naturally.
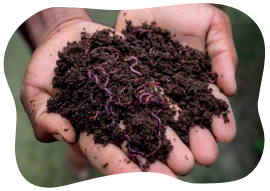
(a) Earthworms for preparing vermicompost
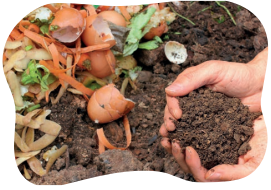
(b) Vermicompost prepared using scraps of leftover food
Pre-Activity Discussion
- Discuss what biodegradable waste is.
- Differentiate between compost and vermicompost.
- Learn about the red earthworm Eisenia fetida.
- Understand why meat and oily food should not be added.
Materials Required
- Plastic/Wooden bin
- Tarpaulin or thick cloth
- Organic kitchen waste
- Dried leaves
- Water
- Red earthworms (Eisenia fetida)
Procedure (Steps to Follow)
- Prepare a bin made of plastic, wood, or any water-resistant material. Cover it with tarpaulin or thick cloth. Make small holes at the bottom to drain extra water.
- Fill the bin with biodegradable/organic waste such as kitchen scraps, fallen leaves and garden waste. This is called ‘bedding material’.
- Moisten the bedding material by adding water carefully.
- Add red earthworms (Eisenia fetida) on top. They will burrow into the material. Get earthworms from a farm or nursery.
- Feed the worms with fruit/vegetable peels, eggshells, and coffee grounds. Avoid meat, dairy, oily food and citrus — these attract pests or harm the worms.
- Keep the bin moist (not waterlogged) and covered to retain moisture and prevent pests.
Question 1.
Which materials did you use to make the vermicompost?
Answer:
We used a plastic bin with a lid, tarpaulin cloth, organic kitchen waste (vegetable peels, fruit scraps, eggshells, dried leaves), water to moisten the bedding and red earthworms (Eisenia fetida) obtained from a nursery.
Question 2.
What types of food scraps did you add to the bin?
Answer:
We added vegetable peels (potato, carrot, cucumber), fruit peels (banana, apple), eggshells, coffee grounds and dry fallen leaves. We avoided adding meat, dairy, oily food and citrus fruits as these attract pests or harm the worms.
Question 3.
What changes did you notice in the compost bin over a period?
Answer:
The changes I noticed in the compost bin over a period can be described as follows
- Week 1 Fresh food scraps were visible and had a mild smell.
- Week 2-3 Earthworms became active; the material started breaking down and became darker.
- After 6-8 weeks The compost turned dark brown/black, had a crumbly texture and smelled like fresh Earth — indicating it was ready to use.
Question 4.
Why is it important to keep the compost bin moist but not waterlogged?
Answer:
It is important to keep the compost bin moist but not waterlogged because earthworms need moisture to survive and break down waste, but too much water reduces air inside the bin and can harm or kill the worms.
Question 5.
Why should meat, dairy, oily food and citrus fruits be avoided in a vermicompost bin?
Answer:
Meat, dairy, oily food and citrus fruits should be avoided in a vermicompost bin because they can produce bad smell, attract pests and harmful insects, and may harm or kill the earthworms, reducing the quality of compost.
Activity 4: Preparing the Kitchen Garden for Planting
Purpose of the Activity
This activity helps students understand the importance of proper soil preparation before planting. Healthy soil ensures better root growth, sufficient nutrition and stronger plants. Good soil preparation is the foundation of a successful kitchen garden.
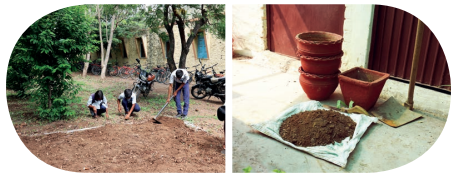
Figure : Plant beds (left) and pots (right) for the kitchen garden
Pre-Activity Discussion
- Discuss why soil quality is important for plant growth.
- Recall what nutrients plants need (N, P, K).
- Differentiate between soil in plant beds and soil in pots.
- Understand why manure is mixed into soil.
Materials Required
- Spade or hand cultivator
- Garden trowel
- Organic Manure/Compost
- Measuring container
- Watering can
- Gloves
Procedure (Steps to Follow)
- Clear the soil of stones, debris, weeds and unwanted plants.
- Loosen the soil using a spade or hand cultivator.
- Break large soil clumps into smaller pieces.
- Add organic manure or compost as directed by your teacher.
- Mix manure evenly with the soil.
- Level the soil surface properly.
- Water lightly to settle the soil before sowing seeds or planting seedlings.
| Observation Record | ||
| Task Performed | What I Observed | Why It is Important |
| Clearing debris | ||
| Loosening soil | ||
| Mixing manure | ||
| Levelling soil | ||
Question 1.
How did you prepare the soil for planting?
Answer:
We first cleared the plot of stones, weeds and debris. Then we used a spade and hand cultivator to dig and loosen the soil to a depth of about 20-25 cm. We then mixed organic manure (vermicompost and cow dung manure) with the soil and levelled the surface to make it ready for sowing.
Question 2.
Did you use organic manure? If yes, what proportion did you use for mixing organic manure with soil?
Answer:
Yes, we used organic manure (vermicompost). We mixed it in the ratio of approximately 1 part manure to 4 parts soil (1:4). This was done under the guidance of our teacher to ensure the plants received the right amount of nutrition without over-fertilising.
Question 3.
Why is it important to loosen the soil before planting?
Answer:
Loosening the soil before planting is important because it allows air, water and nutrients to reach the plant roots easily. It also helps roots grow deeper and spread better, leading to stronger and healthier plant growth.
Question 4.
What will happen if stones and weeds are not removed from the soil?
Answer:
If stones and weeds are not removed from the soil, plant growth will be affected. Stones can block root growth and reduce space for roots to spread, while weeds compete with plants for water, nutrients and sunlight, making the plants weak and unhealthy.
Question 5.
Why is watering done lightly after preparing the soil?
Answer:
Watering is done lightly after preparing the soil to help the soil settle and hold together without getting too compact or waterlogged. It also maintains the right moisture level, which is important for healthy seed germination and plant growth.
Activity 5: Sowing Seeds and Planting Seedlings
Purpose of the Activity
This activity helps students learn the correct method of sowing seeds and planting seedlings. Proper spacing, depth and handling ensure healthy plant growth and higheryield. Correct sowing is the foundation of a successful kitchen garden.

Figure: Sowing seeds in furrows

Figure: Soil background along with plant to plant space
Pre-Activity Preparation
- Read the instructions on seed packets carefully.
- Note recommended planting depth, plant-to-plant spacing and season of growth.
- Arrange labels and permanent markers.
- Keep tools ready (trowel, watering can and gloves).
Observation Task
- Observe the size and type of seeds before sowing.
- Note the soil conditions and observe the correct depth at which seeds are placed.
- Check the spacing between seeds and seedlings.
- Notice how soil is covered and pressed after sowing.
- Observe the watering method used after planting.
| Observation Record | |||
| Day | Germination Observed? | Number of Plants Sprouted | Remarks |
| Day 3 | |||
| Day 5 | |||
| Day 7 | |||
Question 1.
How deep did you plant each type of seed? Use the given table to fill the information?
| S.No | Name of Plant | Seed Sowing Depth (cm) |
| 1. | ||
| 2. | ||
| 3. | ||
| 4. |
Answer:
| S.No | Name of Plant | Seed Sowing Depth (cm) |
| 1. | Coriander | 1 cm |
| 2. | Spinach | 1 cm |
| 3. | Tomato | 0.5 cm(transplanted as a seedling) |
| 4. | Pea | 3 cm |
Question 2.
How much space did you leave b/w one plant and the other? Use the given table to fill the information?
| S.No | Name of Plant | Plant to Plant Space (cm) |
| 1. | ||
| 2. | ||
| 3. | ||
| 4. |
Answer:
| S.No | Name of Plant | Plant to Plant Space (cm) |
| 1. | Coriander | 5 cm |
| 2. | Spinach | 10 cm |
| 3. | Tomato | 50 cm |
| 4. | Pea | 15 cm |
Question 3.
Was the plant-to-plant space same for all the plants grown by you? (Yes/No) If No, explain why?
Answer:
No, the plant-to-plant space was not same for all plants. Different plants grow to different sizes. Big plants like tomato need more space, while small plants like coriander and spinach needs less space. Proper spacing helps plants get enough sunlight, water and nutrients.
Question 4.
Why is it important to follow the recommended seed sowing depth for different plants?
Answer:
It is important to follow the recommended seed sowing depth for different plants because each plant needs a specific depth for proper germination. If seeds are planted too deep, they may not get enough air and sunlight to sprout, and if they are too shallow, they may dry out or be washed away by water.
Question 5.
What changes did you observe in the soil after watering the newly sown seeds?
Answer:
I observe the following changes in the soil after watering the newly sown seeds
- The soil became moist and slightly compact, helping the seeds stay in place.
- The surface soil settled down, reducing air gaps and creating better contact between seeds and soil for germination.
Activity 6: Taking Care of Plants
Purpose of the Activity
This activity helps students understand that planting seeds is not the end of the process. Plants need regular care, protection, water, nutrients, and monitoring to grow healthy. Proper plant care ensures better growth, higher yield, and protection from pests and environmental damage.

Figure : Staking a plant for support
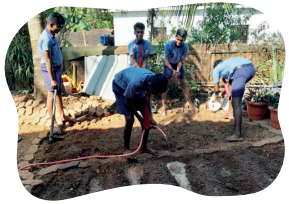
Figure: Watering freshly sown plant beds

Figure: Removing weeds in a plant bed using hand cultivator
Pre-Activity Discussion
- Discuss why plants are called ‘living organisms’.
- List basic needs of plants — sunlight, water, nutrients, air, protection.
- Understand why overwatering or neglect can harm plants.
Observation Task
- Observe the condition of soil before and after watering.
- Note how plants react when supported with staking.
- Observe how weeds grow and how they are removed.
- Monitor plant growth regularly and record changes.
| Plant Care Checklist | |||
| Task | Done(✓) | Date | Remarks |
| Fencing | |||
| Staking | |||
| Watering | |||
| Mulching | |||
| Pest Check | |||
| Weeding | |||
Question 1.
What are the materials that you will use for fencing ?
Answer:
The materials used for fencing a kitchen garden include bamboo sticks, wooden sticks, old pipes, and strong string. These materials are tied together to form a protective boundary around the garden to keep plants safe from animals and damage.
Question 2.
How many poles and the length of string will you need for fencing?
Answer:
The number of poles and the length of string needed for fencing depend on the size of the garden area. Poles are placed at all corners and at regular intervals along the boundary, while the string length should be equal to the total perimeter of the garden with some extra length for tying and securing the fence.
Question 3.
How do you know when a plant needs water?
Answer:
A plant needs water when soil feels dry about 2cm below the surface. Dried leaves are a sign that the plant is thirsty. For potted plants, the pot feels lighter when the soil is dry.
Question 4.
How often do you need to water your plants?
Answer:
Most vegetable plants need watering once a day — either in the morning or evening. New seedlings need more frequent watering (sometimes twice a day in hot weather). During the monsoon season, watering may not be needed every day.
Question 5.
What is the best time for watering plants?
Answer:
The best time to water plants is early morning (before 8 am) or late afternoon (after 5 pm). Watering at noon leads to high water loss through evaporation, and water droplets on leaves in strong sunlight can burn the leaves.
Question 6.
What factors influence the quantity and frequency of watering?
Answer:
The factors that influence the quantity and frequency of watering are
(i) Weather Hot/Dry days need more ‘ water; cool/rainy days need less.
(ii) Soil Type Sandy soil loses water faster.
(iii) Plant Type Some plants like more moisture than others.
(iv) Stage of Growth Young seedlings need more water than established plants.
Activity 7: Observing Your Plants Grow
Purpose of the Activity
This activity helps students understand plant growth and development over time. By observing changes regularly, students learn how plants respond to water, sunlight, nutrients and care. Observation is an important scientific skill.
im-10
Figure: Keeping track of the growth of plants
Observation Guidelines
- Measure plant height weekly
- Observe leaf colour and size
- Note flowering or fruit formation
- Check for pest attacks
- Maintain a diary
Observations of Plants as They Grow
| Date of Observation | Observations (Emergence, Height, Leaf Colour, Flowering, Pests etc) |
| Week 1(Date: _______) | |
| Week 2 (Date: _______) | |
| Week 3 (Date: _______) |
- Keep track of the garden’s growth by taking photographs from different angles or making sketches.
- Photos and sketches can be pasted or drawn in the given space to monitor progress over time.
| Date of Observation | Observations |
| Week 1/Month 1 | |
| Week 2/Month 2 |
Question 1.
How often did you measure the height of your plant? Why is it important to measure it regularly?
Answer:
The height of the plant was measured at regular intervals (every week).
Measuring it regularly is important to track the growth of the plant, understand its development, and identify any problems early.
Question 2.
What changes did you notice in your plant from Week 1 to Week 3 (e.g., height, leaf colour, new leaves)?
Answer:
The changes I noticed in the plant from Week 1 to Week 3 were as follows
- Week 1 Small seedlings emerged with light green leaves.
- Week 2 The plant increased in height and leaves became greener and larger.
- Week 3 More new leaves appeared, the plant grew taller and the stem became stronger.
Question 3.
Did you observe any flowers or fruits on your plant? If yes, in which week did they first appear?
Answer:
Yes, flowers/fruits were observed on the plant. They first appeared around Week 3 (or later, depending on the plant type).
Question 4.
How did regular observation help you understand the needs of your plant?
Answer:
Regular observation helped me understand the needs of my plant by showing how it responds to water, sunlight, and nutrients. It allowed me to notice changes in growth, leaf colour, and overall health, so I could adjust care like watering, adding manure, or protecting it from pests at the right time.
Question 5.
What differences did you notice between healthy plants and unhealthy plants during your observation?
Answer:
I noticed the following differences between healthy and unhealthy plants during my observation
- Healthy plants were green, strong and growing properly with fresh leaves, while unhealthy plants had yellow or drooping leaves and weak growth.
- Healthy plants showed no or fewer pests, whereas unhealthy plants often had pest attacks and signs of poor nutrition or lack of care.
Activity 8: Harvesting
Purpose of the Activity
This activity helps students learn the correct method of harvesting vegetables without damaging plants. Proper harvesting ensures continued growth and better quality produce. Harvesting is the reward for careful plant care.

Figure : Enjoy the produce of your labour

Figure (a): Brinjal plant, and (b): Harvested brinj
Pre-Harvest Preparation
- Ask your teacher about the correct harvesting method.
- Identify vegetables ready for harvest.
- Arrange tools like garden shears or trowel.
- Keep a basket for collected produce.
Observation Task
- Observe which vegetable are fully grown and ready to harvest.
- Note the colour size and firmness of produce.
- Observe how plants look after harvesting.
- Record the condition and quality of harvested produce.
Question 1.
Which crops did you harvest?
Answer:
The crops that I harvested were Spinach, coriander and tomatoes.
Question 2.
How did you know they were ready for harvesting?
Answer:
The crops were identified as ready for harvesting in the following ways
- Spinach: The leaves had grown large and turned dark green.
- Coriander: The plant became bushy with plenty of leaves.
- Tomatoes: The fruits turned red and felt slightly soft when gently pressed.
Question 3.
Which tools did you use to harvest the plants?
Answer:
For spinach and coriander, we used our hands (cut-and-come-again method).
For tomatoes, we used gardening shears to cut the fruit from the vine, leaving a short stem attached. A garden trowel was used for loosening soil around root vegetables.
Question 4.
What precautions did you take to avoid damaging plants while harvesting?
Answer:
The precautions I took to avoid damaging plants while harvesting were
- I harvested carefully without pulling the plants forcefully.
- I used proper tools like scissors or gardening shears to cut the produce.
- I made sure not to disturb the stem and roots while plucking leaves or fruits.
- I gently removed only the ripe produce to avoid harming the rest of the plant.
Question 5.
What did you do with the produce after harvesting?
Answer:
The produce was washed, cleaned and sorted by size and quality.
Damaged produce was removed. The healthy vegetables were given to the school kitchen for use in the mid-day meal.
We also shared some produce with classmates and teachers.
Activity 9: Visit to the Vegetable Market
Purpose of the Activity
This activity helps students understand how vegetables and fruits are sold in the market and how prices vary based on demand, season and quality. It connects the kitchen garden project to real-life economics.
Pre-Visit Preparation
- Make a list of vegetables grown in your kitchen garden.
- Carry a notebook to record prices.
- Observe quality, freshness and packaging.
- Ask vendors about seasonal price changes.
During the Visit — Observation Tasks
- Observe different vegetables and fruits
- Compare prices of similar items
- Check quality (fresh, damaged, size)
- Ask about seasonal variation
- Note whether price is per kg or per piece
| Vegetable Name | Price (₹) |
Question 1.
Did prices differ from shop to shop? Why?
Answer:
Yes, prices differed from shop to shop because of differences in quality, freshness, location and transportation costs.
Question 2.
Which vegetable was the most expensive? Why do you think so?
Answer:
Brinjal was the most expensive because it may have been less available or required more care and cost in production and transport.
Question 3.
Were seasonal vegetables cheaper or costlier?
Answer:
Seasonal vegetables were cheaper because they are available in large quantities during their growing season.
Question 4.
How can growing vegetables at home help save money?
Answer:
Growing vegetables at home helps save money as we do not need to buy them from the market and we get fresh, healthy produce at a low cost.
Question 5.
Why do vegetable prices change in the market?
Answer:
Vegetable prices change in the market due to seasonal availability, demand and supply, quality of produce and transportation or storage costs.
Activity 10: Setting a Price
Purpose of the Activity
This activity helps students understand how to estimate the cost of production and fix a selling price for their kitchen garden produce. It introduces basic concepts of profit, cost and market value.
Discussion Before Pricing
- The price of produce depends on factors such as the cost of seeds or seedlings, soil amendments, tools and equipment, and labels.
- If the produce is sold, a selling price can be fixed for each item.
- Discuss with peers and the teacher how the price of the produce is determined.
- Below table shows a simple way to calculate the price using this information.
How to Calculate
- Calculate total cost of production.
- Check market price from Activity 9.
- Multiply market price by quantity harvested.
- Compare money earned with money spent.
- Discuss whether you made profit or not.
Question 1.
Was your selling price higher or lower than market price? Why?
Answer:
The selling price was similar to or slightly tower than the market price to make it affordable and ensure the produce could be sold easily.
Question 2.
Did you make a profit or loss?
Answer:
There was a small profit overall because the total money earned was slightly more than the money spent.
Question 3.
What factors increase the price of vegetables in the market?
Answer:
Prices increase due to factors like low supply, high demand, transportation costs, weather conditions and storage expenses.
Question 4.
How does hard work affect the value of farm produce?
Answer:
Hard work increases the value of farm produce as it improves quality, yield and freshness, making the produce more valuable in the market.
Question 5.
Why is it important to calculate the cost before selling your garden produce?
Answer:
It is important to calculate the cost before selling garden produce because it helps us set a proper selling price, understand whether we are making a profit or loss, and avoid selling at a price lower than the cost of production.