Including Kaushal Bodh Class 8 Solutions Project 3 and Class 8 Vocational Education Chapter 3 Working with Wood and Bamboo Question Answer in your preparation can make learning more organized.
Class 8 Vocational Education Chapter 3 Question Answer
Kaushal Bodh Class 8 Chapter 3 Question Answer
What did I learn from others? [Page No. 81]
Question 1.
Name three things you learned from the carpenter/experts/ teachers during the project.
Answer:
The three things I have learned from the carpenter, experts, and teachers during this project are as follows
- Safe use of basic carpentry tools like saw, hammer, drill, file and sandpaper.
- Accurate measuring, marking and cutting of wood and bamboo using ruler, pencil and tri-square.
- Joining wooden pieces using nails, screws, glue and joints to make strong products.
Question 2.
What was the most difficult step in making your product? How did speaking to others (e.g., peers, teachers, experts, family, community members, etc.) help?
Answer:
The most difficult step in making the product was cutting and joining the wood and bamboo accurately to ensure proper shape and strength. Speaking to others helped a lot because teachers and experts guided me on correct tool usage, while peers and family helped me improve my design, correct mistakes, and complete the work more efficiently and safely.
Think and Answer [Page No. 82]
Question 1.
Did you enjoy doing this project?
Answer:
Yes, I enjoyed doing this project because it helped me learn new skills like working with wood and bamboo, using tools safely, and making useful products. It was interesting and also gave me hands-on experience in designing and building something on my own.
Question 2.
What did you like, and what would you do differently next time?
Answer:
I enjoying hands-on work involved in the project, especially, learning new skills, working with peers. Next time, I might plan better, choose different materials, or try a more complex design.

Question 3.
Wood has been a part of human civilisation and part of the life of humans. It is present in almost every moment and every step of human life. Find out whether it is mentioned in literature and scriptures. Quote the words that talk of wood and provide translation, if needed.
Answer:
Wood has been mentioned in various ancient scriptures and literature showing its importance in human life. For example
- The Atharva Veda states, “Whatever we dig out from you, 0 Earth! May that have quick regeneration. May we not damage our vital habitat and Earth.” This emphasises sustainable use of resources including wood.
- In the Ramayana, the construction of the bridge to Lanka involved extensive use of wood and trees.
- Buddhist scriptures mention the Bodhi tree under which Buddha attained enlightenment.
- Many folktales and stories describe wooden houses, furniture and tools as essential parts of daily life.
Question 4.
Some examples of jobs related to your work are carpentry, interior design, etc. What other jobs are related to the project? Look around, speak to people and write your answer.
Answer:
Apart from carpentry and interior design. Many others jobs are related to woodworking includes
- Furniture maker/designer
- Wood carver and sculptor
- Forestry worker
- Timber merchant
- Boat builder
- Musical instrument maker
- Cabinetmaker
- Wood finishing specialist
- Restoration expert for antique wooden furniture
- Construction worker specialising in wooden structures
- Bamboo craftsperson
- Sports equipment manufacturer (cricket bats, hockey sticks)
- Paper industry workers
- Packaging industry workers
Working with Wood and Bamboo Class 8 Question Answer
Activity 1: Visit a Local Woodworking/Bamboo Workshop
Students will be able to observe a woodworking/bamboo workshop to understand carpentry processes, tool usage, material selection, safety practices, and decision making involved in designing, cutting, shaping and assembling wooden products.
Think about what you want to ask the carpenter about their process of creating products and the things they take care of at every stage.
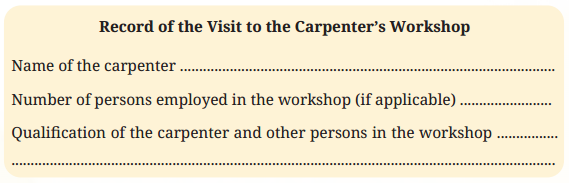
Steps to Follow
- Visit a local carpenter’s workshop or a bamboo workshop with your class.
- Observe the tools, materials, and processes used.
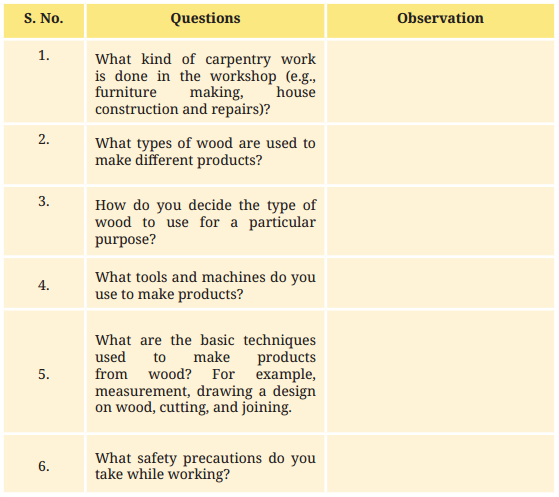
- Ask questions and record your observations in table below.
- Add or remove questions in the table as suitable.
Record of Details about the Carpenter’s Work
Question 1.
What type of wood did the carpenter use most often? Why?
Answer:
The carpenter mostly used softwood such as pine or deodar. Softwood is commonly used because it is easy to cut, shape and finish. It is also suitable for making furniture, shelves and small wooden items.
Question 2.
Which tools were used for cutting and joining? How are they handled safely?
Answer:
The tools used for cutting include hand saw and cutter. For joining tool includes hammer, nails, screws and screwdriver are used.
These tools are handled safely by holding them properly, wearing safety goggles and keeping the workspace clean and organised. The carpenter also keeps tools in the correct place after used to avoid accident.
Question 3.
What did you find most interesting about the carpenter’s work?
Answer:
I found most interesting about carpenter’s work is that the carpenter can turn a simple piece of wood into useful objects like chairs, tables and shelves. The process of careful measurement, cutting and joining of wood was very impressive.
Question 4.
How does the carpenter measure and mark wood before cutting?
Answer:
The carpenter measures and marks wood before cutting by using tools like a measuring tape, steel ruler, and try square. First, accurate measurements are taken, then clear lines are drawn using a pencil or chalk on the surface. These markings guide precise cutting and help avoid mistakes in shaping the wood.
Question 5.
What finishing techniques are used to improve the appearance and durability of the final product?
Answer:
The finishing techniques used to improve the appearance and durability of the final product are as follows
- Sanding is done to smooth rough surfaces and remove uneven edges.
- Painting or varnishing is applied to protect wood from moisture and damage.
- Polishing is used to enhance shine and appearance.
- Sealing helps in increasing strength and extending the life of the product.
Kaushal Bodh Class 8 Working with Wood and Bamboo Question Answer
Activity 2: Understanding Bamboo or Wooden Products
Purpose
Students will be able to observe a wooden or bamboo object closely and understand how its different parts are joined together and how materials and joints are used in its structure.
Material Required
Any one wooden or bamboo object around you (e.g., a chair, shelf, door and bench).
Pre Planning and Steps
- Look at the wooden/bamboo objects around you and pick any one.
- Observe how the different parts of the object are joined together.
- Identify the type of material and the joints used.
- Record your observations below.
Observation
Record observations for the object you selected
1. Which object did you select?
__________________________________________
2. What is it made of (for example, wood, bamboo, etc.)?
__________________________________________
Understanding the Dimensions of an Object
Sketch the object. Label each part and indicate the kind of joint used.
For example School bench
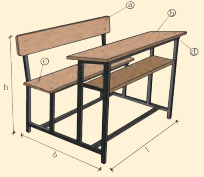
Draw a sketch of the object selected by you.

What type of material is it made of?
For example The bench is made of hardwood __________________________________________
Is it made of a single piece of wood or bamboo? If not, how many parts can you count?
For example There are four different parts and a metal frame; the parts are joined using nuts and bolts.
__________________________________________________________________
Did you see any of the joints shown in Figure Common Joints? __________________________________________.
For example No, there are no wooden joints — metal and wood are joined together using nuts and bolts.
__________________________________________________________________
Question 1.
What type of joint did you find most commonly used in the object you selected?
Answer:
The most commonly used joint in the selected object was the butt joint, where two pieces of wood are joined together at the corners. It is simple and widely used joint in furniture making.
Question 2.
Were any fasteners (nails, screws, bolts) used in the object? Where and why?
Answer:
Yes, fasteners such as screws and nuts and bolts were used in the object. They were mainly used at the corners and joints of the object to keep the parts tightly joined and make the structure strong.
Question 3.
Why are hinges important in objects like doors and cupboards?
Answer:
Hinges are important because they allow the door or lid to move easily. They help the door open and close smoothly and make the object more durable.
Question 4.
What finishing techniques can you observe on the object (if any)?
Answer:
The finishing techniques that can be observed on the object include sanding, painting, and polishing. Sanding makes the surface smooth and removes rough edges.
Painting or varnishing protects the object from moisture and damage. Polishing improves the shine and appearance, making the object look neat, attractive, and more durable overall.
Question 5.
Why is it important to use strong joints in wooden or bamboo objects?
Answer:
It is important to use strong joints in wooden or bamboo objects because of the following reasons
- They provide strength and stability ‘ to the structure.
- They help the object bear heavy loads without breaking.
- They increase the durability and lifespan of the product.
- They ensure safety during regular use and handling of the object.
Activity 3: Making a Prototype of a desired object or product
Purpose
Students will be able to make a small model (prototype) of a selected object using cardboard or waste softwood, to test and refine your design before making the actual product.
Material Required
- Cardboard or waste softwood, cutter, pencil, scale/ruler.
- Glue, cellophane tape, old wire (for making prototype hinges).
Steps to Follow
- Step 1 Sketch a three-dimensional object with dimensions.
- Step 2 Collect the required materials (cardboard or waste softwood, cutter, pencil, and scale) and carefully mark the design on them. Ensure that the markings match the original sketch. Then, cut the material according to the given dimensions.
- Step 3 Assemble the parts of the project using glue and check whether the final model matches your original design.
Hint
- You can use glue instead of nails while working with cardboard, or you can also use cellophane tape.
- You can make hinges by piercing pieces of old wire into the cardboard.
Question 1.
Were you able to measure and cut the material accurately? If not, what would you do differently next time?
Answer:
I was mostly able to measure and cut the material correctly, but a few edges were uneven. Next time, I will measure more carefully and mark the lines clearly before cutting.
Question 2.
How did you join the parts? Any difficulty in joining them? What would you do differently next time?
Answer:
I joined the parts using glue and cellophane tape. At first the pieces moved out of place. Next time I will hold the pieces firmly and allow the glue to dry properly.
Question 3.
Were you able to recreate your sketch in three-dimension (3D)?
Answer:
Yes, I was able to recreate the sketch into a 3D model using cardboard.
This helped me understand the shape and structure of the final object.
Question 4.
Show your model to your peers. What feedback did you get?
Answer:
My classmates appreciated that the model was creative and well-made. They suggested that I smooth the edges and make the parts more equal in size.
Question 5.
what improvements would you suggest to make your prototype more accurate and closer to the original design?
Answer:
I would suggest the following improvements to make my prototype more accurate and closer to the original design
- Take more careful and precise measurements before cutting the material.
- Improve marking by using a sharp pencil and scale for clear lines.
- Cut the material slowly and accurately to avoid errors.
- Use stronger and neater joining techniques for better alignment and structure.
Activity 4: Making a product from wood
Purpose
This activity will enable students to apply basic carpentry skills such as measuring, cutting, sawing, sanding and finishing to make a simple functional wooden product.
Material Required
- Softwood or plywood (scrap wood pieces).
- Hand saw, wood file, plane, claw hammer, measuring tape, steel ruler, bench vice, hand drill, sandpaper, varnish, brush.
- Nails, screws, wood glue, pencil or chalk.
Pre-Planning and Steps
- A small flat piece of wood used to place cups or glasses to protect surfaces from heat or liquid is called a wooden coaster.
- You can also choose to make other simple items such as wall hanging, key chain, key holder, chalk duster, phone stand, nameplate, small wooden toy, bird house, mobile phone holder or keychains.
Steps for Making Products from Wood
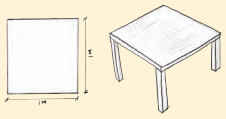
Sketching and planning: Sketch the object you will make (you can draw a simple outline on paper). Collect required materials and tools.
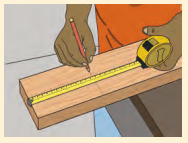
Measuring and marking: Use a measuring tape and pencil to mark where to cut.
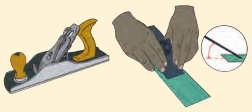
Planing (smoothening the wood): Plane is a tool to shave thin and uneven strips from wood surface. It creates a smooth surface by removing high spots. It also evens out any rough edges. Use a plane to smoothen the surface of wood.
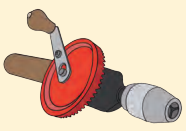
Drilling: Drills are used to create holes in wood to fi screw, nails, etc., using a hand drill. Keep the drill perpendicular to the wood where you want to make the hole for fixing pieces. Select the right type of tool, ensuring that it is fied in the tool holder.
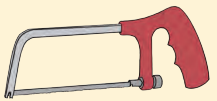
Cutting: Hacksaw is an important tool used to cut wood. Before you start cutting the wood, ensure that the piece is secured tightly in the bench vice. Mark a line to cut and make a small cut at the point the line begins. Check if the line is straight, else do necessary corrections.
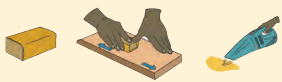
Sanding: Sanding is done to smoothen the surface or smoothen the edges using sandpaper for a polished finish.
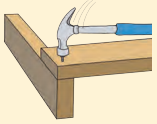
Assembly: Join the parts as per the sketch. You can press fi the joints made for the purpose. You can also use nails or nuts, bolts, and screws to join diffrent parts.
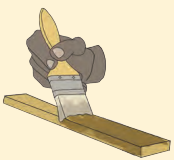
Varnishing/Painting: Varnish is a solution of resins, oil and solvents. It is applied to form a protective layer on the wood surface. It becomes scratch resistant and also enhances appearance and durability.
You can decorate the object to make it look attractive, if you wish
Question 1.
Which object are you going to make?
Answer:
I am going to make a wooden coaster to place cups or glasses on and protect surfaces from heat and liquid.
Question 2.
Sketch the object you plan to make with dimensions.
Answer:
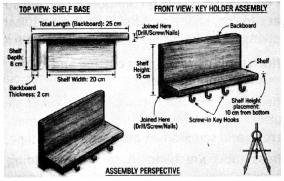
Question 3.
write down the process you followed in making your object. Which tools did you use?
Answer:
The process I have followed and tools I’ve used in making my object are as follows
Process
- First, I sketched the design of the coaster on paper.
- Then I measured and marked the wood using a ruler and pencil.
- I cut the wood using a hand saw. Then smoothed the edges with sandpaper.
- Finally, I applied varnish to give it a good finish.
- Tools used are measuring tape, pencil, hand saw, sandpaper and brush.
Question 4.
Did you face any difficulties while making it, and how did you overcome them?
Answer:
Yes, it was difficult to cut the wood in a straight line. I solved this by marking the cutting line clearly and holding the wood tightly before cutting.
Question 5.
what did you do to make the product look attractive?
Answer:
I smoothed the surface using sandpaper and applied varnish. I also decorated it with simple designs to make it look attractive.
Activity 5: Make a bamboo product
Purpose
This activity will enable students to create a simple and useful bamboo product by applying skills such as sketching, cutting, smoothening, assembling, sanding and finishing.
Material Needed
- Bamboo culm (piece of bamboo), hacksaw, bench vice, measuring tape, marker.
- Sandpaper, hand drill, nails/screws/nuts and bolts, varnish/paint, brush.
Steps for making products from bamboo
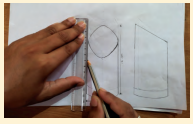
Sketching and planing: Sketch the object you will make (you can draw a simple outline on paper). Remember to label important measurements (width, height, thickness). Collect required materials and tools.
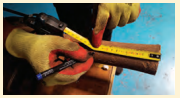
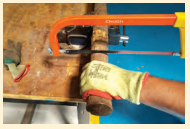
Measuring and marking: Use a measuring tape and marker to mark where to cut. Cutting the piece you want: Cut the internodes from a length of bamboo using a hacksaw, and then cut the parts required according to the sketch. Remember to use a bench vice.
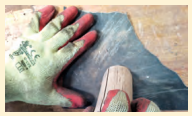
Smoothing: Scrape of the outer skin and smoothen the surface area of the bamboo piece.
Assembling: Join the parts as per the sketch. You can use a hand drill. You can also use nails or nuts and bolts, or screws to join the different parts.
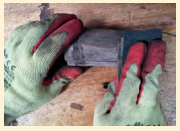
Sanding: Sanding is done to smoothen the surface or smoothen the edges of the product using sandpaper for a polished finish.
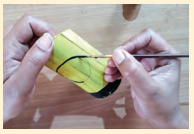
Varnishing/Painting: Varnish is a solution of resins, oil and solvents. It is applied to form a protective layer on the surface. It is scratch resistant and also enhances the product’s appearance and durability.
Question 1.
Which object are you going to make?
Answer:
I am going to make a bamboo pen holder.
Question 2.
Write down the process you followed in making your object. Which tools did you use?
Answer:
The process I have followed and tools I have used in making my objects are as follows
Process
- First, I sketched the design of the pen holder.
- Then I measured and marked the bamboo piece.
- After that I cut the bamboo using a hacksaw.
- Smoothed the surface with sandpaper.
- Finally, I painted and decorated it.
- Tools used are hacksaw, measuring tape, marker and sandpaper.
Question 3.
Did you face any difficulties, and how did you overcome them?
Answer:
Yes, the bamboo surface was rough. I solved this by sanding it properly with sandpaper until it became smooth.
Question 4.
Sketch the object you are going to make with dimensions.
Answer:
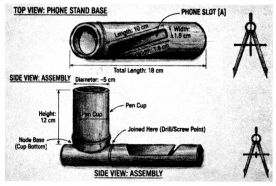
Question 5.
What did you do to make the product look attractive?
Answer:
I painted the bamboo and added simple patterns to make it colourful and attractive.
Activity 6: Costing — How much did you spend?
Purpose
This activity will help students to calculate the total cost of making their product and compare it with the market price of a similar product.
Pre-Planning and Steps
- List all the materials and tools used and their cost in table below.
- Estimate the number of hours you spent making the product.
- Find out the price of a similar product in a local market or online.
Observation
Estimate of Cost of Making Product
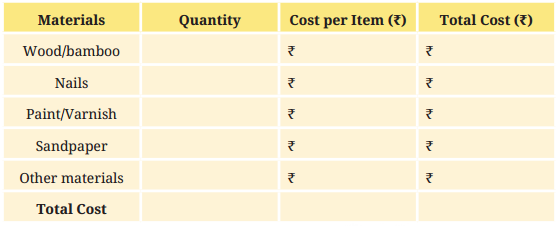
Market Price of a Similar Product ₹ _______________________________________
__________________________________________________________________
Question 1.
Is the cost of making your product more or less than the market price? What could be the reasons?
Answer:
The cost of making my product was less than the market price. This is because I used scrap materials and did the work myself, so there was no labour cost.
Question 2.
What could you do to reduce the cost of making your product?
Answer:
I can reduce the cost by using recycled wood or bamboo, buying materials in bulk and reducing wastage of materials.
Question 3.
Which material contributed the most to the total cost of your product?
Answer:
The material that contributed the most to the total cost of my product was wood or bamboo, as it is the main raw material used in making the product.
It forms the base structure and is required in larger quantity compared to other materials like nails, sandpaper, or paint, making it the most expensive part.
Question 4.
Did you complete the product within the estimated time? If not, why?
Answer:
I did not complete the product within the estimated time because I faced difficulties in accurate measuring, cutting, and assembling the parts properly.
I also needed extra time to correct mistakes and improve the finishing, which made the process take longer than initially planned.
Question 5.
How can better planning help in reducing both time and cost of production?
Answer:
Better planning helps in reducing both time and cost of production in the following ways
- It helps in selecting the right materials in advance, avoiding wastage and extra expenses.
- It reduces errors during cutting, measuring, and assembling, saving rework time.
- It ensures proper step-by-step workflow, which improves speed and efficiency.
- It helps in estimating resources correctly, preventing overuse of tools and materials.
Activity 7: Basic Repairs Around the School
Purpose
This activity will enable students to apply basic carpentry skills for repairing and maintaining wooden items in the school or home, such as benches, cupboards and desks.
Material Needed
Hammer, screwdriver, nails, screws, sandpaper, paint/varnish, brush.
Pre-Planning Steps
- Identify wooden items in your school or home that need repair or maintenance.
- Decide the type of repair needed — tightening, nailing, sanding or painting.
- Carry out the repair carefully.
- Record the details of what you did in table below.
Observation
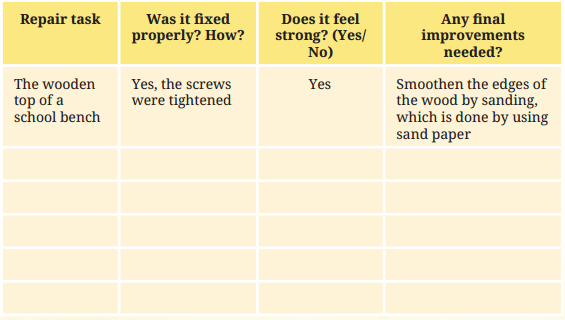
Record of Repair and Maintenance Work
Question 1.
What wooden item did you repair? What was wrong with it?
Answer:
I repaired a school bench. The screws of the bench were loose and the top was slightly shaky and uneven.
Question 2.
How did you carry out the repair? What tools did you use?
Answer:
I tightened the screws using a screwdriver and hammered a loose nail using a hammer. I also used sandpaper to smooth the rough edges.
Question 3.
Why is regular maintenance of wooden objects important?
Answer:
Regular maintenance is important because it keeps the object strong, safe and long-lasting. It also helps prevent damage and increases the life of the wooden item.
Question 4.
What safety precautions did you follow while repairing the wooden items?
Answer:
I followed the following safety precautions while repairing the wooden items
- I used tools like hammer and screwdriver carefully to avoid injury.
- I wore proper safety measures like keeping hands away from sharp edges and nails.
- I worked in a clean and organised area to prevent accidents.
- I handled nails, screws, and tools carefully and stored them safely after use.
Question 5.
What improvements would you suggest to make the repaired item more durable and safe to use?
Answer:
I would suggest the following improvements to make the repaired item more durable and safe to use
- Tighten all loose screws and nails properly to increase strength.
- Smooth all rough edges by sanding to prevent injuries.
- Apply paint or varnish to protect the wood from damage and moisture.
- Replace any damaged or weak parts with new, strong materials.