Including Kaushal Bodh Class 8 Solutions Project 1 and Class 8 Vocational Education Chapter 1 Hydroponics Growing Plants without Soil Question Answer in your preparation can make learning more organized.
Class 8 Vocational Education Chapter 1 Question Answer
Kaushal Bodh Class 8 Chapter 1 Question Answer
What did I learn from others? [Page No. 28]
Question 1.
Have you come across any other advanced farming technology in your locality? If yes, describe the technology.
Answer:
Yes, I have come across hydroponics as an advanced farming technology in my locality. In this method, plants are grown without soil using a nutrient-rich water solution. It allows better control of nutrients, saves water, and supports farming in limited space.
Question 2.
Name any three things that you learnt while setting up the hydroponic system.
Answer:
Three things that I learnt while setting up the hydroponic system are as follows
- How to grow plants without soil using nutrient-rich water.
- The importance of maintaining water pH and nutrient levels.
- The role of proper water supply, oxygen, and system maintenance for healthy plant growth.
Think and Answer [Page No. 30]
Question 1.
What did you enjoy doing the most?
Answer:
I enjoyed the hydroponic activities, growing microgreens was the most enjoyable. Watching tiny seeds sprout into healthy green shoots within 10 days, and then using them in a fresh salad, was a very satisfying and rewarding experience. Setting up the wick system with recycled PET bottles was also fun because it involved creative recycling.
Question 2.
What were the challenges you faced?
Answer:
I faced the following challenges during the project were
- Maintaining the correct water level in the DWC and NFT systems was difficult in the beginning.
- Ensuring the wick was always moist and working properly required daily checking.
- Algae growth in the DWC bucket was observed when the lid was not properly covered.
- Adjusting the water pH to the ideal range of 6.0-7.0 required careful addition of weak acid.
Question 3.
What will you do differently next time?
Answer:
I will improve the following
- Cover the DWC bucket completely with a styrofoam sheet to prevent algae growth.
- Use a timer for the water pump in the NFT system to automate water flow.
- Check the wick daily and replace it if it becomes clogged or dry.
- Start testing and adjusting the pH of the water before adding plants, not after.

Question 4.
Do you think it is economical and practically feasible to grow all crops using hydroponics? Give reasons for your response.
Answer:
Hydroponics is economical and feasible for certain crops, but not for all. The reasons are as follows
- Hydroponics needs controlled environments like polyhouses to regulate temperature, humidity, and light, which increases setup cost.
- It requires continuous use of equipment like pumps and aerators for proper nutrient and oxygen supply.
- It is mainly suitable for urban farming and precision farming, not large open-field agriculture.
- It is not practical for large-scale staple crops due to system limitations and high resource use.
Question 5.
Identify a few examples of jobs related to the work you just did, for example, a gardener, botanist, forest officer, farmer or agricultural scientist. Look around, speak to people and write your answer.
Answer:
Job related to this work includes
- Hydroponic Farmer Sets up and manages soilless growing units commercially.
- Agricultural Scientist researches new farming technologies like hydroponics and aeroponics.
- Botanist Studies plant growth, nutrition and diseases.
- Horticulturist Specialises in growing fruits, vegetables, flowers and ornamental plants.
- Agronomist Advises farmers on crop management and soil/water quality.
- Urban Farming Entrepreneur Sets up rooftop or indoor hydroponic units in cities.
- Agricultural Engineer Designs irrigation systems and equipment like pumps and NFT setups.
Hydroponics Growing Plants without Soil Class 8 Question Answer
Activity 1: Field visit to a farm
Purpose of the Activity
Pre-Visit Preparation (in Class)
Visit a place with a hydroponic unit — a large farm or a small home setup. You can contact the Krishi Vigyan Kendra (KVK), an agricultural university, college or a research centre in your region.
Observe and record new technologies such as liquid nutrients, artificial lights, moisture control, wind protection and water supply systems.
Visit a place with a hydroponic unit — a large farm ora small home setup. You can contact the Krishi Vigyan Kendra (KVK), an agricultural university, college or a research centre in your region.
Observe and record new technologies such as liquid nutrients, artificial lights, moisture control, wind protection and water supply systems.
- Revise basic concepts
- How plants absorb nutrients?
- Rote of sunlight and water in plant growth.
- Difference between soil-based and soilless cultivation.
- Search the online using the given keywords watch at least one video on hydroponics before the visit.
- Prepare a smalt notebook to record observations during the visit.
- Frame 2-3 additional questions to ask the expert.
- Discuss in class
- What is hydroponics?
- How it differs from traditional soil-based farming?
During Visit – Observation Tasks
While visiting, carefully observe and note
- Type of hydroponic setup (large farm or small home unit)
- How liquid nutrients are prepared and supplied to plants
- Use of artificial lights — type, placement and duration
- Methods used to control moisture levels and temperature
- How the unit is protected from wind and excess light
- Water supply and recycling system
- Types of crops or plants being grown hydroponically
- Tools and equipment used for harvesting and storage
Record of Observations During Field Visit
- Date of Visit: _________________________
- Name of Krishi Vigyan Kendra (KVK): _________________________
| New Technologies Related to | Observations |
| Liquid nutrients/nutrient solution | |
| Use of artificial lights instead of sunlight | |
| Simulating moisture in a dry area | |
| Protection from light and wind | |
| Control of water supply |
Questions to Ask Experts
1. What are the advantages and disadvantages of the hydroponics system?
_____________________________________________________________
2. Is there any difference in the method or tools used for harvesting, transport and storage?
_____________________________________________________________
Question 1.
What is hydroponics and how does it differ from traditional Soil-based farming?
Answer:
Hydroponics is a method of growing plants in a nutrient-rich water solution instead of soil. It is different from traditional soil-based farming in the following ways
| Hydroponics | Traditional Soil-based Farming |
| Plants grow in nutrient-rich | Plants grow in soil and |
| water without soil. | get nutrients from it. |
| Uses less water and land, | Requires large land and |
| suitable for urban farming. | more water for cultivation. |
Question 2.
How are nutrients supplied to plants in a hydroponic system?
Answer:
Nutrients supplied to plants in a hydroponic system in the following ways
- Essential mineral nutrients such as nitrogen, phosphorus and potash are dissolved in the water to form nutrient solution.
- Plant roots are either submerged in or regularly exposed to this nutrient solution.
Question 3.
Why is water management important in hydroponics? How is water recycled or reused in the system?
Answer:
Water management is very important because water is the main medium for delivering nutrients to plants.
In hydroponic systems, water is circulated and reused — the water that drains out is collected in a reservoir and pumped back into the system. This recycling significantly reduces water wastage compared to traditional farming.
Question 4.
What are the advantages and disadvantages of growing crops using hydroponics?
Answer:
The advantages and disadvantages of growing crops using hydroponics are
Advantages
- Uses much less water than traditional farming.
- No need for large areas of land — vertical farming is possible.
Disadvantages
- High initial cost for equipment like pumps, pipes and aerators.
- Requires electricity for aerators and pumps.
Question 5.
How are plants protected from excess light and wind in a hydroponic setup?
Answer:
Plants are protected from excess light and wind in a hydroponic setup in the following ways
- Plants are grown inside a polyhouse or greenhouse that controls light, temperature, and humidity.
- Shade nets are used to reduce excess sunlight and prevent heat stress.
- Wind protection nets are used to reduce damage caused by strong winds and protect plant growth.
Kaushal Bodh Class 8 Hydroponics Growing Plants without Soil Question Answer
Activity 2: Growing microgreens for preparing a healthy salad.
Purpose of the Activity
This activity will help students to learn how to grow high-nutrient superfoods at home while studying the plant life cycle. It provides hands-on experience in urban farming, teaching you to monitor seed germination and compare different growing methods.
Pre-Planning
- Discuss what microgreens are and how they differ from sprouts and fully grown vegetables. Talk about why they are considered nutritionally dense despite their small size.
- Revise the following concepts before shorting the activity
- Seed germination and its requirements (moisture, warmth, light)
- Types of seeds suitable for microgreens (cabbage, mustard, fenugreek, spinach, coriander, beetroot, wheat)
- Growing methods difference between soil-based and soilless (hydroponic/coco peat)
- Organic vs. inorganic nutrition supplements.
- Prepare a list of materials you will need and arrange them before the activity begins
- Plastic tray or flat container (approx. 10 cm * 30 cm)
- Soil or coco peat
- Seeds of your choice
- Spray bottle
- Scissors for harvesting
- Frame 2-3 questions you are curious about such as
- Why do microgreens need light but sprouts do not?
- Which seeds germinate the fastest?
Steps for growing microgreens
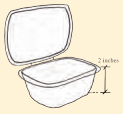
Step 1: Use a plastic tray or a flt earthen pot (ideally, dimensions should be 10 cm × 30 cm). You can also use old plastic-food-packaging containers, offi trays, and flt planters to grow microgreens. Make holes at the bottom of the tray to drain extra water.
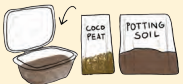
Step 2: Fill the container with soil or cocopeat —about 2 inches deep.
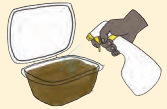
Step 3: Uniformly moisten the soil by adding water.
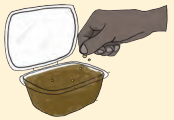
Step 4: Spread the seeds in the container and cover them with a thin layer of soil or cocopeat.
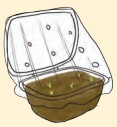
Step 5: Usually, seeds will start germinating within 2–3 days. Keep trays in a moist and humid place. Observe plant growth daily. You can place the trays near a window for sunlight or in racks with artifiial light, like a white tubelight or a Light Emitting Diode (LED) bulb.
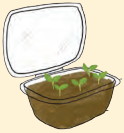
Step 6: Harvest microgreens when you see a set of fist true leaves (about 5 to 7 cm height). True leaves emerge after the initial seed leaves appear. For most microgreens, this is approximately 10 days after planting.
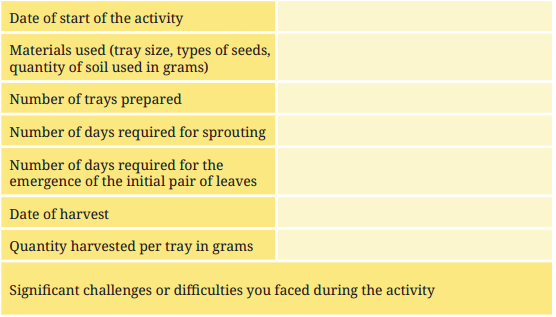
Recording details of growing microgreens
Question 1.
What are the advantages and disadvantages of growing microgreens using hydroponics?
Answer:
The advantages and disadvantages of growing microgreens using hydroponics are
Advantages
- Microgreens are ready to harvest in just 10-15 days —very quick.
- They can be grown in very small spaces using trays.
Disadvantages
- Microgreens cannot be harvested more than once — the tray must be replanted.
- They are delicate and can be damaged by overwatering.
Question 2.
Have you used the microgreens? How did you use them (raw salad or as a garnish)?
Answer:
Yes, I have used the microgreens. I used them in the following ways
(i) Mixed with chopped tomatoes and cucumber to make a fresh healthy salad,
(ii) Used as a garnish on top of a bowl of soup.
Question 3.
Can this method be applied to all crops? What are the probable limitations of microgreen production?
Answer:
No, the microgreen method cannot be applied to all crops. Its limitations are
- It is suitable only for seeds that can germinate and produce edible seedlings quickly (like cabbage, mustard, spinach, coriander).
- Larger plants like tomatoes, brinjal, or root vegetables cannot be grown as microgreens.
Question 4.
What factors affect the growth rate of microgreens ?
Answer:
The factors that affect the growth rate of microgreens are as follows
- Light, temperature and humidity Proper light (natural or artificial) along with suitable temperature and humidity creates a favourable environment for photosynthesis and healthy plant growth.
- Water and moisture Adequate moisture and good-quality water with proper pH help in seed germination and ensure that plants absorb nutrients effectively.
Question 5.
Why is it important to harvest microgreens at the correct stage of growth?
Answer:
Harvesting microgreens at the correct stage, when the first true leaves appear, ensures maximum nutritional value and proper taste. Delayed harvesting may reduce quality, while early harvesting may result in underdeveloped plants with lower nutrient content and yield.
Activity 3: Building a hydroponic system using “Wick Method”
Purpose of the Activity
This activity teaches the principles of sustainable hydroponics by using recycled materials to build a low-cost wick system. Students observe how capillary action transports water to roots, demonstrating how to grow food in minimal space. It builds practical skills in functional design and monitoring while promoting the reuse of everyday resources.
Pre-Activity Preparation (In Class)
Before starting the activity, revise the following concepts
- Capillary action and how water moves through materials
- Types of growth media (soil, coco peat, gravel, perlite)
- Basic plant needs — water, nutrients, light and air
- What a wick is and how absorbent materials work
Use the internet to research the wick method of hydroponics and note down at least two advantages it has over – other hydroponic methods.
Collect and bring the following materials to class before the activity begins
- One used 2L PET bottle (cleaned)
- Waste cotton cloth or thick cotton thread for the wick
- Cutter or scissors
- Screwdriver (for making the hole in the cap)
- Soil or coco peat
- Seeds or seedlings of your choice
- Water
Frame 2-3 questions you are curious about such as
- How far can water travel up through a wick?
- Will the plant roots eventually reach the water reservoir?
Growing plants using wick method
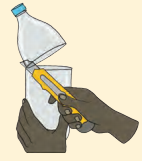
Step 1: You can use any PET bottle. Take a used PET bottle of 2 L capacity. Cut the top (10–15 cm) with a cutter or knife under the teacher’s supervision.
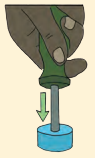
Step 2: Flip the top upside down to rest on the larger bottom part. The top part will be used as a planter while the bottom will be used as a water reservoir. Using a screwdriver or scissors, make a hole in the bottle cap.
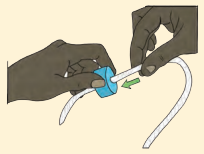
Step 3: Attach a wick of any waste cotton cloth or thread through the hole.
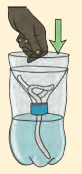
Step 4: Fill the bottom reservoir with water. Place the cap on the bottle and fil the latter with growth medium.
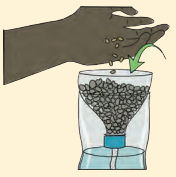
Step 5: Once the soil gets soaked, plant seeds or seedlings
Details of growing plants using wick method
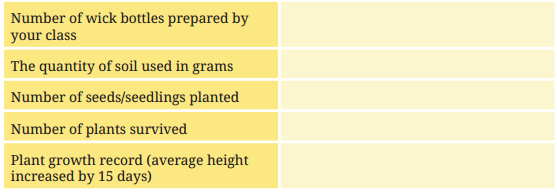
Question 1.
Which seeds, seedlings or plant cuttings did you use for the wick system?
Answer:
We used coriander seeds and a money plant cutting in the wick system. The coriander seeds were sown directly in the coco peat, and the money plant cutting was placed so that one node was in the growth medium. The wick drew water from the reservoir below and kept the medium moist.
Question 2.
Were you able to observe the soil getting wet in the upper pot?
Answer:
Yes, after a few hours of setting up the wick system, the soil or coco peat in the upper planter gradually became moist. This happened due to capillary action.
Water travelled upward through the cotton wick from the water reservoir in the lower part of the bottle, even against gravity.
Question 3.
List three key difficulties during building the system. What did you do to overcome them?
Answer:
The three key difficulties during building the wick system are as follows
- Cutting the PET bottle evenly was difficult and could lead to an uneven setup.
- Making a proper hole in the bottle cap for the wick was challenging.
- The wick sometimes dried out quickly and did not supply enough water.
We drew a straight line before cutting the bottle, made a small hole using a screwdriver and widened it carefully, and used a thicker cotton cloth strip to ensure better water absorption and continuous moisture supply.
Question 4.
How does capillary action help in supplying water to the plants in the wick system?
Answer:
Capillary action helps water move from the reservoir to the plant roots through the wick. The water travels upward through the fibres of the wick without the need for a pump, ensuring a continuous supply of moisture to the plants.
Question 5.
Why is the wick method considered a low-cost and sustainable hydroponic system?
Answer:
The wick method is considered low-cost and sustainable because it uses recycled materials like PET bottles and does not require electricity or expensive equipment. It promotes efficient water use and reuse of resources, making it suitable for simple and eco-friendly farming.
Activity 4: Building a hydroponic system using Deep Water Culture (DWC) or Bucket method
Purpose of the Activity
This activity will help students to grow plants in water using recycled containers. The students will learn how roots stay healthy with oxygen and howto keep the water clean from green slime (algae). By tracking your plant’s growth and costs, you will build useful skills in science and budgeting.
Pre-Activity Preparation (In Class)
- Discuss how DWC differs from the wick method and why oxygenation of water is important for plant roots.
- Revise basic concepts
- Role of oxygen in root health, properties of soilless growth media (cocopeat, coco-coir, sand).
- Why algae grow in sunlit water.
- Research Online Crops commonly grown in DWC and the difference between net pots and regular pots.
- Collect materials before the activity
- Recycled bucket or water tub (10-15 L)
- Styrofoam sheet or plastic sheet for lid
- Tea or coffee cups (as net pots)
- Scissors or cutter
- Cocopeat or sand as growth medium
- Seeds or seedlings
- Aerator or small aquarium air pump
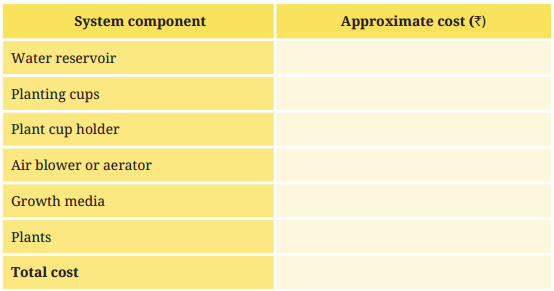
- Estimate the approximate cost of each material, as you will be filling in the cost table during the activity.
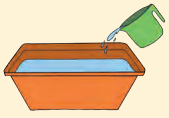
Step 1: Get a bucket or water tub (10–15 L capacity). You can use any recycled bucket or water tub. Just ensure that it does not leak.

Step 2: Make a lid for the bucket or tub using a plastic sheet (a wooden or styrofoam sheet can also be used).
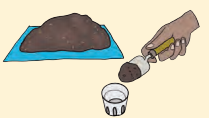
Step 3: Now, make holes in the lid to place the plant cups (net pots). You can use tea or coffe cups as net pots by making holes or vertical slits.
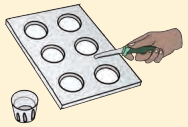
Step 4: Fill growth medium like cocopeat, coco-coir, or sand in the plant cup along with 2–3 seeds or seedlings of spinach.
A net cup needs to fi the hole fimly. You can keep a space of 5–10 cm between the cups.
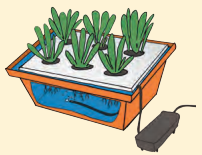
Step 5: Add water in the reservoir such that it just touches the base of the net pot.
Place an aerator in the water tub and observe plant growth regularly.
Details related to setting up the DWC hydroponic system
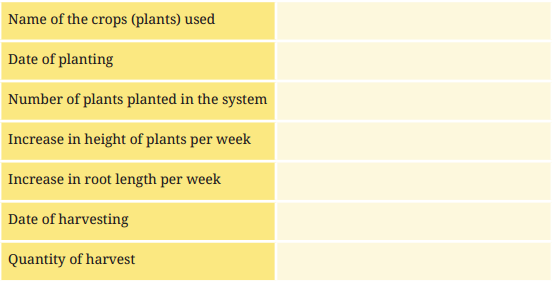
Observing growth of plants in DWC hydroponic system
Question 1.
List three key challenges you faced during construction and maintenance of the DWC system.
Answer:
The three key challenges I faced during construction and maintenance of the DWC system were
(i) Algae started growing in the water because sunlight was entering through a gap in the styrofoam lid. This was fixed by covering all gaps with dark tape.
(ii) The roots of some plants turned slightly brown. We discovered the aerator was not working properly. We replaced the air diffuser and the roots became white again.
(iii) Water level in the bucket dropped faster than expected. We added a marking on the side of the bucket to check the water level daily and refill it regularly.
Question 2.
Why is oxygen supply important for plant roots in the DWC system?
Answer:
Oxygen supply is essential for plant roots to remain healthy and function properly. In the DWC system, roots are submerged in water, so dissolved oxygen prevents „root suffocation, supports nutrient absorption, and ensures proper growth and development of plants.
Question 3.
How does the aerator help in maintaining healthy plant growth?
Answer:
The aerator adds oxygen to the water, increasing dissolved oxygen levels required by plant roots. This helps roots stay healthy and white, improves nutrient absorption, and prevents root damage caused by oxygen deficiency in the DWC system.
Question 4.
What is the role of the lid or styrofoam sheet in the DWC system?
Answer:
The role of the lid or styrofoam sheet in the DWC system is as follows
- It supports the plant cups and keeps them stable above the water.
- It blocks sunlight from entering the water, preventing algae growth and maintaining water quality.
Question 5.
Why should the water level just touch the base of the net pot?
Answer:
The water level should just touch the base of the net pot so that roots can access moisture and nutrients while still getting oxygen. This balance prevents over-submersion and ensures proper root development and healthy plant growth.
Activity 5: Building a hydroponic system using Nutrient Film Technique (NFT)
Purpose of the Activity
This activity will help students to understand the working of the NFT hydroponic system, learn how water flow and slope support plant growth, and develop practical skills in designing, building, and maintaining a low-cost hydroponic setup.
Pre-Planning
- Build a professional NFT system where a thin, moving stream of nutrient water flows over plant roots.
- Understand how to manage water levels and gravity slopes to ensure plants get both food and oxygen.
- Develop technical skills in system design, plumbing and monitoring using recycled or low-cost materials.
- Review how NFT systems differ from soil-based farming by using moving water to feed and oxygenate roots simultaneously.
- Select a location with a power outlet for the water pump and enough light for the plants to grow.
- Gather essential tools like a saw drill for net pot holes and silicone glue to prevent leaks in the PVC pipes.
- Choose suitable crops like leafy greens and prepare a sturdy support structure using metal, wood or bamboo.
Steps to Build the NFT System
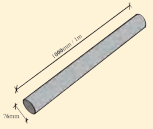
Step 1: Use a PVC pipe of 3inch (76 mm) diameter and 1metre length. You can plant 6 to 7 plants in a metre-long pipe. You can make stacks of 4–5 pieces.
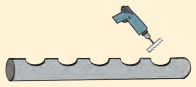
Step 2: You will also need two end caps to close both ends of the pipe. Make holes at equal intervals in the PVC pipe using a saw drill. You must be careful to ensure that the size and distance of the holes accommodate the net pot and keep equal space between the plants.
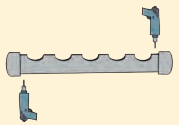
Step 3: You can get the help of an expert (metal fabricator or carpenter) to drill a hole in the PVC pipe. Place the end caps at both ends of the pipe. Drill water inlet and outlet holes at the side of the end caps. You will need to seal these holes with a silicone glue gun after placing the water pipe.

Step 4: Make a structure using wooden or bamboo sticks or a metal rack to place the PVC pipe vertically.
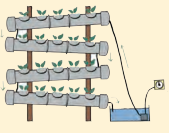
Step 5: You can use a water bucket or a tub as a water reservoir. Add a water pump to the water inlet while connecting all the outlets to the NFT beds. You can attach a simple on–of timer for controlling water flw. An on–of timer is a device that automatically turns on or of an electrical appliance at pre-determined times
Useful App
Use the Indian Council of Agriculture Research (ICAR) AI-DISC mobile application to identify plant diseases, pests and nutrient deficiencies from photos of your plants.
Details relating to setting up the NFT hydroponic system
| S. No. | Detail | Response |
| 1. | PVC pipe (length, number of pipes) | |
| 2. | Net pots (number used) | |
| 3. | Water pump (wattage) | |
| 4. | Water reservoir (capacity in litres) | |
| 5. | Support structure (material used) | |
| 6. | Total approximate cost (?) |
Record of observations related to growth of plants using the NFT system
| S. No. | Detail | Your Response |
| 1. | Name of crops used | |
| 2. | Date of planting | |
| 3. | Number of plants planted | |
| 4. | Leaf colour changes observed | |
| 5. | Any pest infestation noticed | |
| 6. | Any nutrient deficiency signs |
Question 1.
Why did you use an aerator in the DWC system but not in the NFT system?
Answer:
In the DWC system, plant roots are submerged in still (non-moving) water. Without an aerator, there would be no dissolved oxygen in the water, causing the roots to rot and turn brown. An aerator pumps air into the water to dissolve oxygen, keeping the roots healthy.
In the NFT system, water continuously flows as a thin film over the roots. This constant movement naturally aerates the water and keeps oxygen levels sufficient, so no aerator is needed.
Question 2.
Make a comparison chart for DWC vs. NFT systems — you can compare aspects such as ease of construction, plant growth, etc.
Answer:
Comparison chart of DWC vs. NFT systems is as follows
| Feature | Deep Water Culture (DWC) | Nutrient Film Technique (NFT) |
| Ease of Construction | Very Easy; Can be built with a simple bucket, lid and air pump. | Moderate to Difficult; Requires precise drilling, plumbing and slope alignment. |
| Water Movement | Static; water stays in the reservoir and is oxygenated by air stones. | Active; water constantly flows from a reservoir through pipes and back. |
Question 3.
How does the slope of the pipes affect water flow in the NFT system?
Answer:
The slope of the pipes affects water flow in the NFT system in the following ways
- Proper slope ensures a smooth and continuous flow of water over the plant roots.
- Incorrect slope may cause water stagnation or overflow, affecting nutrient supply and plant growth.
Question 4.
Why is a continuous flow of water important in the NFT system?
Answer:
A continuous flow of water is important in the NFT system because it ensures a constant supply of nutrients to the plant roots. It also helps maintain oxygen availability and prevents stagnation, supporting healthy root development and proper plant growth.
Question 5.
What types of crops are most suitable for the NFT hydroponic system?
Answer:
Leafy greens are most suitable for the NFT hydroponic system, as they grow well in a continuous flow of nutrient-rich water. Crops like lettuce, spinach, and herbs are commonly grown because they require less support and adapt easily to this system.
Activity 6: Making compost tea
Purpose of the Activity
This activity helps students understand how to prepare compost tea, a liquid organic manure used in hydroponics. By making compost tea themselves, students learn about the role of nutrients, microbes and aeration in plant growth — and how organic waste can be recycled into a powerful plant food.
Pre-Activity Preparation
- Discuss what compost is and how it is made from decaying plant matter, food waste or manure.
- Revise basic concepts
- Macronutrients needed by plants: nitrogen, phosphorus, potash, magnesium, sulphur.
- Difference between solid and liquid manure.
- What microbes are and why they are beneficial for plant growth.
- Examine a smail sample of ready compost — observe its colour, smell and texture before beginning.
- Arrange the required materials: 100-150 g compost, muslin cloth, 15 L bucket, 10 L water, 50 g jaggery or sugar, wooden stick and an aerator.
- Frame 2-3 questions you are curious about such as
- Why does compost tea need to be brewed for 2-3 days?
- What happens if we skip addingjaggery?
Steps to Make Compost Tea
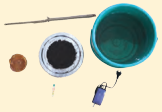
Step 1: Get 100 to 150 g of ready to use compost. Compost has essential plant nutrients, like nitrogen, phosphorus, potash, magnesium, sulphur, etc.

Step 2: Add compost to a muslin cloth and place it in a bucket of 15 L capacity. Add around 10 L water in bucket.

Step 3: Add 50 g jaggery or sugar, stir with wooden stick to mix it. Jaggery or sugar will act as food for microbes in compost. Microbes help plant roots to absopt plant nutrient faster.

Step 4: Put a aerator to brew it for 2–3 days. Aerator provides oxygen, essential for microbial growth
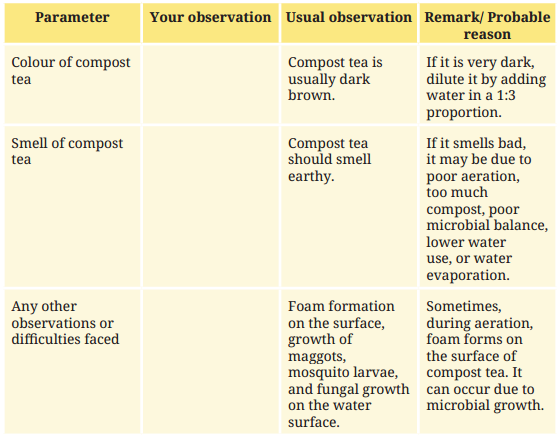
Record of observations during process of making compost tea
Question 1.
Why compost tea is used in hydroponics? Give suitable reasons.
Answer:
Compost tea is used in hydroponics because of the following reasons
- It provides a liquid form of organic nutrients that easily mixes with the water system.
- It supplies essential nutrients like nitrogen, phosphorus, potassium, and other minerals directly to plant roots.
Question 2.
Why is jaggery added to the compost tea? What role do microbes play?
Answer:
Jaggery (or sugar) is added to feed the beneficial microbes present in the compost. These microbes break down the complex organic nutrients in the compost into simpler forms that plant roots can absorb easily. The microbes multiply quickly when given jaggery as food. They also help protect plants from harmful diseases.
Question 3.
What colour and smell should good compost tea have?
Answer:
Good compost tea should be dark brown with a pleasant earthy smell. If the tea is very dark, it should be diluted with water in a 1:3 ratio before use. A bad or rotten smell indicates poor aeration or too much compost was used.
Question 4.
What does the aerator do in the compost tea setup? Why is oxygen important for microbial growth?
Answer:
The aerator pumps air into the compost and water mixture. This provides oxygen to the beneficial microbes in the compost.
Oxygen is essential because the microbes that break down nutrients are aerobic (oxygen-loving). Without oxygen, harmful anaerobic bacteria may grow instead, producing bad smells and reducing the quality of the compost tea.
Question 5.
What problems might cause bad smell in the compost tea?
Answer:
Bad smell in compost tea might cause the following problems
- Poor Aeration: If the aerator is not working properly, there is insufficient oxygen for beneficial microbes.
- Too Much Compost Added: Overloading the water with compost can lead to anaerobic decomposition and foul odour.
Activity 7: Maintaining water pH
Purpose of the Activity
This activity helps students understand the importance of water pH in a hydroponic system. By testing and adjusting the pH of water themselves, students learn how acidity and alkalinity affect nutrient absorption in plants — and how weak acids can be safely used to maintain the ideal pH range for healthy plant growth.
Pre-Activity Preparation (In Class)
- Discuss what pH means and why it matters for plant growth in a hydroponic system.
- Revise basic concepts
- pH scale: neutral (7), acidic (below 7) and alkaline (above 7).
- Why nutrient mobility is best between pH 6.0 and 7.0.
- Difference between strong acids and weak acids, and why weak acids are safer for school use.
- Examine a pH paper strip — understand how the colour change indicates different pH values.
- Arrange the required materials: 1 L tap water, pH paper strips, weak acid (vinegar or citric acid/lime juice), measuring cylinder and a hydroponic setup (DWC or NFT).
- Frame 2-3 questions you are curious about such as
- Why is pH 7 considered neutral?
- What will happen to the plants if the water becomes too acidic?
Maintaining water pH in hydroponic system
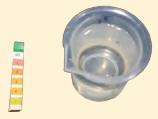
Step 1: Take 1 L of tap water. Check its pH with a pH paper strip. It will be neutral.

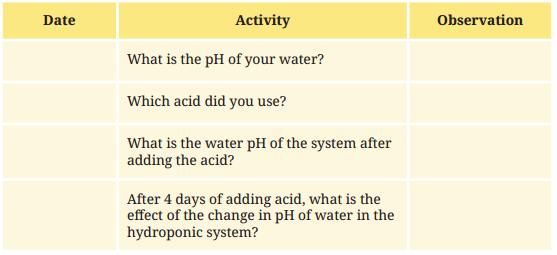
Step 2: Add a cup (20 –30 mL) of a weak acid. Adjust its pH to 4 (acidic) using weak acids like vinegar or citric acid

Step 3: Add this water to your hydroponic system (DWC or NFT). Check the change in the pH value of water.

Step 4: Check its effect on the growth of plant roots and leaves in 2–3 days, and note your observations.
Results of pH test of water before and after adding acid
Question 1.
What is pH and why is it important in hydroponics?
Answer:
pH is a measure of the acidity or alkalinity of water. It is important in hydroponics because it affects nutrient absorption.
If the pH is not in the ideal range, plants cannot absorb nutrients properly, affecting their growth and health.
Question 2.
What is the ideal pH range for plant growth in hydroponics?
Answer:
The ideal pH range for plant growth in hydroponics is between 6.0 and 7.0. In this range, nutrient mobility is highest, allowing plants to absorb essential nutrients efficiently for proper growth and development.
Question 3.
Why are weak acids used to adjust pH in hydroponic systems?
Answer:
Weak acids like vinegar or citric acid are used because they are safer and easier to handle, especially in school setups. They help reduce pH gradually without causing harm to plants or users compared to strong acids.
Question 4.
How can you test the pH of water in a hydroponic system?
Answer:
The pH of water can be tested using a pH paper strip. When dipped in water, the strip changes colour, which is compared with a colour chart to determine whether the water is acidic, neutral, or alkaline.
Question 5.
How does adjusting pH help in healthy plant growth?
Answer:
Adjusting pH helps maintain the optimal range for nutrient absorption. Proper pH ensures that essential minerals remain available to plant roots, supporting healthy growth, better root development, and improved overall plant productivity.