Free access of the complete Ganita Prakash Book Class 6 Solutions and Chapter 8 Playing with Constructions Class 6 NCERT Solutions Question Answer are crafted in simple format to align with the latest CBSE syllabus.
Class 6 Maths Chapter 8 Playing with Constructions Solutions
Playing with Constructions Class 6 Solutions Questions and Answers
8.1 Artwork Construct (Page No. 190 – 191)
Question 1.
What radius should be taken in the compass to get this half circle? What should be the length of AX?
Solution:
The radius should be taken of 2 cm in the compass to get this half circle and the length of AX is 4 cm.
Question 2.
Consider a “Wavy Wave” of the given form.

Take a central line of a different length and try to draw the wave on it.
Solution:
Step 1. We start with the central line of different lengths, say, 10 cm. (Figure 1)

Step 2. Since \(\frac{10}{2}\) = 5, using a ruler, take point C on AB such that AC = 5 cm. C is the mid-point of AB.
As 5 ÷ 2 = 2.5, using a ruler, take points D on AC and E on CB such that AD = 2.5 cm and CE = 2.5 cm.
D is the mid-point of AC and E is the mid-point of CB. (Figure 2)

Step 3. With centre at D, draw a half circle above the central line AB and of radius 2.5 cm. With centre at E, draw a half circle below the central line AB and of radius 2.5 cm. (Figure 3)

Step 4. Draw vertical lines in the half circles above and below the line AB. (Figure 4)

Step 5. The figure represents the required depiction of the given “Wavy Wave” with the central line of length 10 cm.
Question 3.
Try to recreate the figure representing a “Wavy Wave”, where the waves are smaller than a half circle.
Try to recreate the figure where the waves are smaller than a half circle (as appears in the neck of the figure ‘A Person’). The challenge here is to get both the waves to be identical. This may be tricky!
Solution:
We shall draw a “Wavy Wave” of the form given in Figure 1.

Here, the waves are smaller than a half circle.
Step 1. We start with the central line AB of length 10 cm, say. (Figure 2)

Step 2. Since 10 ÷ 2 = 5, using a ruler take a point C on AB such that AC = 5 cm. C is the mid-point of AB.
Since 5 ÷ 2 = 2.5, using a ruler, take points D on AC and E on CB such that AD = 2.5 cm and CE = 2.5 cm.
D is the mid-point of AC and E is the mid-point of CB. (Figure 2)

Step 3. At D, draw a perpendicular line below AB, using a protractor. At E, draw a perpendicular line above AB, using a protractor. (Figure 3)

Step 4. Using a ruler, mark points F and G such that DF = 1.5 cm and EG = 1.5 cm.
Equal distances between DF and EG can also be slightly less than or greater than 1.5 cm. (Figure 4)

Step 5. Join AF and BG. With the centre at F, draw an arc from A to C of a radius equal to AF. With the centre at G, draw an arc from B to C of a radius equal to GB. (Figure 5)

Step 6. Draw vertical lines in Figure 5. Also, erase the extra lines in Figure 5 as shown in Figure 6.

Step 7. Figure 6 represents the required depiction of a “Wavy Wave”, where the waves are smaller than a half circle.
![]()
8.2 Squares and Rectangles Figure it Out (Page 194)
Question 1.
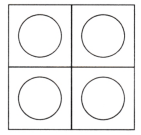
Draw the rectangle and four squares configuration (shown in Figure) on a dot paper. What did you do to recreate this figure so that the four squares are placed symmetrically around the rectangle? Discuss with your classmates.

Solution:
To recreate the configuration where a rectangle is placed at the center, and four squares are placed diagonally opposite around it, follow these steps:
1. Draw the Rectangle:
Begin by drawing the rectangle in the center of the dot paper. Ensure the sides of the rectangle are aligned with the dots for accuracy and symmetry.
2. Positioning the Squares Diagonally:
Next, place the four squares at the corners of an imaginary larger square around the rectangle. Each square will be positioned diagonally opposite to one another, ensuring they are all equidistant from the rectangle. The squares should be placed outside the rectangle.
3. Ensuring Symmetry and Diagonal Alignment:
Ensure that each square is aligned diagonally concerning the center of the rectangle. The arrangement creates a balanced and symmetrical pattern, with the four squares positioned at the outer corners, maintaining equal spacing from the rectangle’s edges.
By following these steps, the rectangle and the four squares are placed symmetrically, with the squares occupying diagonally opposite positions around the central rectangle. This arrangement helps demonstrate how shapes can interact spatially, maintaining both symmetry and balance.
Question 2.
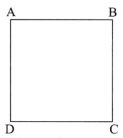
Identify if there are any squares in this collection. Use measurements if needed.

Solution:
In the given collection, only figure A is square as all the sides are equal length and the vertex angles are 90°.
Question 3.
Draw at least 3 rotated squares and rectangles on a dot grid. Draw them such that their corners are on the dots. Verify if the squares and rectangles that you have drawn satisfy their respective properties.
Solution:
We draw two rotated squares and two rotated rectangles on a dot grid such that the comers of squares and rectangles are on dots.

We have drawn two rotated squares (II and III) and two rotated rectangles (I and IV). These squares and rectangles are drawn keeping in view the number of dots between sides and also the position of sides.
Using a protractor, we find that all angles of figures I to IV are 90°.
Using a ruler, we find that the opposite sides of Figures I and IV are equal and all sides of Figures II and III are equal.
∴ By definition, figures I and IV are rectangles, and figures II and III are squares.
8.3 Constructing Squares and Rectangles Construct (Page No. 197)
Question 1.
Draw a rectangle with sides of length 4 cm and 6 cm. After drawing, check if it satisfies both the rectangle properties.
Solution:
Take the length
Step 1:
![]()
Step 2:

Mark a point to draw a perpendicular to PQ through P.

Step 3:

Can you see why PS should be 6 cm long?
Step 4: Draw a perpendicular to line segment PQ through Q.

Step 5: If we had used the compass, then the next point can easily be marked using it!

Step 6:

- The opposite sides are equal in length, and
- All the angles are 90°.
![]()
Question 2.
Draw a rectangle of sides 2 cm and 10 cm. After drawinfg, check if it satisfies both the rectangle properties. t
Solution:
Rectangle with sides 2 cm and 10 cm.
Steps
(i) Draw a line AB = 10 cm.
(ii) At point A, use the protractor to mark a 90° angle and draw line AD 2 cm.
(iii) Do the same at point B to draw line BC = 2 cm.
(iv) Connect D and C to complete the rectangle.
(v) Check that opposite side are equal and all angles are 90°.

Question 3.
Is it possible to construct a 4-sided figure in which
(i) all the angles are equal to 90°
(ii) opposite sides are not equal?
Solution:
No
8.4 An Exploration in Rectangles Construct (Page No. 201 – 203)
Question 1.
A Square within a Rectangle
Construct a rectangle of sides 8 cm and 4 cm. How will you construct a square inside, as shown in the figure, such that the centre of the square is the same as the centre of the rectangle?

Hint: Draw a rough figure. What will be the sidelength of the square? What will be the distance between the corners of the square and the outer rectangle?
Solution:
The centre of a rectangle (or square) is the point of intersection of its diagonals.
Step 1. Using a ruler, draw a line AB equal to 8 cm. Using a protractor, draw perpendicular lines at A and B. Using a ruler, mark point P on the perpendicular line at A such that AP = 4 cm. Using a ruler, mark point Q on the perpendicular line at B such that BQ = 4 cm. Join P and Q using a ruler. Erase the lines above P and Q. (Fig. 1)

Step 2. Draw diagonals AQ and BP, using a ruler. Let the diagonals intersect at C. This point is the centre of the rectangle ABQP and of the required square. (Fig. 2)

Step 3. Erase diagonals AQ and BP. Using a protractor, draw a perpendicular line on AB and pass through the centre C. Let this perpendicular meet AB at R and PQ at S. (Fig. 3).

Step 4. Since AP = 4 cm, each side of the square must be 4 cm. Using a ruler, mark points A’ and B’ on AB such that A’R = 2 cm and RB’ = 2 cm. Thus, A’B’ = A’R + RB’ = 2 cm + 2 cm = 4 cm.
Similarly, using a ruler, mark points P’ and Q’ on PQ such that P’S = 2 cm and SQ’ = 2 cm. Thus, P’Q’ = P’S + SQ’ = 2 cm + 2 cm = 4 cm. (Fig. 4).

Step 5. Using a ruler, join A’ and P’ and also B’ and Q’. Erase the line RS. (Fig. 5).

Step 6. In Fig. 5, A’B’Q’P’ is the required square with centre C, which is also the centre of the given rectangle.
Question 2.
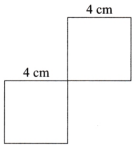
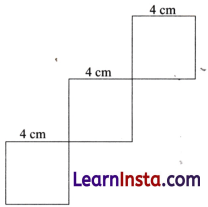
Falling Squares
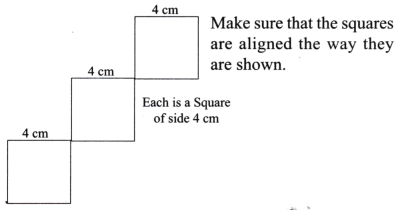
Now, try this.
Solution:
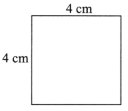
Draw a square of side 4 cm.

Again, draw a square of side 4 cm at one comer of the previous square.
Repeat the previous step, we get
Draw the second figure by yourself.
![]()
Question 3.
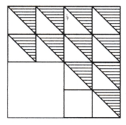
Shadings
Construct this. Choose measurements of your choice. Note that the larger 4-sided figure is a square and so are the smaller ones.
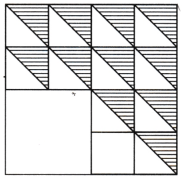
Solution:
Draw a square of sides 4 cm each and cut it into 4 smaller squares with sides 2 cm each.
Again cut the one smaller square with side 2 cm each into 4 smaller squares with side 1 cm each.
Repeat the previous step in 2 more smaller squares of side 2 cm each and leave one smaller square as it is.
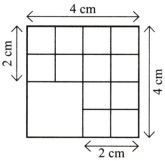
Now, out of 12 smaller squares, draw a diagonal in 11 smaller squares and shade its one part. Then, we get the required figure.
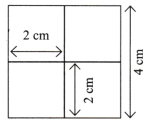
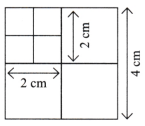
Question 4.
Square with a Hole
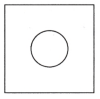
Observe that the circular hole is the same as the centre of the square.
Hint: Think where the centre of the circle should be.
Solution:
Draw a square with side 4 cm.
Determine the centre by drawing the diagonals of the square.
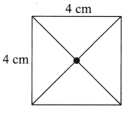
Now, from the centre of square, draw a circle with radius 1 cm.

We get the required figure.
Question 5.
Square with more Holes
Solution:
Do it Yourself.
Question 6.
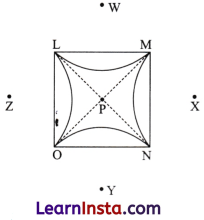
Square with curves
This is a square with 8 cm sidelengths.
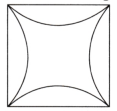
Hint: Think where the tip of the compass can be placed to get all the 4 arcs to bulge uniformly from each of the sides. Try it out!
Solution:
First draw a square with 8 cm sidelengths named ABCD.
Now, mark the midpoints of each side of the square as L, M, N and O on sides AB, BC, CD and DA respectively. Also, join diagonals AC and BD. Let they intersect at P.

Further, draw lines passing through L and N and extend it to the points W and Y such that PL = LW = PN = NY. Similarly, extend line OM to the points X and Z.
Using these points as centres draw four circular axes with a radius equal to WA. Each arc should be drawn inside the square, connecting two adjacent vertices.
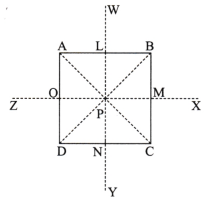
Thus, we get the required figure.
![]()
8.5 Exploring Diagonals of Rectangles and Squares Construct (Page No. 211)
Question 1.
Construct a rectangle in which one of the diagonals divides the opposite angles into 50° and 40°.
Solution:
Step 1: Draw a line with an arbitrary length.
![]()
Step 2: Draw a perpendicular on AB through B and mark D on the perpendicular at any length using ruler.

Step 3: Put protractor at point A and mark point C on line BD such that ∠BAC = 50°.

Step 4: Draw a line perpendicular to AB at A and mark the point E such that AE = BC.
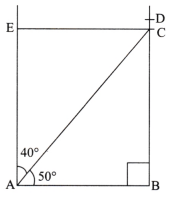
Thus, ABCE is the required rectangle with ∠CAB = 50° and ∠EAC = 40°
Question 2.
Construct a rectangle in which one of the diagonals divides the opposite angles into 45° and 45°. What do you observe about the sides?
Solution:
Step 1:


Step 2:

Step 3: Draw a perpendicular through A on AB.

Now ∠A is divided into two angles. One measures 45°. The other angle is 45°.
Step 4:

Draw a line perpendicular to BC at C to get the point D.
When both angles are equal the adjacent sides of a rectangle are equal and it is called square.
Question 3.
Construct a rectangle one of whose sides is 4 cm and the diagonal is of length 8 cm.
Solution:
Steps
(i) Draw a line segment AB = 4 cm.
![]()
(ii) At B, draw a perpendicular line BY.

(iii) Take an arc of length 7 cm on a compass and draw the arc to cut the perpendicular BY at the point C.

(iv) At the points C and A draw two perpendiculars which will intersects at the point D.

Here, ABCD is the required rectangle.
Question 4.
Construct a rectangle one of whose sides is 3 cm and the diagonal is of length 7 cm.
Solution:
Do it yourself.
8.6 Points Equidistant from Two Given Points Construct (Page No. 215)
Question 1.
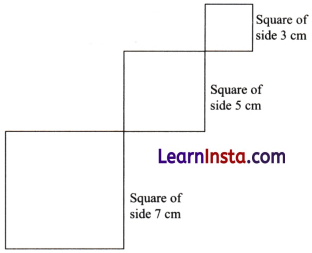
Construct a bigger house in which all the sides are of length 7 cm.
Recreate the given figure. Note that all the lines forming the border of the house are of length 7 cm.
Solution:

Step 1. Using a ruler, draw a line DE equal to 7 cm. (Fig. 1)

Step 2. Using a protractor, draw perpendicular lines to DE at D and E. Take point B perpendicular at D such that BD is 7 cm. Take point C on perpendicular at E such that CE is 7 cm. (Fig. 2)

Step 3. 7 cm – 1 cm = 6 cm and 6 cm ÷ 2 = 3 cm. Using a ruler, take points P and Q on DE such that DP = 3 cm and QE = 3 cm. Using a protractor, draw perpendiculars to DE at P and Q of length 2 cm each. (Fig. 3)

Step 4. Join R and S. With centres at B and C and a radius of 7 cm, draw arcs to intersect at point A. Join AB and AC. With the centre at A and a radius of 7 cm, draw an arc from B to C. Also, erase the extra lines. (Fig. 4)

Step 5. Fig. 4 is the required recreation of the given house with all the lines forming the border of the house of length 7 cm.
Question 2.
Try to recreate ‘A Person’, ‘Wavy Wave’ and ‘Eyes’ from the section Artwork, using ideas involved in the ‘House’ construction.
Solution:
Do it yourself.
![]()
Question 3.
Is there a 4-sided figure in which all the sides are equal in length but are not squares? If such a figure exists, can you construct it?
Solution:
Yes, it is a rhombus.

Step 1: Draw a vertical line segment PR of length 6 cm.
Step 2: Take the compass of any radius and from the point P mark an arc towards the left and the other towards the right of PR. Repeat the same from point R without changing the compass radius.
Step 3: The other diagonal measures 7 cm. Thus, draw a line joining the two points where the arc intersected each other in such a way that OS = OQ = \(\frac{7}{2}\) = 3.5 cm
Step 4: Join the point P with Q, Q with R, R with S, and S with P.