Class 6 Maths Chapter 8 Playing with Constructions Notes
Class 6 Maths Chapter 8 Notes – Class 6 Playing with Constructions Notes
Artwork
In this topic, we learned to construct some artworks like circles, wavy waves, and eyes.
Circles
A circle is a shape where every point on its edge is at the same distance from its center. This distance is known as the radius. Many familiar objects have this circular shape. Here are some examples you might recognize.
- Clock Face: The surface where the numbers are displayed.
- Pizza: Often made in a round shape.
- Wheel: Found on bicycles and cars.
- Ring: Worn on fingers as jewelry.
![]()
If you need to draw a circle with a radius of 3 cm, then you can follow these steps using a compass.
I. Set the compass width to 3 cm. This is the distance between the pointer and the pencil.
II. Choose the location where you want the center of your circle to be and make a small dot there. Let us call this point O.
III. Place the pointer end of the compass exactly on the dot O.
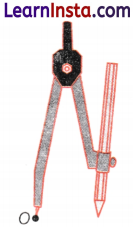
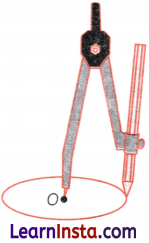
IV. Hold the compass steady at point O and carefully rotate it 360 degrees to draw the circle. Ensure you make a smooth, continuous movement for an even shape.
Example 1.
Use a compass to draw a circle of radius 4 cm.
Solution:
Step I: Use a ruler to set the distance from the point of the compass to the pencil’s lead at 4 cm.
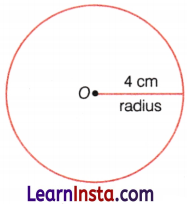
Step II: Place the point of the compass at the centre of the circle O.
Step III: Draw the circle by turning the compass through 360°.
Constructing a Wavy Wave
To draw a wavy wave where the central line is given, follow these steps.
Let us assume the central line AB is 10 cm long and that the first wave is represented as a half-circle.
Materials Needed:
- A ruler
- A compass
- A pencil
- An eraser
Steps:
(i) Use the ruler to draw a straight line segment AB that is 10 cm long. Label the endpoints as A and B.
![]()
(ii) Find the center for the half-circle.
![]()
Determine the mid-point of AB. You can do this by measuring 5 cm from either end of the line and marking this point as M. This mid-point will be the center of the half-circle.
(iii) Adjust the compass so that the distance between the pointer and the pencil is 5 cm (which is half the length of AB) and place the pointer of the compass on point M (the mid-point of AB).

(iv) Draw a half-circle above the line segment AB taking M as a center. This means you will draw the arc from one end of AB to the other, creating a semi-circular wave shape above the central line.

Example 2.
Construct two wavy waves on a central line of length 16 cm.
Solution:
Step I: Draw a central line of 16 cm and mark the endpoints as A and B.
![]()
Step II: Divide the central line into 4 equal parts saying the points C, D, and E.
i.e. AC = CD = DE = EB = 4 cm.
![]()
Step III: Draw a semi-circle on AD and DB each in opposite directions taking C and E as the centers, respectively.

Constructing Eyes
(i) Lightly draw two horizontal lines on your paper as guides for the upper and lower curves of the eyes.
(ii) Mark two points, A and B, along the upper guideline, ensuring the distance between them is equal for symmetry.

(iii) Set the compass to a width slightly less than the distance between the guidelines to define the height of the eye curves.
(iv) Place the compass point on A and draw an arc that touches the upper guideline, extending towards the middle.
(v) Repeat the process with point B on the other side to complete the upper curve of the eye.

(vi) Without changing the compass width, place the compass on point A again and draw an arc below the upper curve, touching the lower guideline.
(vii) Repeat the process with point B to complete the lower curve.
(viii) Ensure the upper and lower curves form a symmetrical eye shape.
(ix) Lightly adjust any parts of the curves if needed to maintain symmetry.
(x) Add the iris, pupil and other details to complete the eye drawing.

Squares and Rectangles
Rectangle
A rectangle is a four-sided polygon with the following properties.

- Vertices: The corners of a rectangle are labeled as A, B, C, and D.
- Sides: The sides of the rectangle are AB, BC, CD, and DA.
- Angles: Each angle in a rectangle is a right angle (90 degrees).
- Opposite Sides: The sides AB and CD are opposite sides and are equal in length. The sides AD and BC are the other pair of opposite sides and are also equal in length.
![]()
Square
A square is a special type of rectangle with additional properties:

- All four sides are of equal length.
- All the angles are 90°.
Naming Rectangles
A rectangle can be named using the labels of its vertices. For example, a rectangle with vertices as A, B, C, D can be named in various ways.
- Valid Names: ABCD, BCDA, CDAB, DABC, DCBA, CBAD, BADC.
- Invalid Names: ABDC, ACBD. These do not follow the sequential order around the rectangle.
Naming Squares
Similarly, a square can be named using the labels of its vertices, ensuring that the order follows the path around the square.
Example 1.
Which of the following is not a valid name for a square?
(i) PQRS
(ii) SPQR
(iii) RSPQ
(iv) QRSP

Solution:
All the given names (PQRS, SPQR, RSPQ, QRSP) are valid names for the square as they list the vertices in a sequence around the shape.
A square remains a square even when rotated, as it continues to satisfy all its defining properties.
Constructing Squares and Rectangles
Follow these steps to draw a square whose sides measure 5 cm.
1. Using a ruler, draw a line segment AB corresponding to the length of one side of the square (5 cm).
![]()
2. Place the set square at the end point A of the line segment AB and draw a perpendicular line that exceeds 5 cm.

3. Using the ruler, mark a point D on this line that corresponds to 5 cm.

4. Place the set square at the endpoint B of the line segment AB and draw a perpendicular line longer than 5 cm.

5. With the ruler, mark a point C on this line segment that corresponds to 5 cm.

6. Next, use the ruler to connect the two points C and D made in steps 3 and 5.

Rectangle
Use the following steps to draw a rectangle with a length of 7 cm and a width of 4 cm.
1. With a ruler, draw a line segment AB corresponding to the same measurement as the longest side of the rectangle (7 cm).
![]()
2. Place the set square at the end point A of the line segment AB and draw a perpendicular line that exceeds 4 cm.

3. Using the ruler, mark a point D on the perpendicular line that corresponds to the width of 4 cm.

4. Place the set square at the end point B of the line segment AB and draw a perpendicular line that exceeds 4 cm.
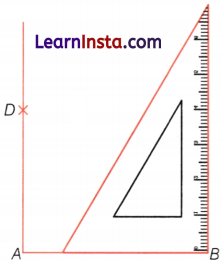
5. Using the ruler, mark a point C on the perpendicular line that corresponds to the width of 4 cm.

6. Using the ruler, connect the two points on the perpendicular lines made in steps 3 and 5.

Exploring Diagonals of Rectangles and Squares
Let us consider a rectangle ABCD. Join AC and BD. These two lines AC and BD are called the diagonals of the rectangle. In a rectangle, the diagonals are equal in length and intersect at the center.

Diagonal divides each pair of opposite angles into two smaller angles.
In the figure, the diagonal AC divides angle A into two smaller angles p and q, and angle C into two smaller angles u and t.
Similarly, diagonal BD divides the angle B into two smaller angles r and s, and D into two smaller angles v and w.
Here, ∠p + ∠q = ∠r + ∠s = ∠u + ∠t = ∠v + ∠w = 90°
Also, ∠q = ∠u and ∠p = ∠t, the same for others.
![]()
Example 2.
Construct a rectangle in which one of the diagonals divides the opposite angles into 60° and 30°.
Solution:
Let us draw a rough diagram.

Steps:
(i) Draw a horizontal line segment AB. This will be one side of the rectangle.
![]()
(ii) At point A, use a protractor to measure and draw a ray AX at a 60° angle with the live segment AB.

(iii) At point B, measure and draw a 90° angle. Draw a line segment BC extending from B meeting AX at C.

(iv) At Point A and C, draw a 90° angle which meets at the point D.

ABCD is the required rectangle. Here, diagonal AC divides the opposite angles A and C into 60° and 30°.
Example 3.
Construct a rectangle where one of its sides is 3 cm and the length of a diagonal is 6 cm.
Solution:
Steps:
(i) Draw a line segment AB = 3 cm.
![]()
(ii) At B, draw a perpendicular line BY.

(iii) Take an arc of length 6 cm on a compass from A and draw an arc to cut the perpendicular at point C.

(iv) At points C and A draw two perpendiculars that will intersect at point D.
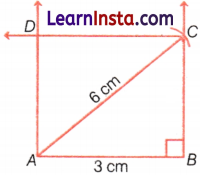
Here, ABCD is the required rectangle.
![]()
Example 4.
Construct a rectangle that can be divided into 3 identical squares of side 4 cm.
Solution:
Step I: Draw a horizontal line segment AB of 4 cm.
![]()
Step II: From points A and B, construct perpendicular lines upwards.
Mark points C and D such that AC = BD = AB forming square ABCD.

Step III: Extend line AB to the right by two more segments of equal length (same as AB), marking points E and F.

Step IV: Construct perpendiculars from points E and F upwards, marking points G and H such that EG = FH = EF = AB.

Step V: Connect points C, D, G, and H to form the complete rectangle ACHF.

This rectangle can now be divided into three identical squares ABDC, BEGD, and EFHG.
Points Equidistant from Two Given Points
Consider two points B and C separated at a distance of 4 cm.
![]()
Suppose we have to draw AB and AC such that AB – AC = 6 cm.
Then, the point A will be called equidistant from the points B and C.
To draw take an arc of length 6cm on the compass and draw two circles taking the centres B and C.
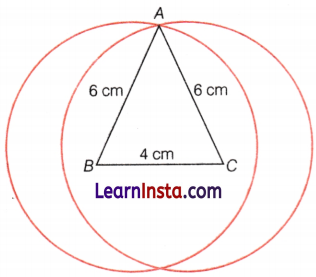
The point of intersection of two circles is at 6 cm from the points B and C because AB = AC = 6 cm.
![]()
Example 5.
Complete the construction to construct a 4-sided figure ABDC such that all the sides are equal.

Solution:
We have to find a point D such that BD and CD are equal to 5 cm.
To do so follow the steps.
Take an arc of length 5 cm and draw two circles taking B and C as the centers.

Both the circles intersect at point D and point D is at a distance of 5 cm from points B and C. Join BD and CD.

The 4-sided figure formed is the required figure. This type of 4-sided figure where all the sides are equal is called a Rhombus.
→ The process of precisely drawing lines, angles, and other figures in geometry with a ruler, compass, or protractor is known as construction.
→ We use the following mathematical instruments to construct geometrical figures or any general shapes:
- A ruler
- A divider
- A protractor
- A pair of compasses
- Set-squares
→ Uses of instruments in geometry box:
1. A Ruler

Use: To draw line segments and to measure their lengths.
![]()
2. A Divider

Use: To compare lengths
3. A Protractor

4. A Pair of Compasses

Use: To mark off equal lengths but not to measure them. To draw arcs and circles.
5. Set-Squares

Use: To draw perpendicular and parallel lines.
![]()
→ Using the ruler and compasses, the following basic constructions can be made:
- An angle of given measures
- A circle, when the length of its radius is known.
- A line segment, if its length is given.
- A copy of a line segment.
- A perpendicular to a line through a point on and outside the line.
→ We can also construct composite geometric shapes using these basic figures. However, we should be careful while doing these constructions. Here are some tips to help you.
- Draw thin lines and mark points lightly.
- Maintain instruments with sharp tips and fine edges.
- Have two pencils in the box, one for insertion into the compass and the other to draw lines or curves and mark points.
- A rough diagram can be useful in planning how to construct a given figure.
→ All the points of a circle are at the same distance from its center. This distance is called the radius of the circle.
→ A compass can be used to construct circles and their parts.
→ To make an arc, keep the compass point fixed and move only the pencil arm.
→ Rotating a square or a rectangle does not change its lengths and angles.
→ A square can be constructed with the given lengths of its sides or that of one of its sides and a diagonal.
→ A rectangle can be constructed with the given lengths of its sides or that of one of its sides and a diagonal.