Students often refer to Class 7 Ganita Prakash Solutions and NCERT Class 7 Maths Part 2 Chapter 6 Constructions and Tilings Question Answer Solutions to verify their answers.
Class 7 Maths Ganita Prakash Part 2 Chapter 6 Solutions
Ganita Prakash Class 7 Chapter 6 Solutions Constructions and Tilings
Class 7 Maths Ganita Prakash Part 2 Chapter 6 Constructions and Tilings Solutions Question Answer
6.1 Geometric Constructions (Page 139)
Question.
Justify the following statement using the facts that we have established.
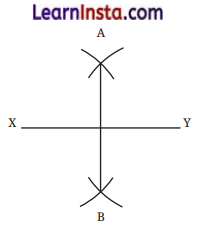
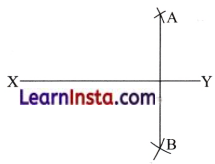
Any point that has the same distance from X and Y lies on the perpendicular bisector of XY.
Solution:
Let P be any point with PX = PY and O is the midpoint of XY, so XO = YO.

Consider triangles, ΔXPO and ΔYPO. They have
- PX = PY (given),
- XO = YO (since O is the midpoint),
- PO = PO (common).
![]()
Hence, ΔXPO ≅ ΔYPO by SSS congruence condition.
From the congruency, we get corresponding angles at O are equal, so ∠XOP = ∠POY.
Butthese two angles are adjacent angles that form a straight line along XY; equal adjacent angles on a straight line must each be 90°. Therefore, OP ⊥ XY.
Since O is the midpoint of XY and OP is perpendicular to XY, the line OP is the perpendicular bisector of XY. As P lies on OP, it lies on the perpendicular bisector of XY.
Thus, any point equidistant from X and Y lies on the perpendicular bisector of XY.
Figure it Out (Page 140)
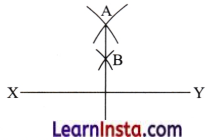
Question 1.
When constructing the perpendicular bisector, is it necessary to have the same radius for the arcs above and below XY? Explore this through construction, and then justify your answer.
[Hint 1: Any point that is of the same distance from X and Y lies on the perpendicular bisector.
Hint 2: We can draw the whole line if any two of its points are known.]
Solution:
It is not necessary to have the same radius for the arcs above and below XY while constructing the 5 perpendicular bisector. Any point that is at the same distance from X and Y lies on the perpendicular bisector. When arcs are drawn from X and Y with the same radius (greater than half of XY), the intersection points of these arcs are equidistant from X and Y.
Hence, even if the arcs above and below XY have different radii, as long as both pairs of arcs intersect and the intersection points are equidistant from X and Y, the line joining these intersection points will still be the perpendicular bisector.
Since a line can be drawn if any two of its points are known, the radii for the arcs above and below XY need not be the same; they only need to be the same from X and Y respectively, to ensure the intersections are correctly placed.
![]()
Question 2.
Is it necessary to construct the pairs of arcs above and below XY? Instead, can we construct both the pairs of arcs on the same side of XY? Explore this through construction, and then justify your answer.
Solution:
It is not necessary to construct the pairs of arcs above and below XY. The perpendicular bisector can also be x – constructed by drawing both pairs of arcs on the same side of XY. When arcs are drawn from X and Y with the same radius (greater than half of XY), the intersection point of these arcs lies at an equal distance from X and Y.
Since any point that is equidistant from X and Y lies on the perpendicular bisector, we can find two such intersection points on the same side of XY.
As a line can be uniquely determined by any two points, joining these intersection points and extending the line will make it pass through the midpoint of XY and meet XY at a right angle. Hence, constructing arcs on one side of XY is sufficient to draw the perpendicular bisector accurately.
Question 3.
While constructing one pair of intersecting arcs, is it necessary that we use the same radii for both of them? Explore this through construction, and then justify your answer.
Solution:
Yes, it is necessary to use the same radius for both arcs while constructing one pair of intersecting arcs.
When the arcs are drawn from X and Y with equal radii, their intersection points are at equal distances from both X and Y. This ensures that the points of intersection lie exactly on the perpendicular bisector, as every point on it is equidistant from X and Y.
If different radii are used, the arcs will not intersect at points equidistant from X x and Y, and the line joining those points will not pass through midpoint of XY.
Hence, using the same radius for both arcs is essential to obtain a correct perpendicular bisector.
Question 4.
Recreate this design using only a ruler and compass—

Solution:
Step 1: Draw a circle with centre O and any convenient radius.
Step 2: Draw a straight line through O to cut the circle at points A and B. This line is the diameter AB.
Step 3: With centres A and B and radius more than half of AB, draw arcs above and below AB. Join the points where these arcs intersect. This line is the perpendicular bisector of AB, and it meets the circle at C and D. Now, A, B, C, and D divide the circle into four equal parts.
Step 4: Without changing the compass width (still radius OA), draw circles with centres at A, B, C, and D. Each of these circles passes through O.
Step 5: The overlapping arcs between each pair of neighbouring circles form four identical petal shapes around O.
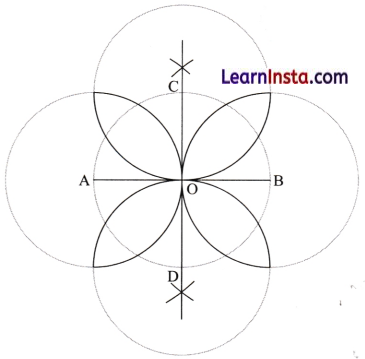
Trace only these curved overlapping parts to get the required figure.
![]()
Figure it out (Page 142)
Question 1.
Justify why AB in Fig. 6.4 is the perpendicular bisector.
Solution:
When the rope’s ends are fixed at X and Y and its midpoint is pulled to form point A above the line XY , both parts of the rope are stretched equally, making AX =AY.
Similarly, when the midpoint is pulled below the line XY to form point B, we get BX=BY. Since A and B are each equidistant from X and Y, they both lie on the perpendicular bisector of XY. The line joining A and B therefore passes through all such points that are equidistant from X and Y, which makes AB the perpendicular bisector of XY.
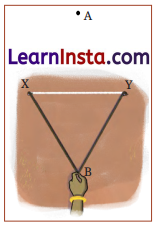
Question 2.
Can you think of different methods to construct a 90° angle at a given point on a line using a rope?
Solution:
Do it yourself.
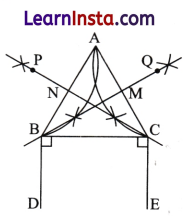
Figure it out (Pages 144-145)
Question 1.
Construct at least 4 different angles. Draw their bisectors.
Solution:
Do it yourself.
Question 2.
Construct the 8-petalled figure shown in Fig. 6.5.

Solution:
Do it yourself.
Question 3.
In Step 2 of angle bisection, if arcs of equal radius are drawn on the other side, as shown in the figure, will the line OC still be an angle bisector? Explore this through construction, and then justify your.

Solution:
We have OA = OB. Draw equal radius arcs from A and
B to meet at C, then CA CB.
So, OC is the perpendicular bisector of AB, and it meets AB at M, with AM = BM.
Now compare AOAM and AOBM
- OA = OB (construction),
- AM = BM (OM is the perpendicular bisector of AB)
- OM = OM (common)
By SSS, ΔOAM ≅ ΔOBM, so ∠AOM = ∠BOM. Hence, the line OM, which is the same as OC, bisects ∠AOB.
![]()
Question 4.
What are the other angles that can be constructed using angle bisection? Can you construct a 65.5° angle?
Solution:
By repeated bisection, we can make halves, quarters, eighths,… of any angle we already have. From standard constructible angles (90° from a perpendicular and 60° from an equilateral triangle), we can get 45°, 30°, 22.5°,15°, 11.25°, 7.5°, 75° (45° + 30°), 37.5° (\(\frac{1}{2}\) of 75°),
67.5° (45°+ 22.5°), etc.
A 65.5° angle cannot be obtained using only angle bisection from these basics, unless we first have 131° available to bisect. We cannot reach exactly 65.5° with bisection alone.
Question 5.
Come up with a method to construct the angle bisector using a rope.
Solution:
Do it yourself.
Question 6.
Construct the following figure.

How do we construct the petals so that they are of the maximum possible size within a given square?
Solution:
- Draw the square ABCD
- Draw both diagonals AC and BD
- At the point of intersection of diagonals, bisect the right angles formed. These bisectors intersect the sides of the squares at M, N, O, and P.
- With centres M, N, O, P and radii equal to MB, BN, CO, DP, respectively, draw semicircles inside the square along AB, BC, CD, and DA. The four arcs meet at O, forming the four maximum-size petals.
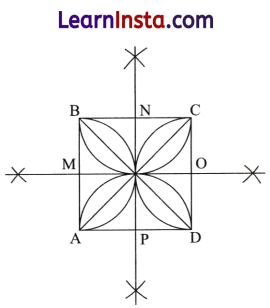
Each arc (semicircle) has side of the square as a diameter, so any larger arc would leave the square.
![]()
Figure it out (Page 147)
Question 1.
Construct at least 4 different angles in different orientations without taking any measurement. Make a copy of all these angles.
Solution:
Do it yourself
Question 2.
Construct the Fig. 6.6.
Solution:
Do it yourself
Figure it out (Page 148)
Question 1.
Construct 4 pairs of parallel lines in different orientations.
Solution:
Do it yourself
Question 2.
Construct the following figure.
Solution:

- To draw the given design, first draw a circle with centre O.
- Through O, draw two perpendicular diameters.
- Next, draw the bisectors of the four right angles formed at O.
- Mark the points where these lines meet the circle as S, T, U, V, W, X, Y, and Z.
- Now, with the same centre O, draw a smaller circle inside the first one.
- Again, draw angle bisectors through O to mark the points where these lines cut the smaller circle as A, B, C, D, E, F, G, and H.
![]()
Join the points using straight lines in order as follows:
S-A-T-B-U-C-V-D-W-E-X-F-Y-G-Z-H-S.
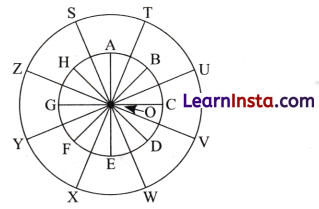
After joining, erase the arcs of both circles, keeping only the straight lines, and shade half of the side of each arm of the design.
Arch Designs
Trefoil Arch (Page 149)
Use these support lines to construct an arch. If required, adjust the radii of the arcs to make the arch look more aesthetically pleasing.
Solution:
Do it yourself.
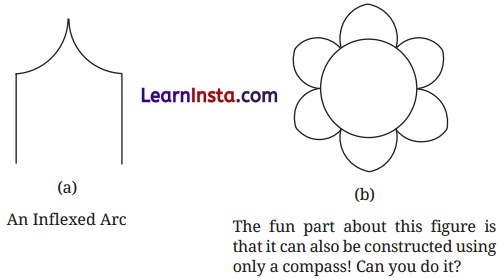
A Pointed Arch (Page 150)
Use these support lines to construct an arch. If required, adjust the radii of the arcs to make the arch look more aesthetically pleasing.
Solution:
Do it yourself.
A Pointed Arch (Page 150)
Question.
If their midpoints are marked, will you be able to construct a pointed arch?
Solution:
Yes, if the midpoints of the two supporting lines are marked, we can construct a pointed arch.

Figure it out
Question 1.
Use support lines in Fig. 6.11 to construct a pointed arch. Make different arches, by changing the radius of the arcs.
Solution:
Do it yourself
![]()
Question 2.
Make your own arch designs.
Solution:
Do it yourself
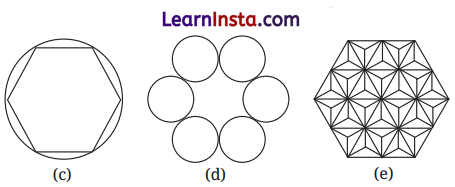
Regular Hexagons
Regular Hexagon and Equilateral Triangles (Page 152)
In Fig. 6.12 can you explain why AOD, BOE and COF are straight lines?
Solution:
Since ΔAOB, ΔBOC, ΔCOD are equilateral, we have
∠AOB + ∠BOC + ∠COD = 60° + 60° + 60°= 180°
So, ∠AOD = 180° and hence AOD is a straight line.
Similarly, BOE and COF are also straight line
Construction of a 60° (Page 153)
Question.
Why is ∠CAX=60° ? Is there an equilateral triangle here?
Solution:
When we draw arcs with the same radius from points A and B, the two arcs intersect at C such that AB=AC= BC
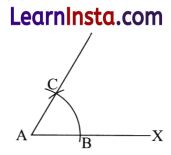
Thus, ΔABC is an equilateral triangle and in an equilateral triangle, each angle is 60°
Hence, ∠CAX=60°, as ΔABC is equilateral.
Question.
Construct a regular hexagon of sidelength 5 cm.
Solution:
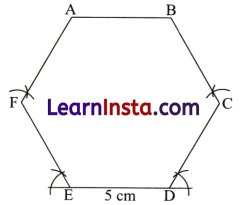
Thus, ABCDEF is the required regular hexagon of sidelength 5 cm.
![]()
(Page 154)
How will you construct 30° and 15° angles?
Solution:
We can construct a 30° angle by constructing the angle bisector of a 60° angle. Also, we can construct a 15° angle by constructing the angle bisector of 30° angle.
6-Pointed Star (Page 154)
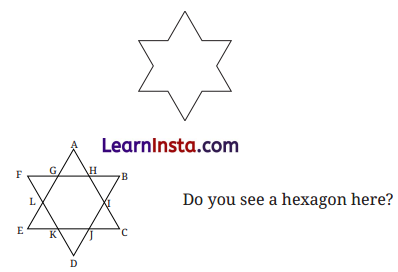
Construct the following 6-pointed star. Note that it has a rotational symmetry.
Hint:
Solution:
- To make a six-pointed star, construct a regular hexagon ABCDEF.
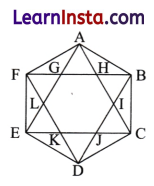
- Join alternate vertices: A to C, C to E, E to A, B to D, D to F, and F to B.
This will form two overlapping equilateral triangles, creating a six-pointed star. - Finally, erase the sides of both the hexagons, ABCDEF and GHIJKL to make the shape stand out clearly.
![]()
Question.
Are the six triangles forming the 6 points of the star —
ΔAGH, ΔBHI, ΔCIJ, ΔDJK, ΔELK, ΔFLG — equilateral? Why?
[Hint: Find the angles]
Solution:
Yes, all six tip triangles are equilateral.
Constructing the star from a regular hexagon gives two equilateral triangles,
ΔACE and ΔBDF
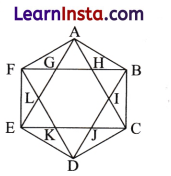
At each vertex (say A), the sides AC and AE meet at 60°.
Because corresponding sides of equilateral triangles are parallel, the segments forming the base of the tip triangle (points G and H on the other large triangle) meet those sides at 60° as well.
So ∠GAH = ∠AGH = ∠AHG = 60°
Hence, AAGH is equilateral, and by symmetry the same holds for ΔBHI, ΔCIJ, ΔDJK, ΔELK and ΔFLG.
Figure it Out (Pages 154 – 155)
Question 1.
Construct the following figures:
(a)
- Draw an equilateral triangle ABC.
- Draw the perpendicular bisectors of AB and AC.
- Locate points P and Q on these bisectors at the same distance from A.
- With centre P and radius PA, draw the arc from B up to A.
- With centre Q and the same radius, draw the arc from C up to A.
- Draw two perpendicular lines DB and CE of same length from B and C respectively.
- Keep the two arcs and the vertical posts. Rub out the other side of the triangle, labelling and the construction marks
(b)
- Start by drawing a large circle with any radius.
This will be the central circle of your flower. - Pick any point on the circumference of the central circle. Using the same radius as the central circle, place the compass at the point and draw a second circle. This new circle will intersect the central circle at two points.
- Next, place the compass at the points of intersection of the central circle and draw the other two circles with the same radius.
- Continue this process by placing the compass at each new intersection point and drawing another circle with the same radius.
- We will do this a total of 6 times, so we will add 6 additional circles (each one overlapping the others symmetrically), creating 6 petal-like arcs.
- Erase any extra construction lines that are not part of the petal shapes, leaving only the 6 petals and the central circle.
![]()
(c)
- Start by drawing a circle with any radius.
- Place the compass at any point on the circle’s circumference and draw an arc that intersects the circle.
- Keep the compass at the same radius. Take the compass point to the intersection point and draw another arc on the circumference.

- Repeat this for the next intersection point, ensuring you create arcs that mark 6 intersection points in total around the circle.
- Use a straight edge to join the 6 intersection points in order. This will form a regular hexagon inscribed inside the circle.
(d)
- Start by drawing a regular hexagon.
- Next, draw the diagonals of the hexagon that connect opposite vertices. The point where all the diagonals meet is the centre of the hexagon.
- Each set of two adjacent vertices of the hexagon, along with the centre of the hexagon, forms an equilateral triangle.

- Draw the perpendicular bisectors of any two sides of the triangle. The point where these bisectors meet is the incentre of the equilateral triangle. Since all the sides are equal, the incentre is equidistant from all three vertices of the triangle.
- Set your compass to the distance from the incentre to the middle of any side of the triangle. This will be the radius. Place the compass at the incentre and draw the circle inside the triangle. This circle will touch all three sides of the triangle, perfectly inscribed in the triangle.
- Repeat the above steps for all six equilateral triangles formed by the hexagon.
- Erase other lines and curves except these triangles.

(e)
- Start by drawing a regular hexagon.
- Draw the diagonals connecting opposite vertices of the hexagon. This will divide the hexagon into 6 equilateral triangles.
- For each equilateral triangle, we need to draw an upside-down equilateral triangle inside it by joining the midpoints of the equilateral triangle. This process will divide each of the 6 equilateral triangles into 4 smaller equilateral triangles.
- Now, further divide each of the smaller equilateral triangles into 3 isosceles triangles by drawing the angle bisectors of the three interior angles.

- Repeat this process for each of the 24 smaller triangles (4 per original triangle).
![]()
Question 2.
Optical Illusion: Do you notice anything interesting about the following figure? Flow does this happen? Recreate this in your notebook.
Solution
It seems that a white, equilateral triangle is in the centre, even though its sides are not explicitly drawn.

This perceived, non-existent shape is because:
- The three black shapes all have a 60° wedge removed, and these wedges are oriented to point inward, aligning with the vertices of the illusory triangle.
- The three black ‘V’ shapes also point towards the vertices of the illusory triangle.
Question 3.
Construct this figure.

[Hint: Find the angles in this figure.]
Solution:
Do it yourself.
Question 4.
Draw a line / and mark a point P anywhere outside the line. Construct a perpendicular to the given line l through P. [Hint: Find a line segment on / whose perpendicular bisector passes through P]
Solution:
- Draw a line / and mark the point P outside the line.
- Place the compass pointer on point P.
- Adjust the compass opening so that when you draw an arc, it intersects the line l at two distinct points. The radius must be greater than the shortest distance from P to l
- Label the two intersection points on line l as A and B.
- Construct the perpendicular bisector of the line segment AB (the line m).
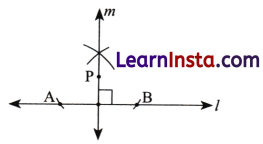
This is the required perpendicular line through P.
6.2 Tiling
Figure it Out (Page 156)
Question.
How can the tangram pieces be rearranged to form each of the following figures?
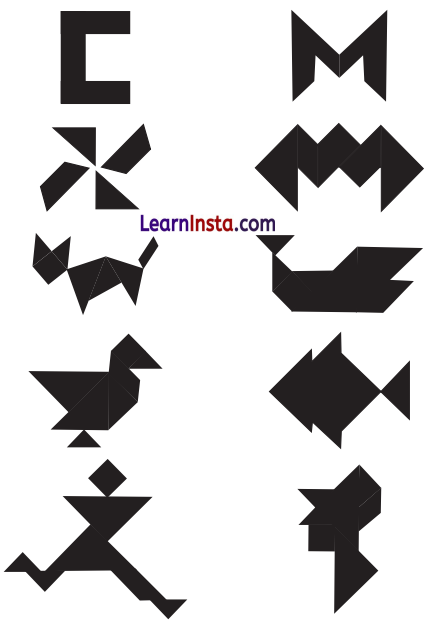
Solution:


(Pages 157-158)
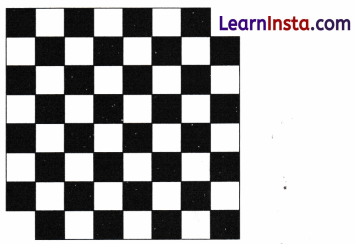
Question.
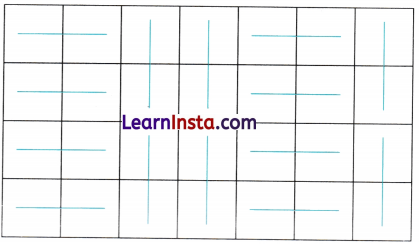
Can a 4 × 7 grid be tiled using 2 x 1 tiles?
Solution:
Yes, the following is the one possible way.
Question.
Complete the justification.
Solution:
The total number of unit squares in the 5×7 grid:
5 x 7=35 unit squares.
Each 2 x1 tile covers exactly 2 unit squares.
Since each tile covers 2 unit squares, the number of tiles required to cover the entire grid would be:
\(\frac{35}{2}\)=17.5 tiles
However, we cannot have a fraction of a tile.
Thus, it is impossible to cover the entire grid with 2×1 tiles.
![]()
Question.
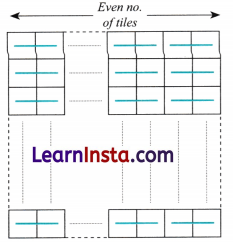
Is an m x n grid tileable with 2 x 1 tiles, if one of m and n is even and the other is odd? If yes, come up with a general strategy to tile it.
Solution:
Yes. Case I: If m is even and n is odd, then one general strategy for this case is to cover each column with vertical tiles. This is possible because the number of rows is even.

Case II: If m is odd and n is even, then one general strategy for this case is to cover each row with horizontal tiles. This is possible because the number of columns is even.
Question.
Is an m × n grid tile able with 2×1 tiles, if both m and n are odd? Give reasons.
Solution:
It is not possible to tile an m x n grid with 2 x 1 tiles if both m and n are odd. This is because the total number of unit squares in the grid is m × 77, and since each 2 × 1 tile covers exactly 2 unit squares, the total number of squares must be even to be fully tiled. However, if both 773 and 73 are odd, the product m × 77 is odd, which means the total number of squares is odd. Since each tile covers an even number of squares, so it is impossible to cover an odd number of squares, and thus tiling the grid with 2×1 tiles is not possible.
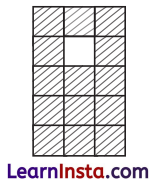
Question.
Here is a 5 ×3 grid, with a unit square removed. Now, it has an even number of unit squares. Is it tileable with 2 × 1 tiles?
Solution:
Yes, the following is the one possible way.
Question.
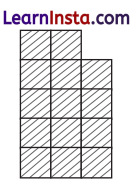
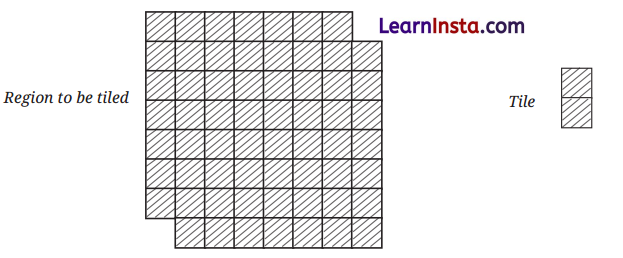
Is the following region tileable with 2 x 1 tiles?
Solution:
Yes, the following is the one possible way.

Figure it Out (Page 160)
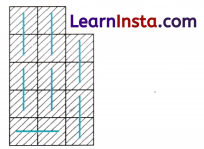
Are the following tilings possible?
Question 1.
Solution:
Yes, the following is the one possible way.
![]()
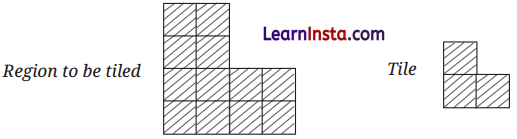
Question 2.
Solution:
Not possible
Converting it in a black and white region, we can see that the number of white squares and black squares is not equal, hence it is not tileable.